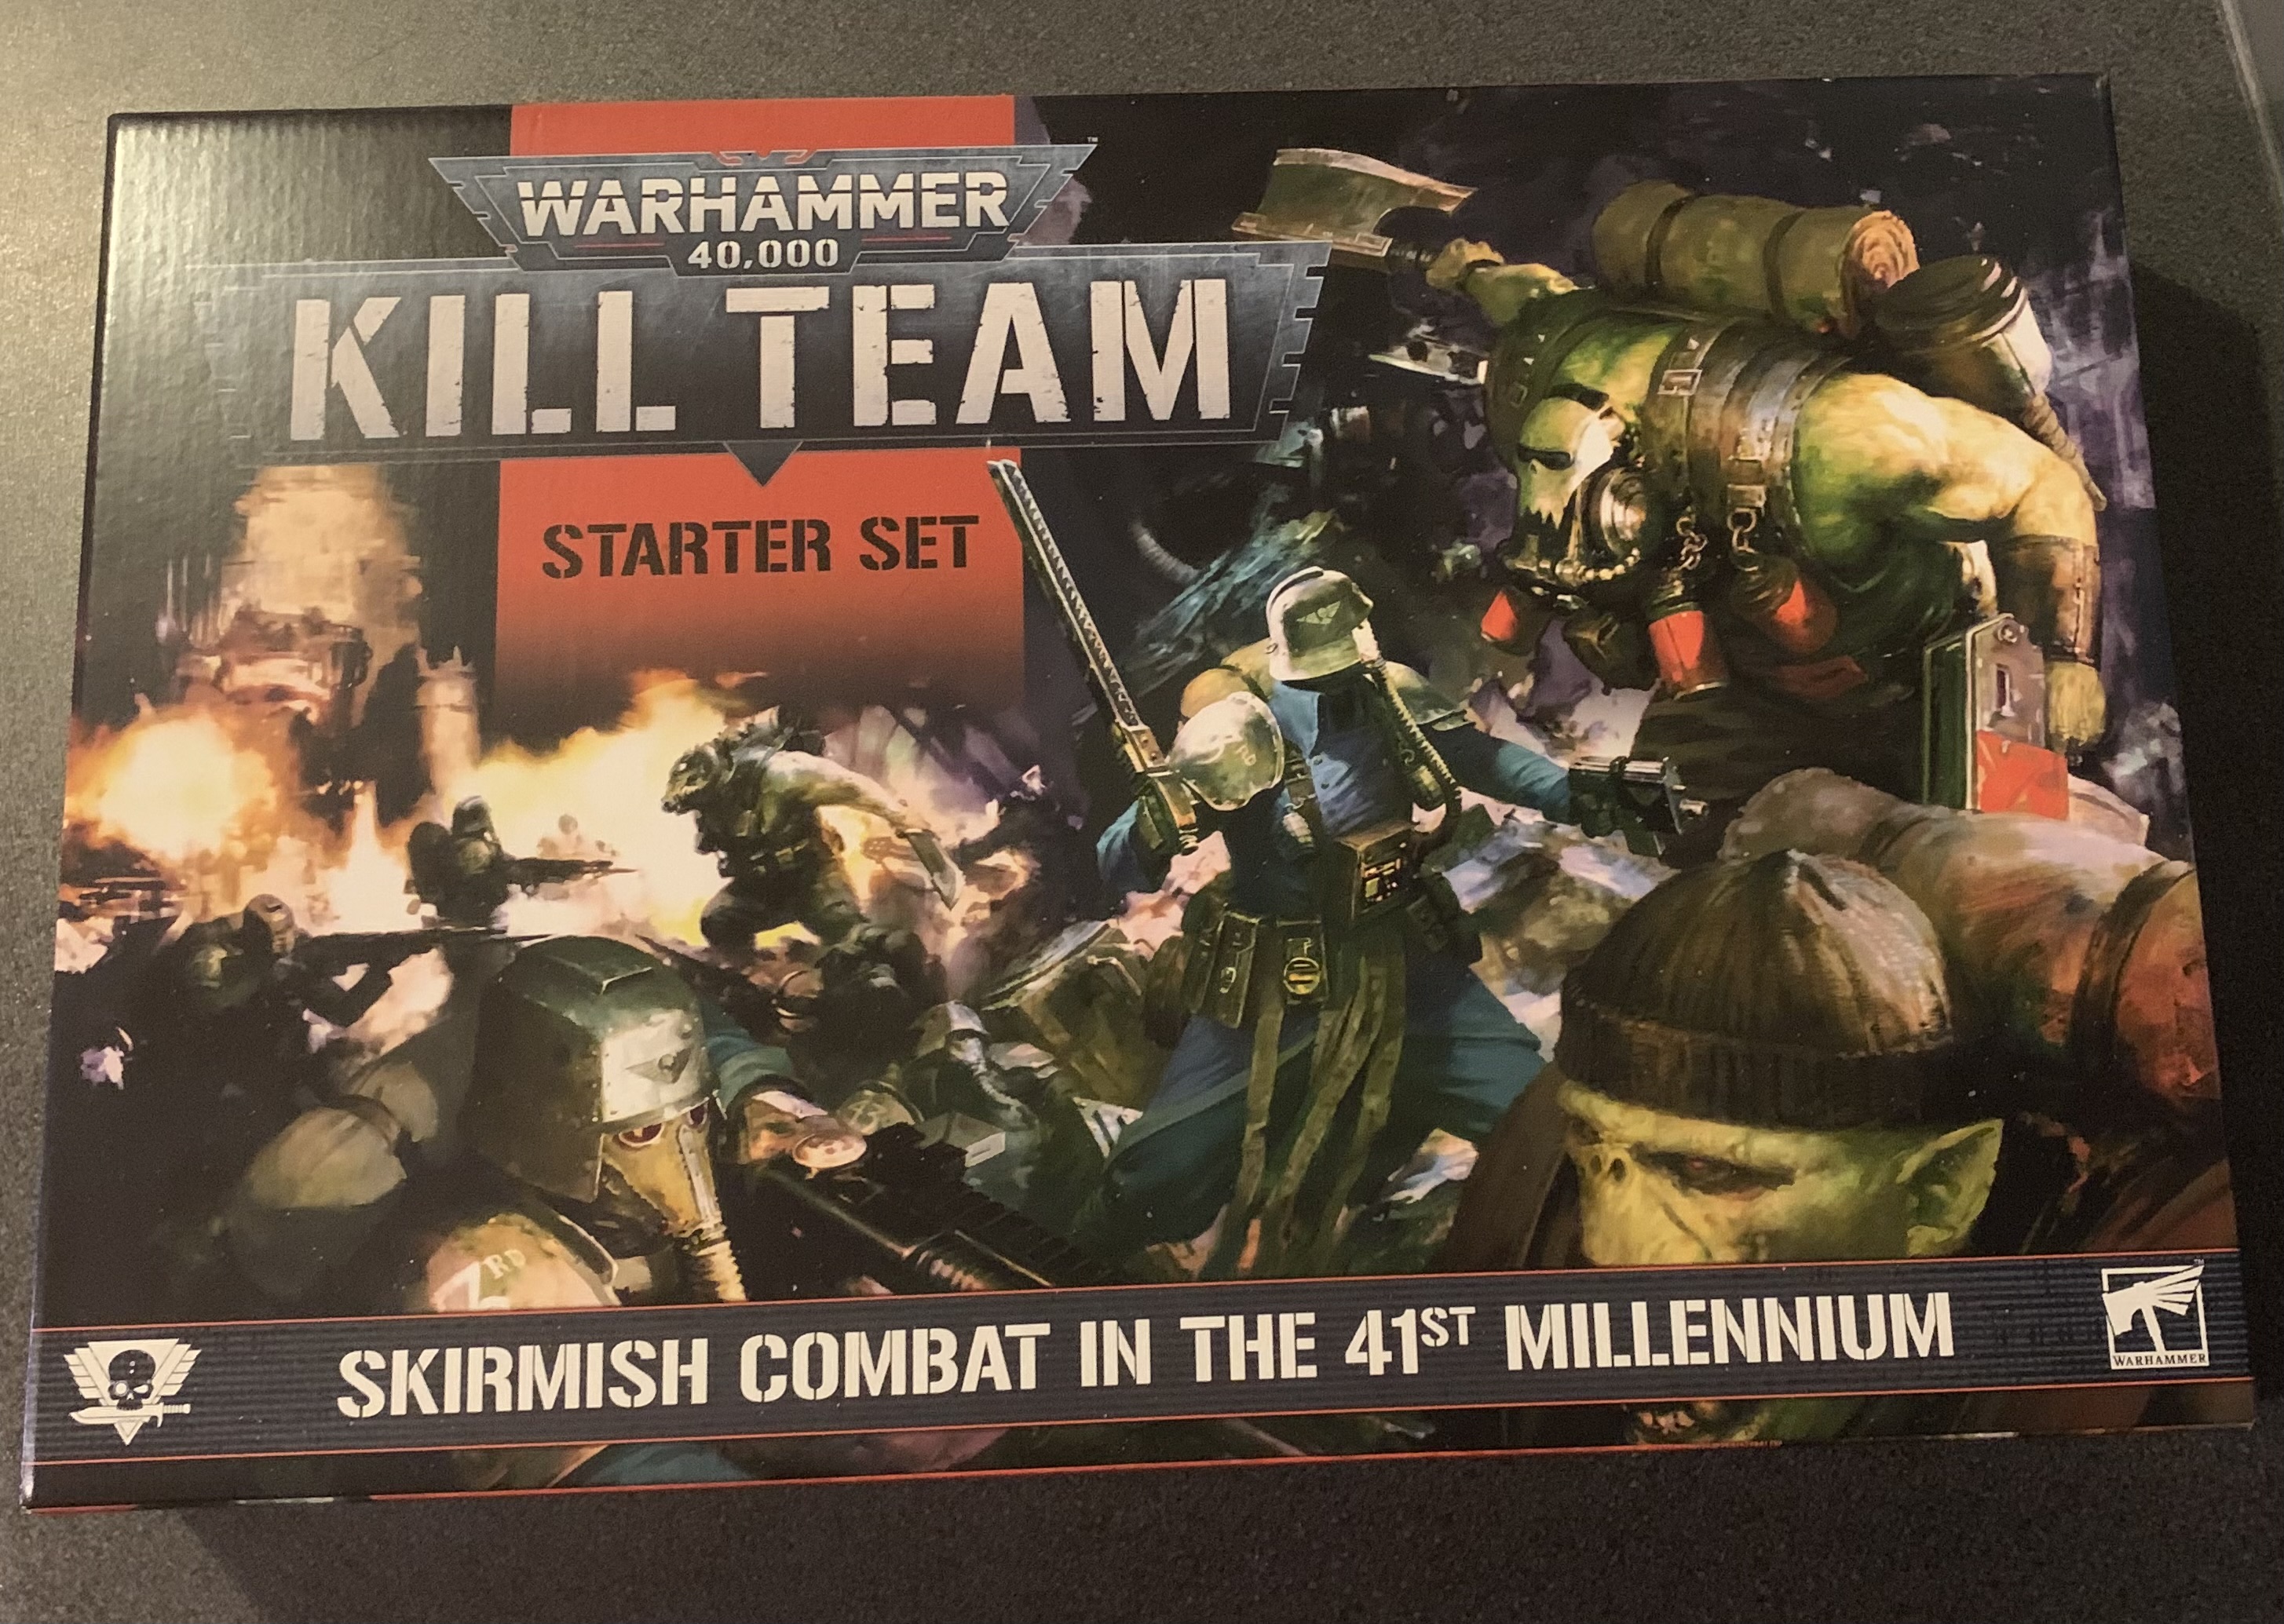
In today’s article, we’re going to be looking at the brand new Kill Team Starter Set box – the slimmed down version of Kill Team: Octarius – that Games Workshop were kind enough to send over to me for review, and it reminded me of something rather special. And if I’m right, it could be the best advert for the hobby since the 1990s. Let’s discuss.
Now, that might be a bit of a bold call, but I genuinely think there’s something about this box that could encourage a lot of people to join the hobby. For a start, just look at that box art. That is human soldiers fighting monsters in a very cinematic way. The font is all militaristic, the colours are bright and bold, and it has that ever wonderful name “Warhammer” in the title there. Were I a 9 year old boy again, I’d see that and just think “Wow. I want that” and a lot of credit has to go to the people who laid out that box cover.
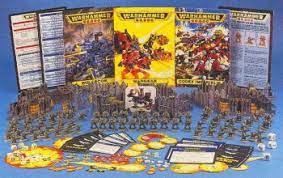
Back when I was a 9 year old boy (and this is going to show my age a bit), Christmas wish-listing involved looking through big catalogues that were delivered to our house. I’d flick through the back section where all the kids toys were, and between the Sega Game Gears, Thundercat Playsets, and Lego Pirate stuff, I would see this:
Now, you might be about to criticise me for the resolution of image I’ve used there, but I’ve done that for a very good reason – that was often what you saw in the catalogue. I didn’t know what it was, but it had loads of toy soldiers, terrain, amazing pictures and bright colours – and loads of cardboard explosions too! For me, it would be a boxed set that would kick off a lifetime obsession, but that was back in the very early 1990s. I genuinely think that this Kill Team box could well perform a similar function in the early 2020s. And boy am I feeling old right now.
The Octarius box that came out recently is big and overwhelming – it’s a hefty hit of the hobby drug that we who are already all in on the plastic crack wagon, love to devour. But it’s hefty and pricy and it requires a fair bit of pre-existing knowledge to be truly exciting. This box is slimmer, and lighter. You don’t feel too precious about the cover of the box because it’s not quite as shiny. This isn’t something to be savoured by well-worn hobbyists, but instead it’s a shiny lure to fresher eyes. This is the box you should put into catalogues today, not that those are really a thing anymore (thanks, internet).
I spoke about this recently too – have the plastic as the first thing people see when they open the box. It’s the most exciting bit of the product, and I’m glad GW are continuing to do this after those years of extra boxes and cardboard inserts. Get to the good stuff early.
You get a little less terrain in this box, but in terms of actual minis, you still have the Orks and the Guardsmen and they continue to look amazing. These miniatures are some of the best examples of the sculpting craft and they’ll appeal to those new hobbyists who like to play as humans (because they can imagine themselves fighting monsters in the future) and those who like to be aliens (because they like new and interesting things). And the humour of the Orks in particular is a real win in this box – definitely better than 40 monopose boys and gretchin and a cardboard dreadnought for sure! Furthermore, the small numbers of miniatures involved in Kill Team are a lot less intimidating than the vast armies needed to play big 40k.
This makes me very happy too. Once you get past the sprues and a single cardboard insert, this is all that’s left, and while we seasoned gamers demand vast quantities of bits, bells and whistles, if you’re coming into this as a newbie, it’s nicer to have a small set of rules and the basics to get you going. This looks genuinely friendly and hopefully the rules are easy enough for new players to digest. I remain unconvinced about the whole “move two triangles and a hexagon” when you could just say however many inches it is, but that’s a minor gripe really.
But I’m serious about how appealing I think this box will be to new players. It’s a great gateway option, and while of course there are starter sets available for 40k and AoS, I think this Kill Team box presents a better option. The rules are simpler, the models represent complete units, and those colours and that artwork – I really think GW are onto a winner here. Especially if they can get into toy stores and, well, whatever pass for catalogues now in the 2020s. This box gets two thumbs up from me, and I hope it brings lots of new blood into the hobby. Onwards!
Hello again friends and happy new year to you all. Today I bring you a brand new lazy painters army list after Games Workshop were kind enough to send me the brand new Genestealer Cults codex.
And what a codex it is. Let’s start with the cover – that might just be the best looking Codex cover art I’ve seen in years. It has such a striking look to it that really captures the grimdarkness of the game, and the strange cultish behaviour of the faction. I love it – great work by the artist for bringing this faction to life even before opening the book.
What’s more, I’m reminded that, by and large, the Genestealer Cults range is the finest range of miniatures in any system over all, in my opinion. So many characterful pieces and when the old genestealer models are perhaps bottom of that tree in terms of looks, almost entirely due to their age, and they still look pretty decent, that’s a pretty fine range. From the sneaky Sanctus to the Jackal Alphus, there are a lot of wins here.
I have to remind myself of all of this because, well, this list threw up a couple of issues, chief amongst them being, that I have failed in my usual quest. Every time I put together one of these lists, the objective is to take the codex, and make an army that can be fun to use but doesn’t contain too many models and tries to avoid repetition too much in the units you take. And I couldn’t do that with this book. At all. Let me explain.
When I did this with the Ork book, I was worried that I’d have problems with a horde army, but in the ork book you have big HQs like Ghazghkull, elite units like Mega Nobz, and huge things like Bonebreakers, Morkanauts, Gorkanauts and even Stompas to eat up those points. The most expensive thing in this book that I got into my list? A unit of 2 ridgerunners – light vehicles that come to only just over 150 points for the pair. That’s it. Without leaning too hard on repetition, there was no way to make a low model count army that was still fun to play with. So while I don’t think you’ll find too many GSC lists with fewer models than this, I’ve instead opted to focus more on having a fun, thematic list this time. Because the model count is… well, it ain’t low (not by my own standards anyway). But I reckon this could be a fun force to build and play with, so let’s take a look at its make up.
HQs
I’m taking two detachments in this army, one that is brutal and footslogging, and the other that is fast and full of firepower. Leading the footsloggers, I will be taking a Patriarch and a Magus, along with their little familiar buddies. This gives me one brutal melee specialist (who’s also psychic), and a psyker to buff and support the rest of the units, while also blighting my enemies. Leading the faster detachment, I have two Jackal Alphus models – while this breaks the repetition rule a little, this is one of the best looking minis in the range and it does fit with what we’re doing here to have two of them. Also, the chance to do a little converting/kitbashing with the second one is very enticing.
Elites
Skipping troop choices entirely (because they involve a lot of minis for very few points in this army), we’re packing out the Elite slots to make our Footsloggers as deadly as possible. Two units of 10 purestrain genestealers gives us a lot of AP-3 claws and talons for not much money, and with movement 8, they’ve got a good chance of getting into the thick of it in early turns. Then we’re going to pack a unit of 5 Aberrants into a Goliath Truck to bring some more muscle to the party, and they’ll have back up from a Biophagus and there’ll be an Abominant skulking around too because he is hard as nails with his 5+ FNP and his Strength x2 Power Sledgehammer. Lastly in the Elites spot, we’re taking a Sanctus who’ll probably be armed with a sniper rifle to really capitalise on his Soulsight rules.
Fast Attack
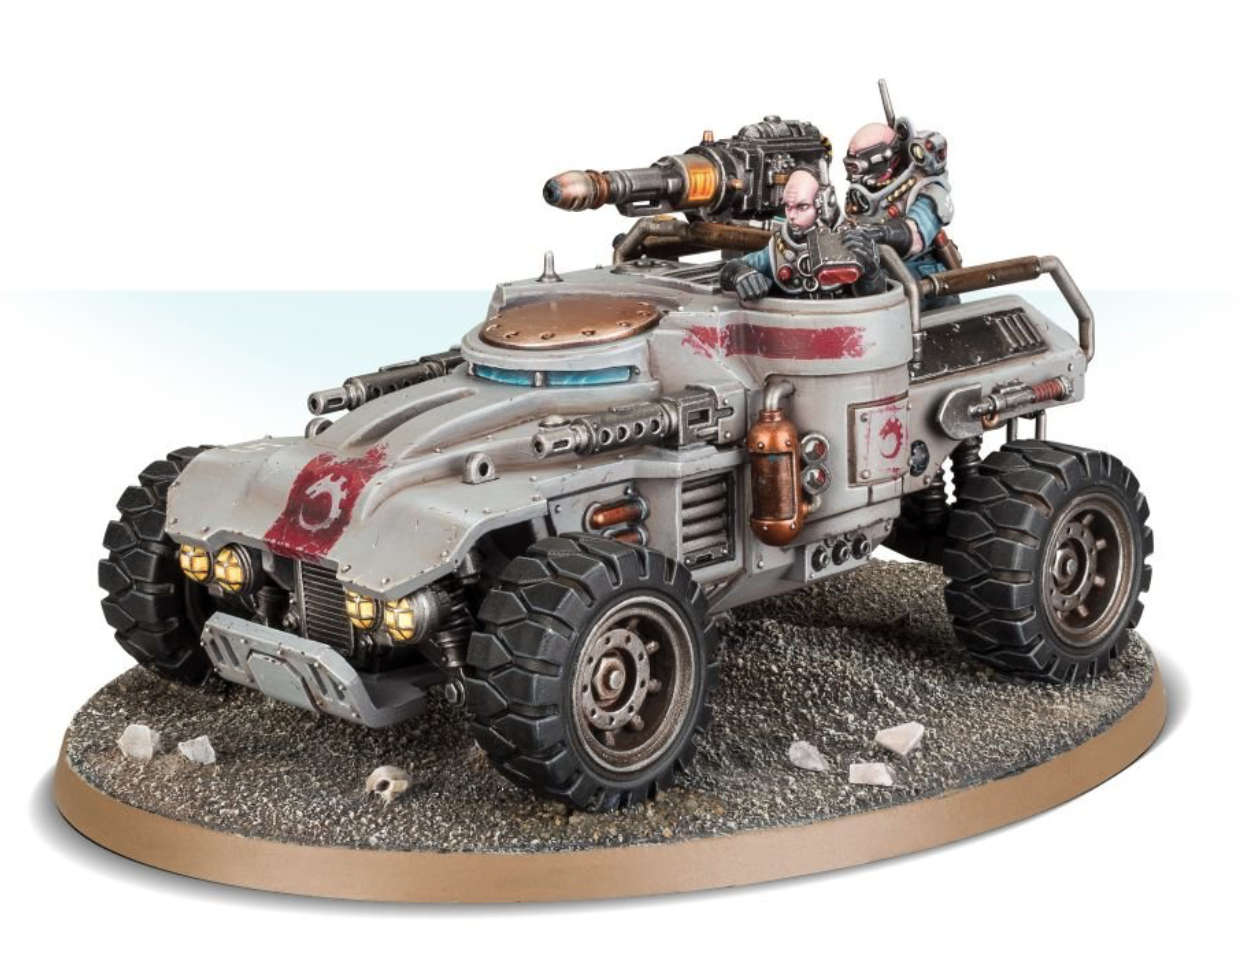
Accompanying those Jackal Alphus dudes into battle will be plenty of speedy stuff. We have a unit of six Atalan Jackals that includes one quad and a lot of demolition charges that tear around the enemy’s flanks. Then we have three units of the aforementioned 2x Ridgerunners to provide a very mobile fire support team. While 6 Ridgerunners feels like too many to me, they will at least be a lot of fun on the battlefield, and they have a range of fun weapon options too.
Heavy Support
We’re rounding out our speedy detachment with two Goliath Rockgrinders because they do look pretty cool, they’re pretty hardcore, and they eat up plenty of points too.
The List:
Vanguard Detachment –
HQ – Patriarch with Familiar
HQ – Magus with Familiar
Elites – 10x Purestrain Genestealers
Elites – 10x Purestrain Genestealers
Elites – 5x Aberrants
Elites – Abominant
Elites – Biophagus with Familliar
Elites – Sanctus
Dedicated Transport – Goliath Truck
=][=
Outrider Detachment –
HQ – Jackal Alphus
HQ – Jackal Alphus
Fast Attack – 6x Atalan Jackals
Fast Attack – 2x Achilles Ridgerunners
Fast Attack – 2x Achilles Ridgerunners
Fast Attack – 2x Achilles Ridgerunners
Heavy Support – Goliath Rockgrinder
Heavy Support – Goliath Rockgrinder
Points: 1977 (but you can spend 20 points on the “Excavate” Proficient Planning upgrade for one unit)
Model Count: 50. Yep, 50. Best I could do to keep this interesting and fun.
Army Name: Too Many Extra Arms
Additional Stuff:
In terms of how this plays, you certainly have speed on your side. You have a lot of fast moving heavy guns, a few sniper rifles and plenty of demolition charges to offer fire support, and you have a big core of claws that will tear even power armour to shreds in close combat. To boost said core of claws, I would take the Twisted Helix as your Cult alignment because everything will get +1 to move, +1 strength, and your Abominant and Aberrants become even more of a threat.
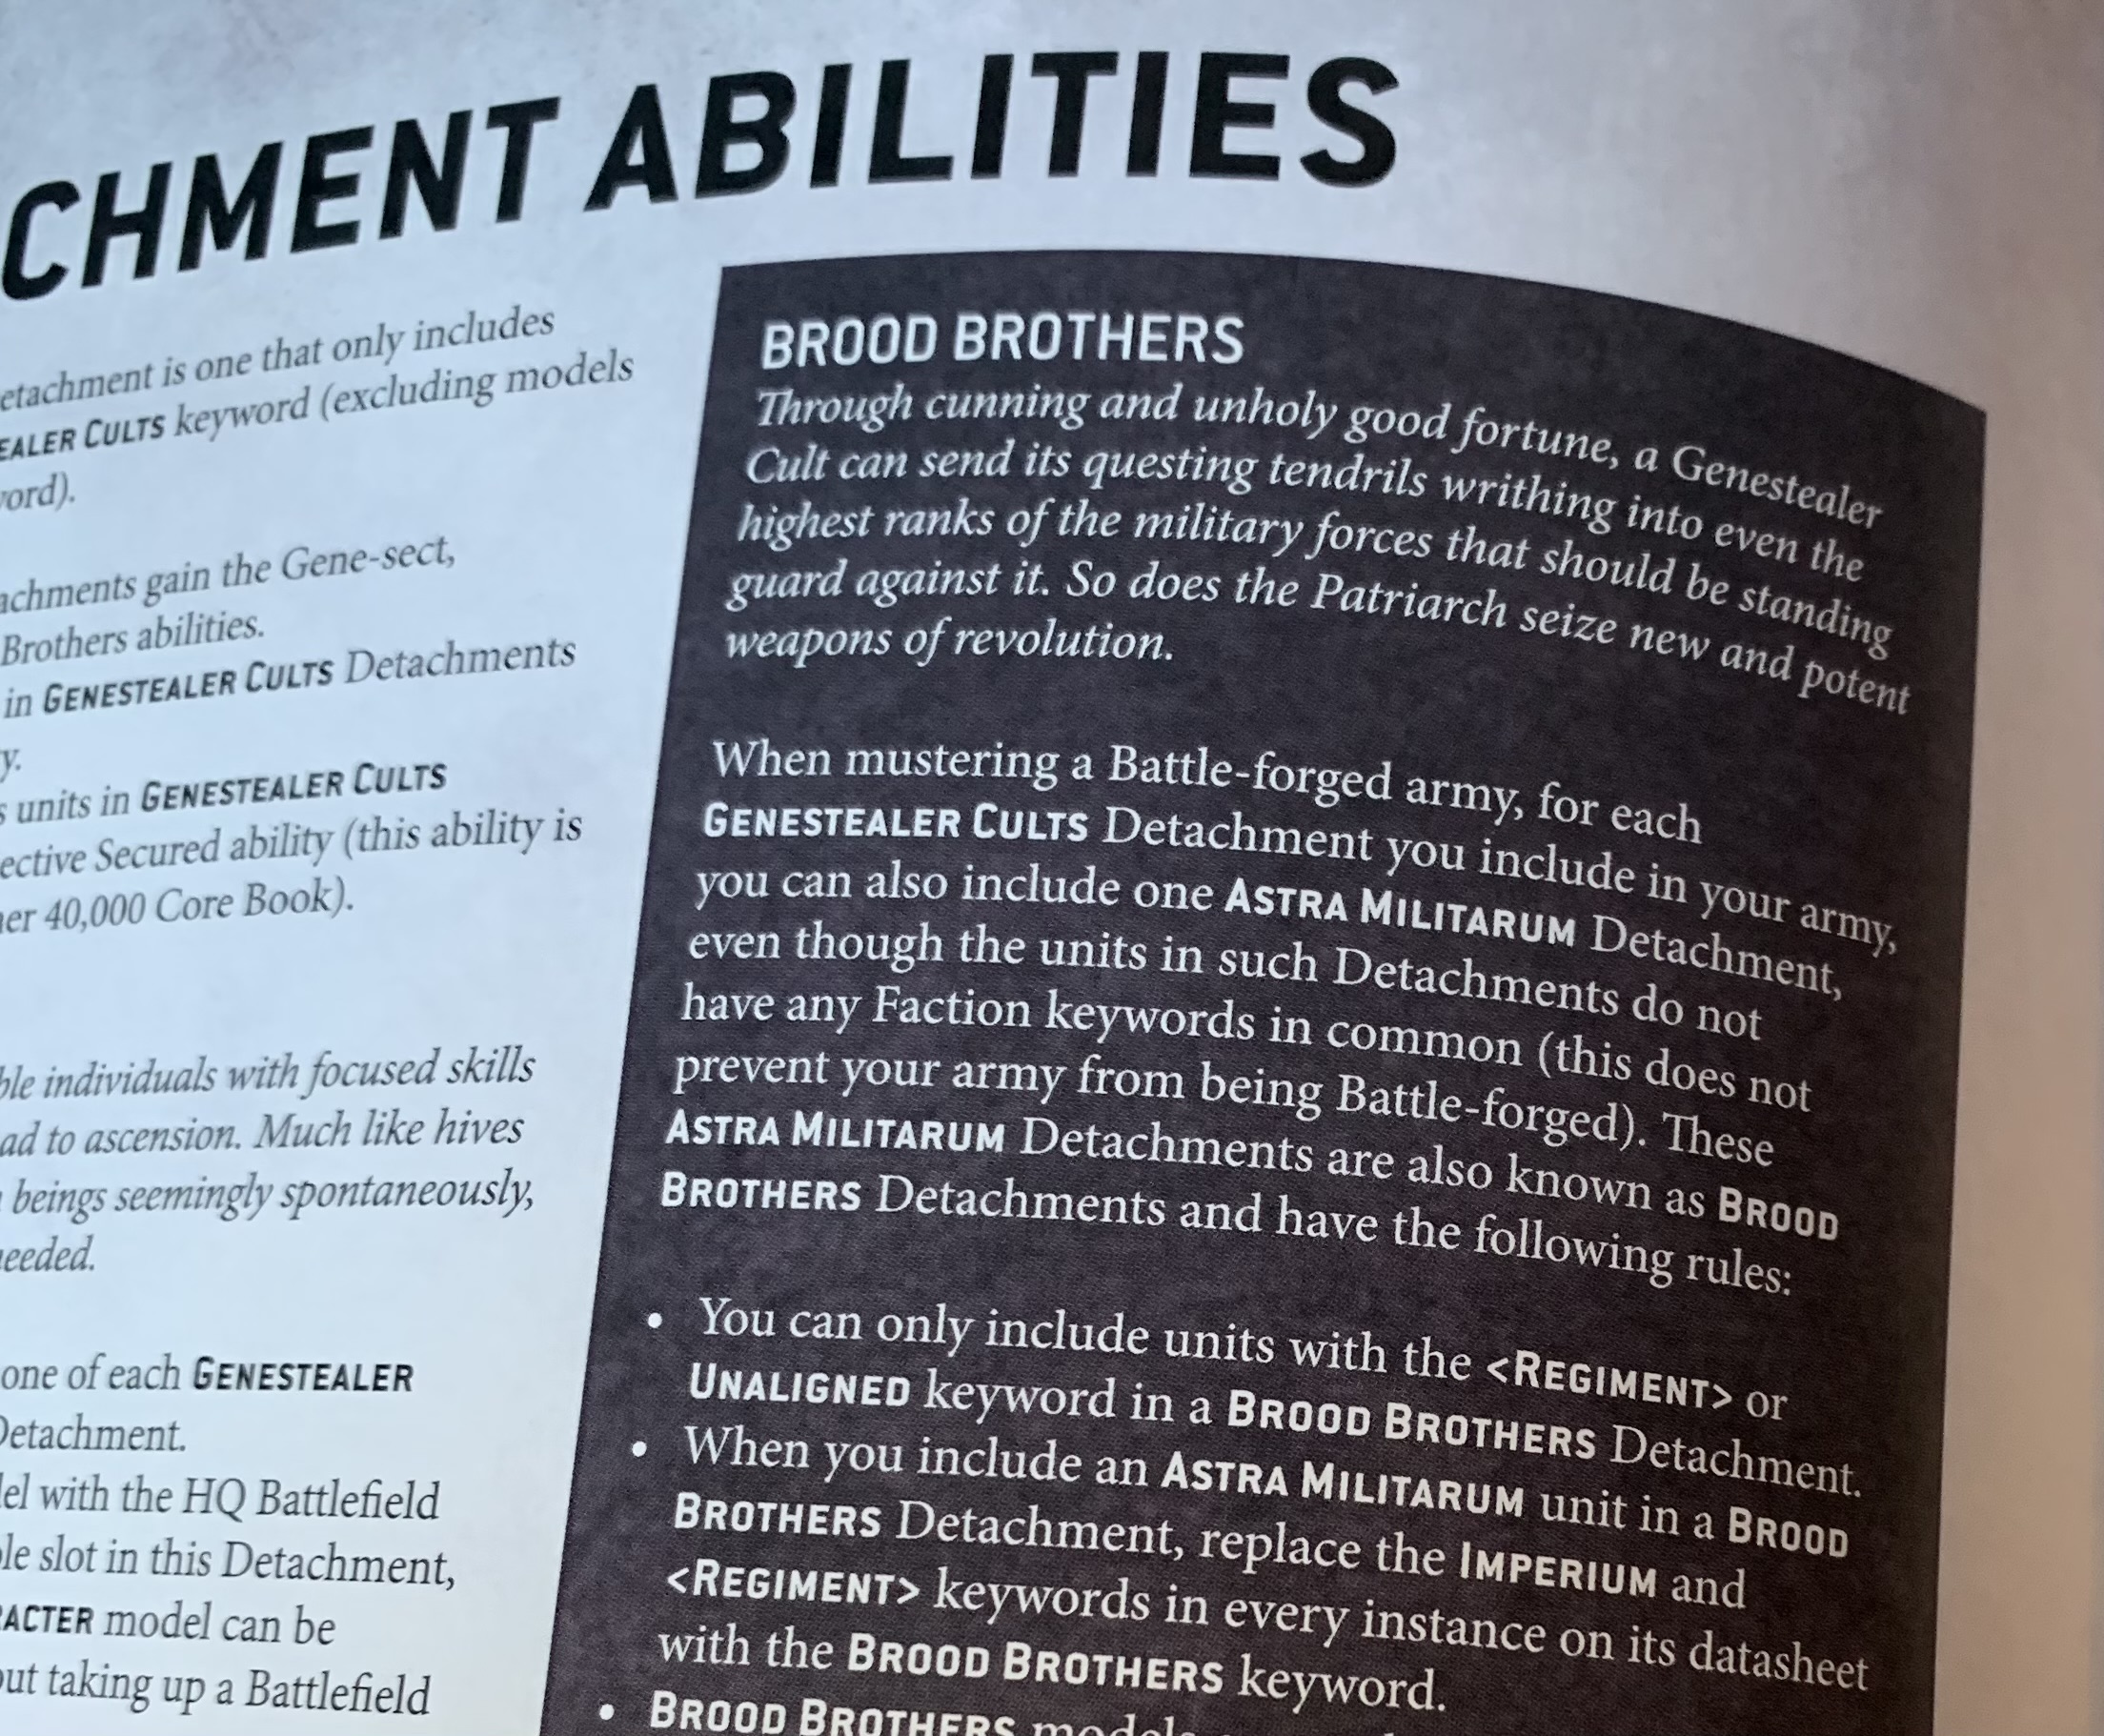
Now, I know what some of you will be thinking of my failure – why didn’t I take advantage of the Brood Brothers rules and pack in some Leman Russ tanks? Well, I could have done that in theory because those rules do of course still exist:
But the rules and points for the available units aren’t in this book, I don’t have an Astra Militarum book to hand, and in my mind, I’m highlighting the fun things to do with this book, and this book alone. I could have added allies to any armies I’ve done for this if I’d really wanted to, but that’s not the point. Nor would it have been the point to give Proficient Planning abilities to every possible unit – where’s the fun in that (well, there are a lot of fun rules in there actually)? I stuck to this book, and the models included therein, because that’s what we as players, typically, want to enjoy.
And that brings me on to the real pain of this book – I will never be able to take a Genestealer Cults 2000 army. Not because I couldn’t write a list with a low enough model count to accommodate my inability to paint hordes, because as mentioned, I think this is one of the best looking ranges in the game and painting six Ridgerunners actually sounds quite fun. When the 40k survey came out recently, my major bit of feedback was that the game has a problem with having too many rules, especially when compared to AoS which feels quick and streamlined by comparison. Well, the GSC are among the worst offenders and while all the rules are thematic and in keeping with the army’s values, there are simply too many of them. What other army comes with a token sheet (albeit a very useful token sheet) attached to the codex?
And take the Biophagus – a unit that has pretty much an entire A4 page of rules, and costs just 50 points. That just feels a bit too much to me. So is the basic troop choice in the book having access to 16 different wargear options. That’s right, if you’re running Neophite Hybrids (another unit with a full A4 of rules) you can take everything from a an Autopistol to a Webber and almost anything else in between. Options and versatility are great, but I almost gave myself a headache trying to work this list out. Add onto this the Brood Brothers rules, warlord traits, relics, 4 pages of stratagems, psychic powers, a page of cult-specific rules, Proficient Planning abilities, Army-wide rules like Crossfire and… it’s too much (and I’m sure I’m forgetting some things there). It’s far far too much to make running this army fun for someone like me. Happily though, not everyone is like me, and I will say that the rules are certainly thematic.
But I love the miniatures – they’re fantastic. If I use them though, they’ll be in games of Kill Team or Necromunda. This codex has some wonderful art, fascinating lore, lavish model photography, but if you’re a lazy painter like me, it’s probably not the army for you. But if you do love rules, and lots of them, maybe this army will be ideal for you. I didn’t want to rant about all this but as someone who likes casual-competitive games, this is a bit of a barrier to me enjoying this army. I’ll still be enjoying the miniatures though – this faction is full of winners where miniatures are concerned.
Until next time, have a wonderful time painting and playing. Onwards!
The hobby can be a weird place sometimes. And it gets in you brain, right? You see things that no-one else sees in the world because your head is full of paints and brushes and basing materials. You look at a twig like it could be a tree, or a rock like it could be a piece of crumbling rubble… and then there’s aubergine with black truffle. Right…?
Ok, some context would help. I was doom-scrolling through Instagram a few nights ago, and an advert caught my eye. Here it is:
Now, to most people, this would appear to be someone shaving black truffle on a piece of Aubergine covered in some sort of sauce, with sesame seeds, and whatever that green stuff is – is it cress, or a herb maybe? But did I see that? No. No, because my brain was in hobby mode, the black of the aubergine looked like a base rim at a fleeting glance and so my brain tells me that this is a display base someone’s working on. I also thought it looked quite cool – vibrant and wild, but realistic in a strange way too. Then I realised I was looking at an ad for a restaurant that I almost certainly won’t be eating at and I realised I needed a rest.
I put this onto my twitter and lots of people could at least see what I was getting at. I wasn’t totally in outer space with my thinking – it could be a base. So, well, despite having quite a lot on at the moment, I’ve written a step-by-step guide to help you create your own Truffled Aubergine base. Because that’s what I do, dammit.
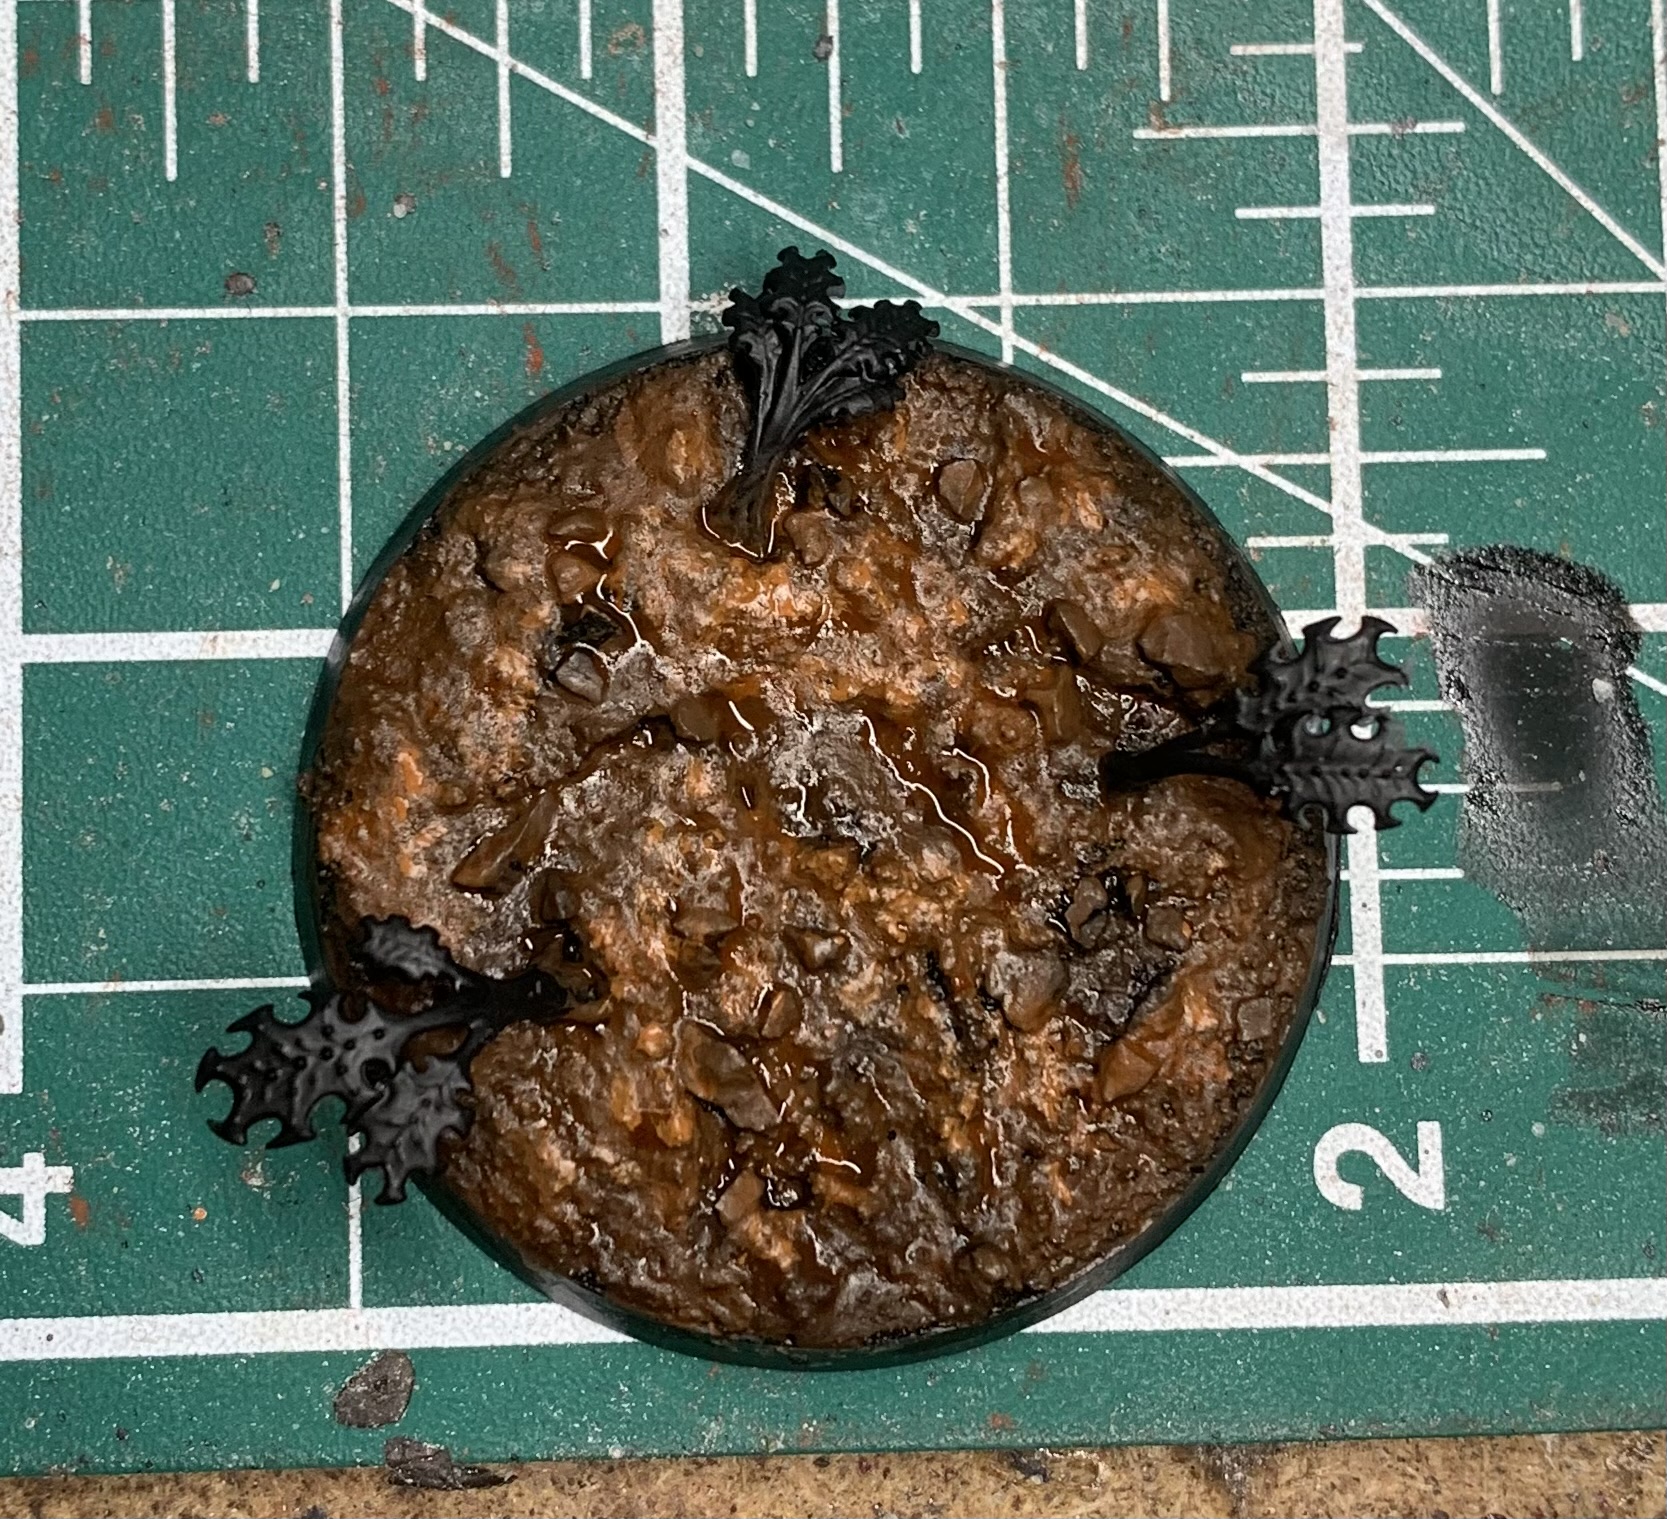
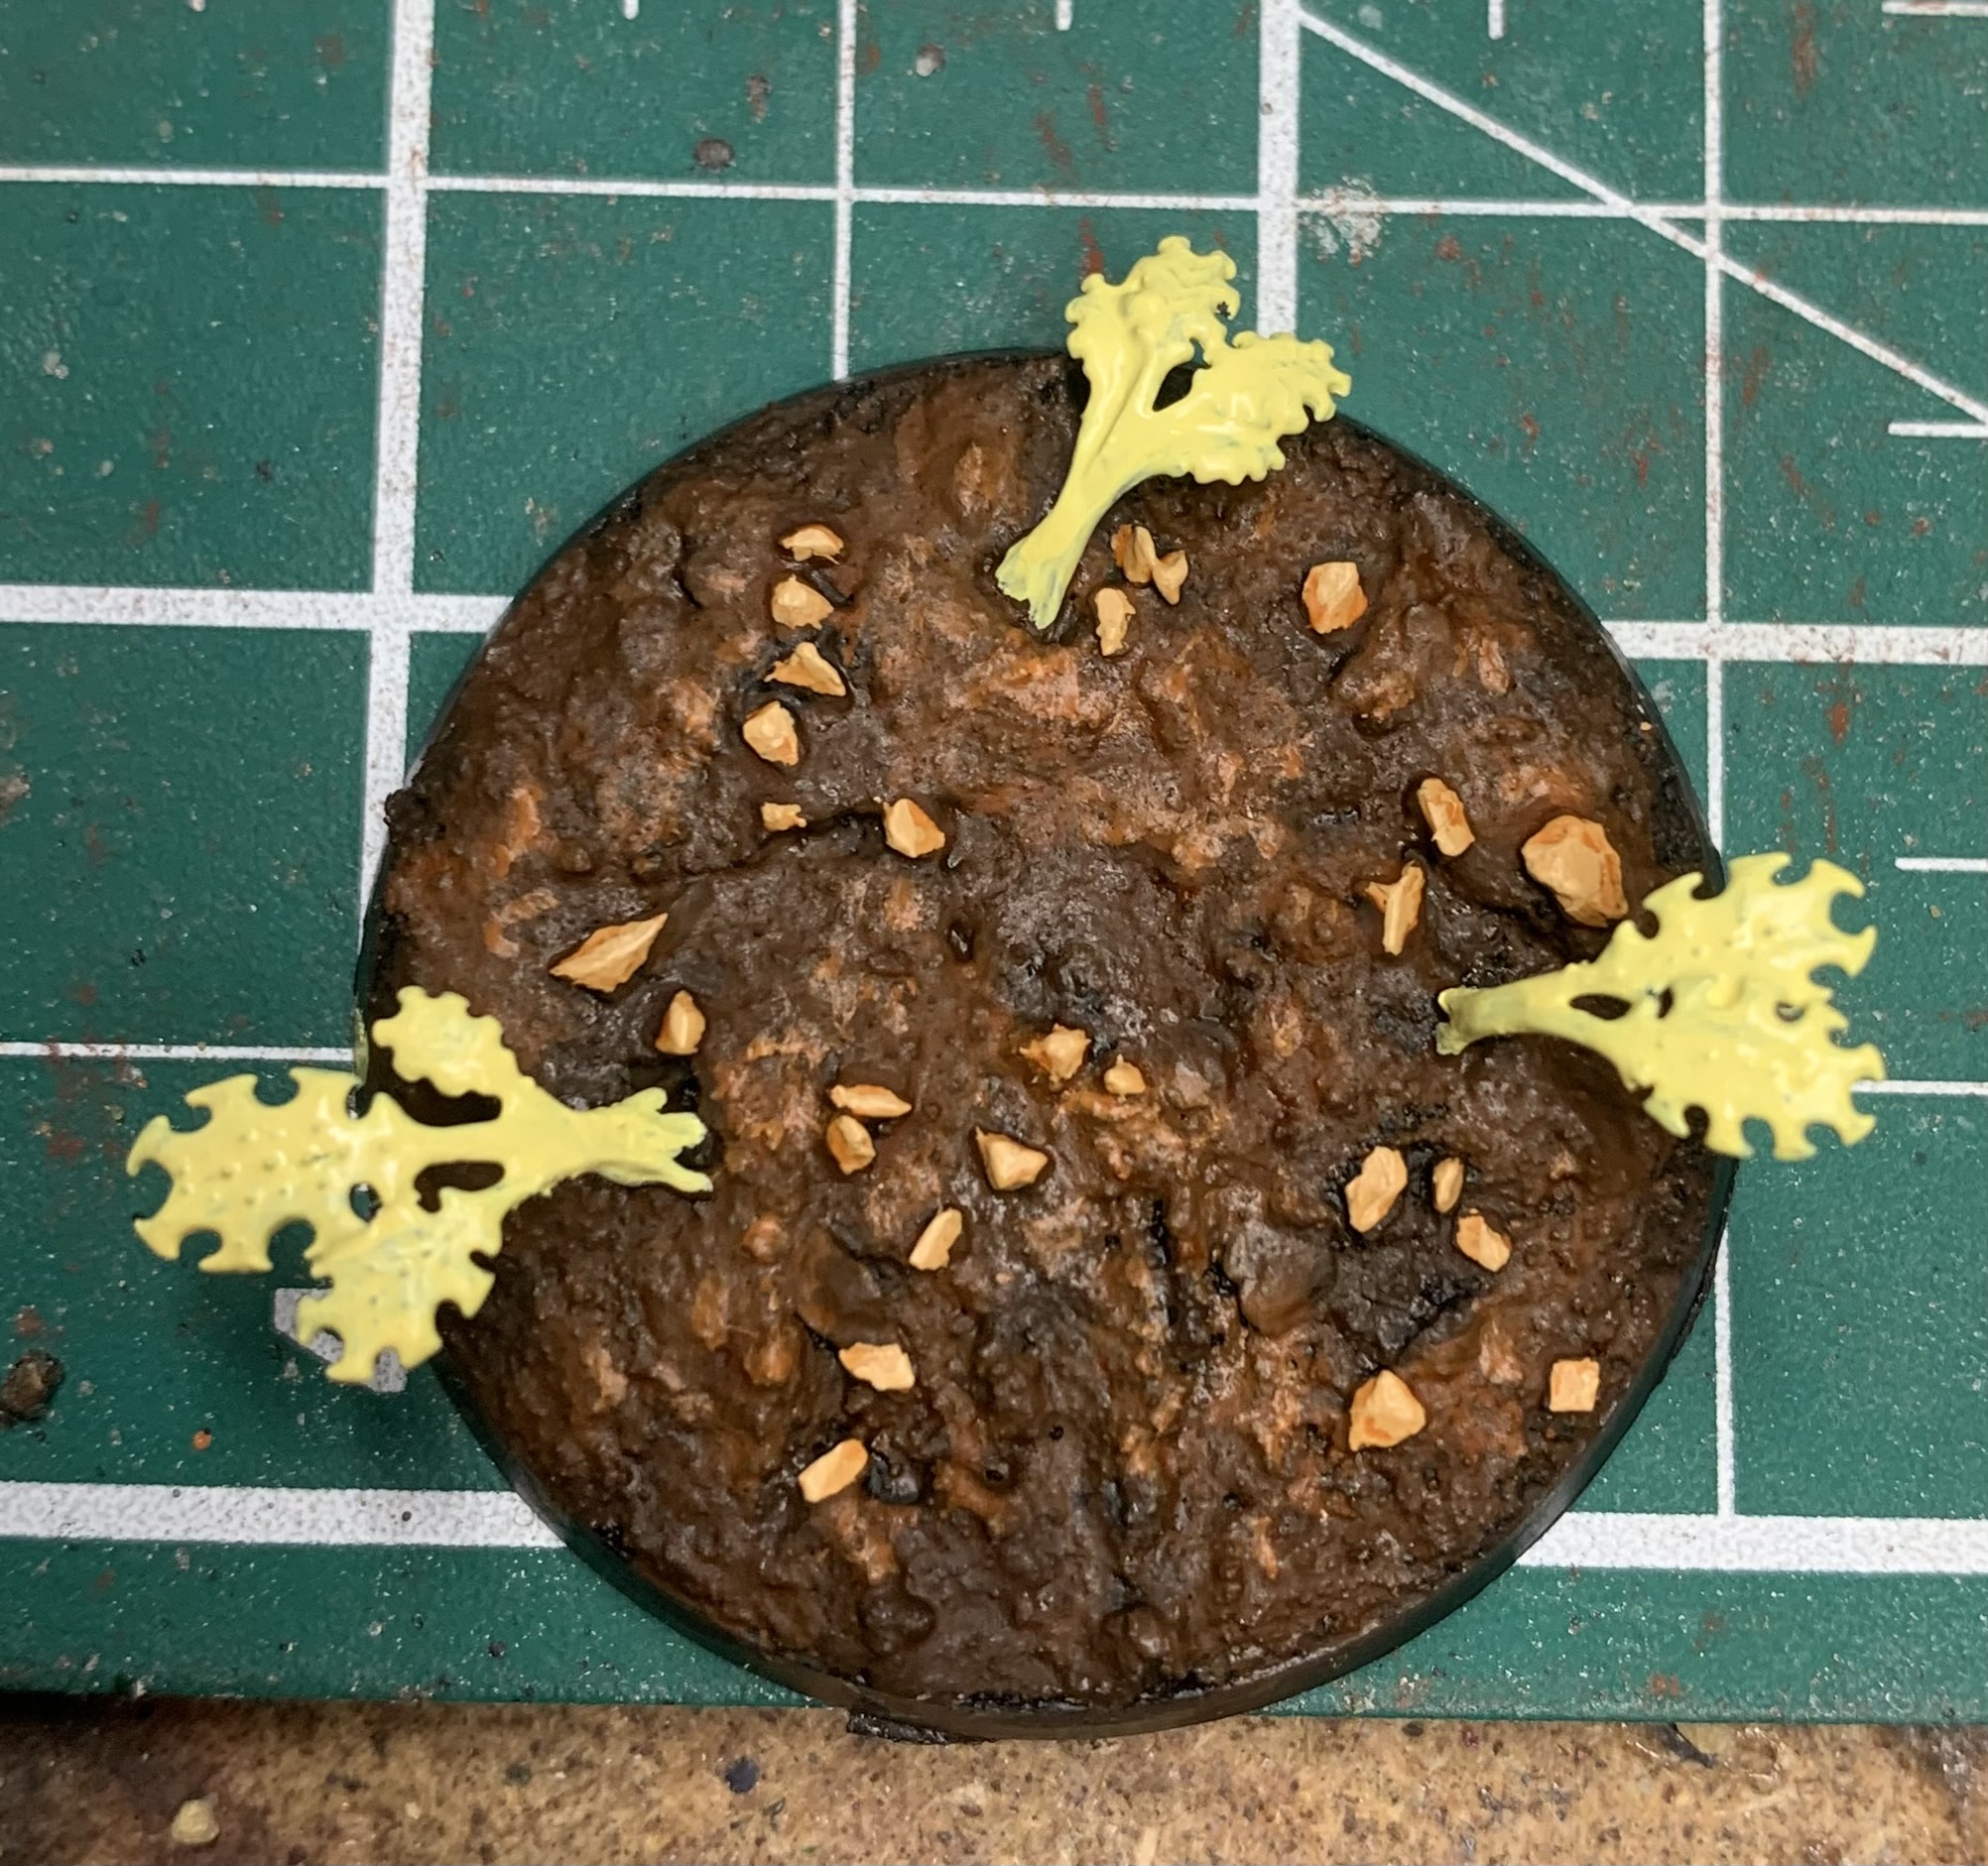
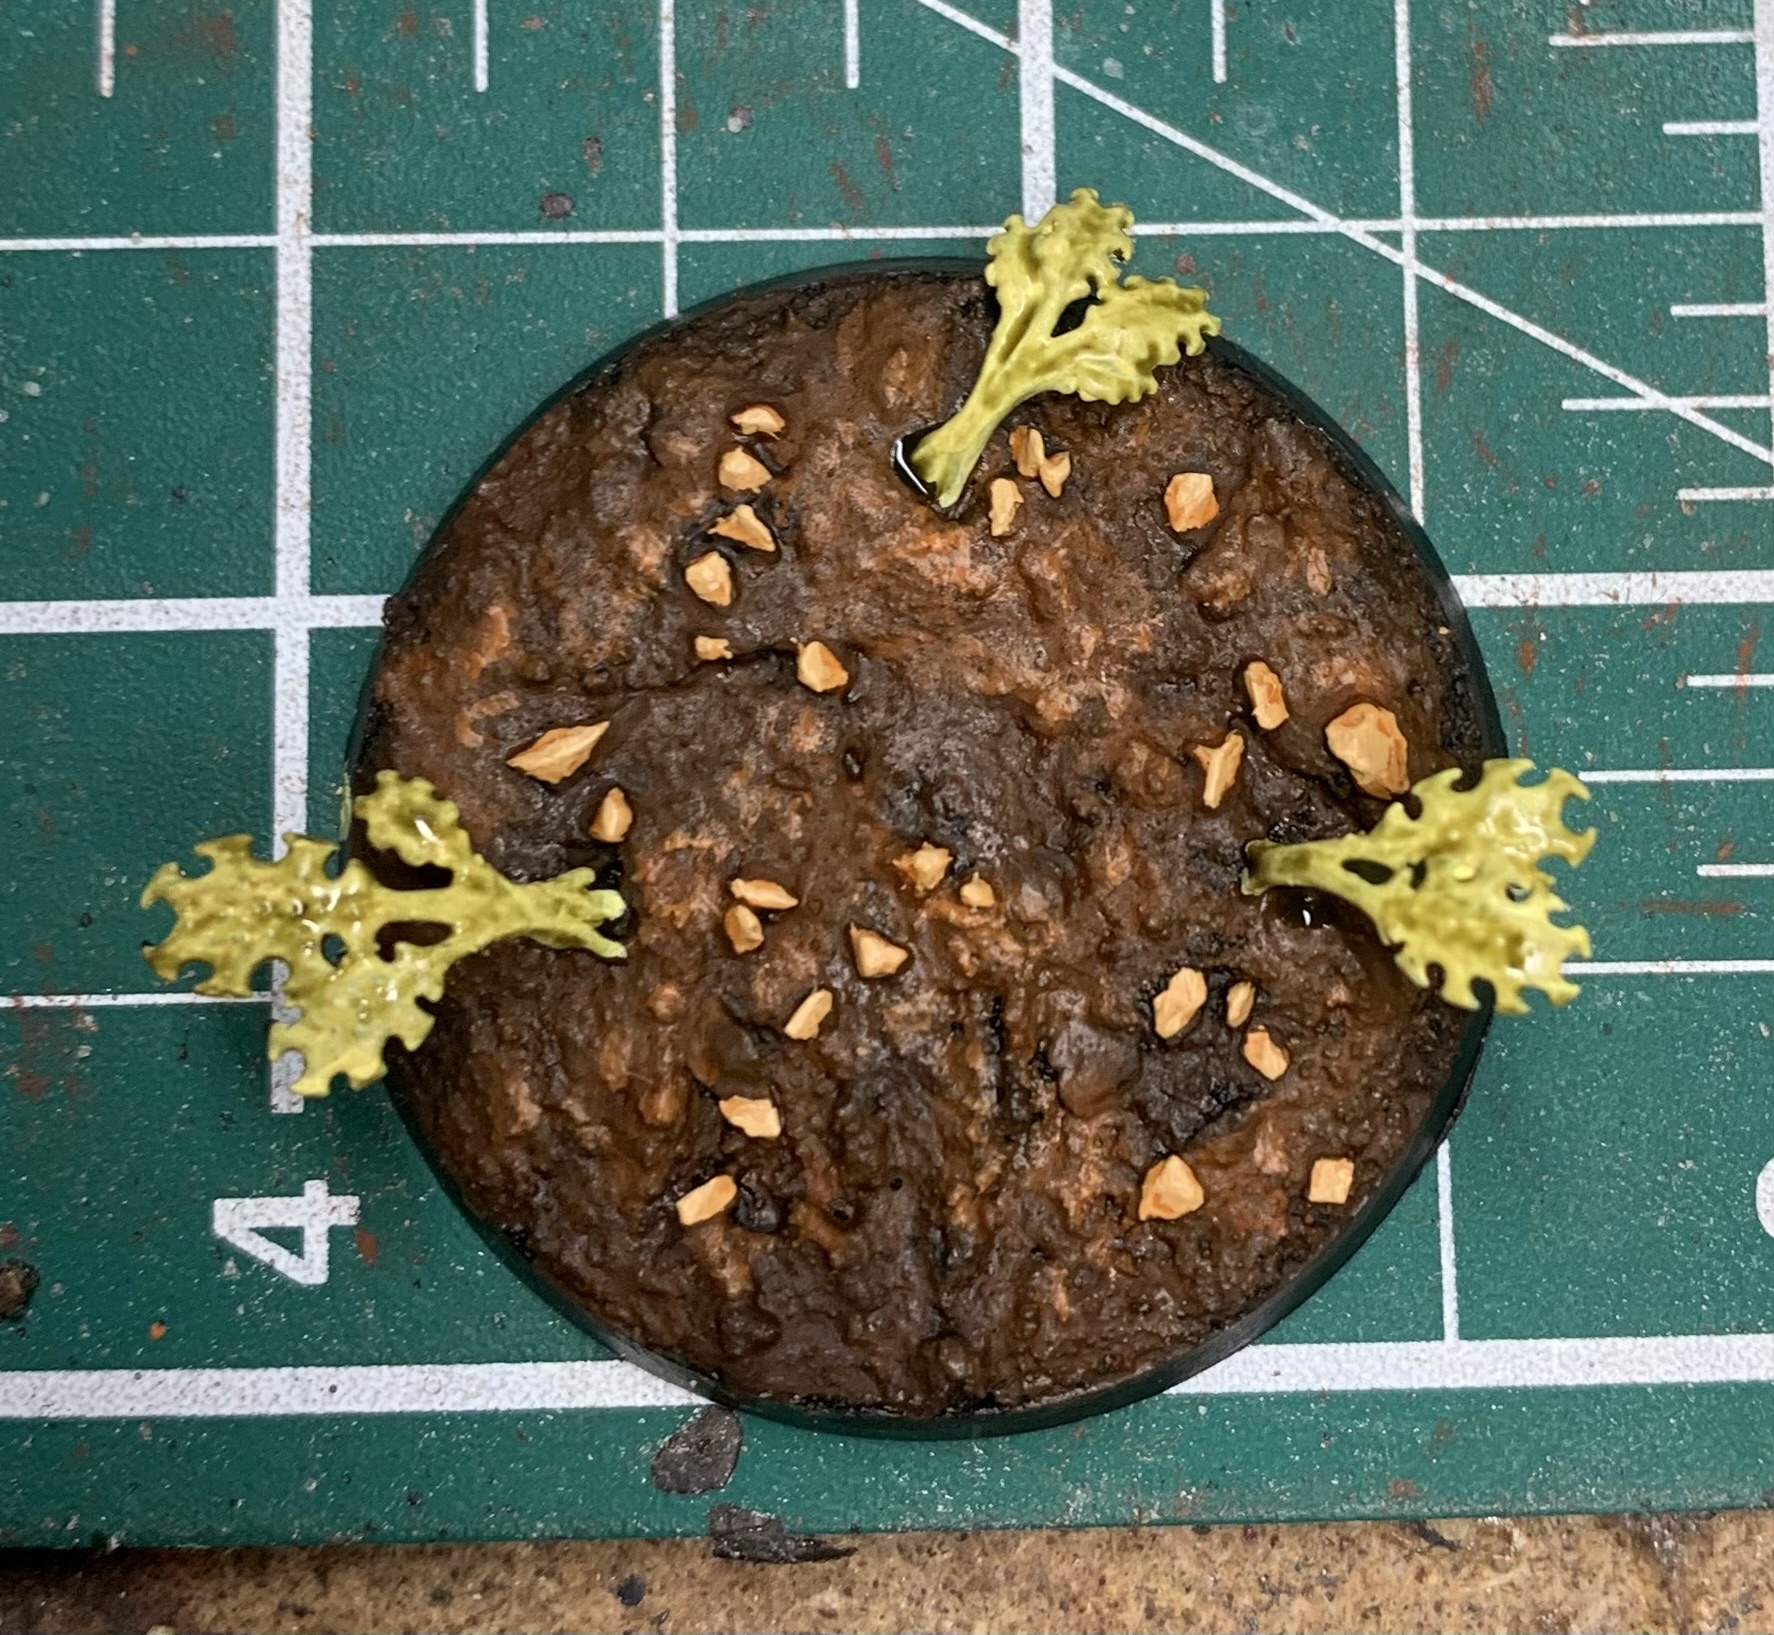
I didn’t take any pictures of the base when it was just undercoated so I’ll tell you how I did it. I put down a relatively thick and uneven base of Armageddon Dunes, which I then sprinkled with some very small stones, before pushing in some of the smaller Barbed Bracken pieces. Easy. In hindsight, I’d have used a little super glue on those bits of barbed bracken to help steady them a bit, but you don’t need to if you’re prepared to be delicate with them. Then I undercoated the whole thing with black paint, and that leads us to…
Step 1: Rhinox Hide – just cover the whole base in it. Doesn’t matter if there’s a little black left showing here and there though.
Step 2: Rhinox Hide/Skrag Brown (1:1) mix -Hit about 75-80% of the base with this mixture.
Step 3: Skrag Brown – Focus more on the centre and the areas where you put down the mix in step 2, and hit a little less again – make sure you can see all the shades coming through. You can work on this while the last stage is still drying too.
Step 4: Fuegan Orange – Once all the previous paints are dry, put down a layer of Fuegan Orange. I could have gone with a slightly thinned Gryph-hound Orange here to make it more orangey, but I like the subtleness that the shade gives me.
Step 5: Skrag Brown/Firedragon Bright (1:1) mix – hit some of the most raised areas with this mix. It’s fine that the shade is still drying in the recesses – you should just be dotting this around the higher up bits anyway in a non-uniform sort of way.
Step 6: Ungor Flesh – Time to pick out the little rocks we drizzled over the top of the base while the Armageddon Dunes was drying – these are our Sesame Seeds! One or two layers being careful not to get any onto the dirt.
Step 7: Feugan Orange – You could use Seraphim Sepia here if you wanted them a bit muddier, but it’s that dark orange look in the original image that led me down this route. Let that dry and more onto…
Step 8: Ungor Flesh (again) – just pick out the bulk of the Sesame Seeds with Ungor Flesh leaving the lower parts and any recesses still with the wash on them.
Step 9: Ungor Flesh/White Scar (1:1) mix – just hit the tips of these little stones with this to help make ’em pop! Now, onto those leaves…
Step 10: Dorn Yellow – Start off by putting down a couple of layers of Dorn Yellow as a base. Be gentle with these if you didn’t use glue – they’re a bit bendy and fragile.
Step 11: Athonian Camoshade – Hit these with some shade and you don’t want it to pool too much, but it’s not big drama if it does.
Step 12: Dorn Yellow – Just pick out the stems with some of the original base paint here.
Step 13: Dorn Yellow/White Scar (1:1) Mix – hit the stems again, just lifting those tones a little. Apparently this caused my camera to lose focus but that’s not something new on this blog!
Step 14: Dorn Yellow/Moot Green (1:1) mix – hit the lower areas of the leaves with a couple of thin coats of this paint. Don’t worry about losing detail in the centre of the leaves here – we’ll come back to that.
Step 15: Moot Green – the rest of the leaves get a nice coat or two of Moot green to make them a little more appetising.
Step 16: Athonian Camoshade – A little of this shade down the middle of the plant and our greenery is done!
Step 17 – The Truffle – So, there’s no easy way to do this really, unless, like me, you happen to have a collection of tiny leaves made from real leaves that were collected a couple of autumns ago before being baked and pushed through a fine mesh. But you could use pencil shavings, old herbs… something that looks like dead foliage. Just put down some watered down pva glue in patches and sprinkle this on. If you’re feeling very rich, you could use real truffle!
The PVA will dry a little glossy, but that works for random wet patches on the forest floor. If you don’t like this though, you could always go over it with a little matt varnish.
Step 18: Abaddon Black – The final touch, the Aubergine itself. Just hit the base rim with Abaddon Black, and you’re done!
I quite like it! It definitely has a very “forest floor” look to it, and there’s a bit of alien forest to it as well, thanks to the Barbed Bracken. I think I could have gone a bit more orange with it – made those tones a bit more vibrant to fit the image on the ad, but I’m happy enough with where I got to. This is what’s great about seeing the world through hobby eyes every now and again – it takes you down weird little journeys like this and what you find at the end can be pretty decent if you set your mind and brushes to it. Is it a perfect representation? No. But if anyone ever remarks on this base, I’ll tell them that it was based entirely on an ad for Truffled Aubergine. I guess it’s a case of compliments really going to the chef!
Until the next time my brain makes me do weird stuff like this again, have a fun time with your paints and toy soldiers. Onwards!
It’s time for our second LPAL of the day and this time we’re looking at the Emperor’s true Golden Boys (sit down Ultramarines), the Adeptus Custodes. Thank you to GW for sending me the book to work with and look through.
It’s also worth noting that if you’re a fan of Imperial lore in the 41st Millennium, this book is a must have. There are some truly delightful touches in the lore sections, with the ‘Deeds of Legend’ sections in particular being a real treat. And on a purely aesthetic note, I love the ‘old gold’ palette that this book uses throughout – perfect for the faction it deals with.
Now, after the abject failure that was my attempt to do a small 2000 point army for the Genestealer Cults, it’s nice to be sat working with a faction that I know I can produce a very small army list for in terms of model count. So let’s go with a bit of a challenge – let’s aim for less than 20 models. Should be fun. And for those not familiar with these lists, I aim for limited repetition, fun to play with on the tabletop, and a very low model count for us painters who don’t have time to work on more expansive armies. Let’s see what I can do with the Adeptus Custodes…
HQ Choices
We’re going to build our entire force inside a single Vanguard Detachment for this, allowing me to take advantage of the cool and costly Elites choices available, but before we get onto them, let’s see who’ll be leading the army. For a start, we’ll take a Shield Captain on Dawneagle Jetbike with a Salvo Launcher and a Misericordia because all of that looks and sounds very cool. The Custodes jetbikes are one of my favourite things in this range so expect to see more of these ‘Movement 14”’ monsters later on. And because I like to get the new stuff into these lists when I can, we’re going to add a Blade Champion into the mix. His Vaultswords have plenty of different profiles making him very handy whatever the enemy throws at this army.
Elites
Let’s start with the two Contemptor Dreadnoughts I’m adding in here as these remain some of my favourite units in the game, and I’ll probably be giving them each multi-meltas because why the hell wouldn’t I? Then we’re taking two units of 3x Allarus Custodians, all armed with an additional Misericordia (don’t want to get too bogged down with hordes and these will help). I also just happen to think the Allarus are a little cooler-looking than your standard Custodes. Then we’re going to give those dudes a bit of support with a Vexilus Praetor in Allarus armour because those Vexilla options are too sweet not to employ in a force like this.
Fast Attack
This is easy for me – two units of 3x Vertus Praetors on their jetbikes, with each unit packing a Salvo Launcher and a bunch more Misericordias to ensure they can take on any enemy.
Heavy Support
A Land Raider. Because it’s big, packs plenty of firepower and despite its age, these rolling boxes still have a habit of scaring your opponents. If they focus on trying to bring this down, the rest of your army has a chance of getting into the fight unscathed.
Army List:
Vanguard Detachement –
HQ – Shield Captain on Dawneagle Jetbike
HQ – Blade Champion
Elites – Contemptor Dreadnought
Elites – Contemptor Dreadnought
Elites – 3x Allarus Custodians
Elites – 3x Allarus Custodians
Elites – Vexilus Praetor in Allarus Terminator Armour
Fast Attack – 3x Vertus Praetors
Fast Attack – 3x Vertus Praetors
Heavy Support – Land Raider
Points: 1956 (with 44 points to spend on one of the Captain-Commander traits)
Model Count: 18 (now that’s a nice number for any army!)
Army Name: Old, Gold and Bold
Additional Stuff:
Pretty simple tactics for this one. Big tank sits at the back and uses its long range to force the enemy to hide. Your small core of footsloggers move up to the centre to hold and fight, with the Dreads dealing with anything armoured that gets too close. Finally, you have seven jetbikes to zoom around, take back-field objectives and take on anything they want to. I’m not saying it’ll be great, but I think this list could be a lot of fun for the right person.
Looking through the Shield Hosts, I’d take this army as Emperor’s Chosen due to the access it has to a 4+ FNP and a “Salamander” reroll. That’ll help things survive a little longer for sure, and who doesn’t enjoy a cheeky reroll?
And that’s it really. A very fun, simple and low model count army – we shall call that a success! It’s always nice to put together a successful list, and it’s a fun codex to play around with for sure. Frankly, I’m just happy I managed to get through the whole post without calling them “Custards”… dammit! So close! Anyway, until next time, happy hobbying. Onwards!
It’s been a while since I’ve put together a good old fashioned name generator for Necromunda (over three years to be precise) but as it’s the festive period, and because we’ve recently had the release of the Underhive Outcasts Gang and the associated rules for them, I thought I’d roll up my sleeves and have a go again. In fact, I had always meant to do this back then but I never got around to it, but now that you can take Outcast gangs, and Venator gangs for that matter, I think it’s about time I righted this wrong. So further below, using the same old system, we have a way for you to come up with a name for your new gang if you need a little help or inspiration.
Speaking of that, I had thought about using mother’s maiden names, the name of the street you live on, or some other method, but thought it would just look like a phishing scheme so I stuck to the tried and true first initial of your first name, first initial of your last name method. It’s worked well for us until now and if it ain’t broke…
What was really fun about this for me was thinking back to the above expansion that appeared in my youth, and also the Kal Jericho novels that I still recommend to people all the time – wonderful enjoyable reads (especially if you imagine Kal has the voice of Archer, Scabbs is Cyril, Yolanda is Lana… essentially it’s Archer does Necromunda and it’s one of my favourite things to do). You might see some nods to these products in the chart below…
Anyway, that’s all a lot of ado, so without further ado (given we’ve had so much ado already) here’s the name generator for you:
So given that my initials are “JA”, I could name my gang the “Junkyard Assassins”, but if, for some reason, that didn’t quite sit right, I could switch it round and go for “Ash Waste Jackals”. Both not only give me names to work with, but they also provide a little flavour I could tie-in to the makeup of my gang, how I paint them and how I base them.
Now, if you’re still looking for a name for your gang that is one of the more traditional Necromunda Houses, you can find some more name generators on this site:
Well, I guess that means that’s all. Huh. I could have sworn I’d written more of these… maybe I did and I never got a chance to post them up. I shall do some digging and see what I can put together!
If you do use this name generator or any of the others linked here, or any of the others that are found on this site, I’d love to hear about the results you got and any thoughts you had on them, so do stick a comment down below. And if I don’t post here again until after Xmas, have a happy, healthy, safe and fun winter break. Onwards!
In the days of pre-sculpted bases and texture paints (both of which are awesome by the way – those Necromunda bases…), the art of basing can sometimes feel a little lost. Basing has never been the sexiest bit of the hobby, but it’s a skill that isn’t just worth learning, but one that can make your miniatures special to both you as the painter, and to those looking at it. A base helps to place your miniature in its world or its universe, and it’s something that’s worth taking the time to learn and enjoy. I promise you, sometimes, the base, whether you’re army painting or competition painting, can be the most fun part of a miniature. Here are 9 tips and tricks from me, to help you get the most from your basing.
Stealing stones from a pub planter
That stone came from a pub on the north side of Hyde Park in London
We all have a limited amount of funds, and frankly, actually spending money on basing material is a bit much when you HAVE TO spend money on the actual cool miniature itself. But what if I told you half of the materials in my basing materials collection were either free, or cut price? A lot of miniatures companies, large and small, like to deploy the “we saw you coming” technique, and I can’t blame them, but I can undercut them by telling you that so much stuff that you think costs money really doesn’t. The title of this section comes from the days before lockdown when I would go to the pub and they would often have slate filled planters in the garden. Slate is a great material, especially for characters, but it’s not the only freebie. If the gardener of the family is weeding or getting rid of plants, take what they want to throw out, dry it, and use the roots as small saplings or trees, even roots! If you’ve got a couple of quid, go to your local pet store and buy some fish gravel and budgie sand – you can get kilos of it for next to nothing and it will last even the most prolific army painter years. There’s treasure everywhere, Hobbes, and if I had a penny for all the mornings I’ve woken up to find my coat pockets stuffed with stones, bark, corks… I’d have £1.35!
Use a different shade that scares you
Carroburg Crimson was used across the base of this dreadnought
Rocks aren’t grey. One of the easiest basing methods is to put down some sand (as mentioned above,Budgie sand’s great if you’re feeling frugal) or texture paint, base paint it, shade it black (or with Agrax if you feel fancy) and then highlight it. Well, how about you use something different to a dark or muddy-looking wash? How about using Carroburg Crimson? Or Drakenhoff Night? Or an orange wash, or a green wash, or… well, anything other than black/brown? This can be a great way to frame your minis. If you’re doing Ultramarines, why not do a red-tinted base to make that blue pop more? if you’re doing Black Legion, any colour will help add uniformity and interest to your army while also framing those darker toy soldiers. If you’re starting a new army, have fun and do something different. It will help to put your army in a unique setting of your own design, make it recognisable, and allow the character to punch through.
Tufts are not the only organic
I guess Nurglings are kind of organic too, right?
Tufts, be they Citadel tufts or from any other company, are really fun ways of adding an organic touch to your bases, but they’re not the only trick up a hobbyists’ sleeve. Tiny amounts of greenstuff can help you create mushrooms, toadstools, and (what I call) spore puffs – just little spherical things that might be full of fungal spores. Or take some autumn leaves, or coloured paper and buy a leaf punch to help convey a forest setting when you add them to a base. What’s more, there a companies that make actual teeny-tiny flowers and bushes to use on your bases. With a little time, and a little money you can have your army tramping though a veritable Eden. if there was ever a way to bring your bases to life, this is it.
The simple pool and making it special
A lot of hobbyists think that to install a water feature on your mini, you have to invest loads in water effect products but really you don’t. Yes, those products are great, but I’ve made watery pools of life from glue, contrast paints and a gloss varnish. Ok, if you want a flowing river, yeah, you’ll need something that can do that unless you’re very good with greenstuff, but for a simple pool? No, all you need is a well in the base, a glue to fill it that leaves you with a flat surface when dry, and some colour. Contrast paints are great for this, and when you cover them in ‘ardcoat, you’ll get a small pond that can make characters stand out, and put your army in a verdant and life-giving realm or area. Or, depending on the colour you use, it can be a pool of blood, or bile, or lava… whatever you need and it takes no real effort or money to do.
That’s my glowing rock!
Ok, so it doesn’t always have to be the rock that’s glowing.
I remain of the opinion that OSL gets overused especially by those who don’t understand how light works. A small campfire spreads its orange light all over a Stormcast Eternal… who has been painted like he’s in daylight? Sorry, it looks naff. But, very subtle OSL used by anyone can make a detail on a mini’s base all important. That glowing orb, shining icon or, yes, that sickly green glowing rock can add a very simple detail to a base that just helps to make your army special and recognisable. You don’t have to go mad (it’s better that you don’t – straight jacket rental prices be crazy for a start), but maybe your general has the biggest glowing rock, or the most of them, and in your squads, only one or two appear. It’s easy to do, and makes things different to what everyone else is doing.
Debris and the player you hate/love
Poor Black Templar…
Most of us are not alone in this hobby. And most of us have substantial bits boxes, even when we’ve only worked on a single army. So how about theming your army, through basing, as a (playful) “screw you” to your best mate? When you’re both working on armies, do a bits exchange. Those heads and weapons that neither of you need, just slide them across the table to each other, and then incorporate those into your bases (or hell, even buy some bits if he or she is initially unwilling to supply you with trophies). Trust me, the Dark Angels player will be delightfully horrified by seeing the decapitated helm of a Ravenwing biker at the feet of your champion. The discarded T’au pulse rifles strewn across the bases of your mob of Boyz… a wonderful way to make your army matter more both in your eyes, and in the eyes of your chief opponent.
The Importance of Elevation
Even ancient Dragons need a good vantage point
Not to sound like someone who looks down on others, but when you’re higher up, you just feel more important. And this works for miniatures as well. If you place your captains, chaplains, librarians and any other bosses on elevated base, it makes them stand out as more important in your army. It’s a trick that makes characters more characterful, and sets aside the minis you care about from the ones who are probably going to die to the echoes of your disinterested shrugs. You can achieve this for the cost of almost no money, either by using bits of cork board, or by using those stones you robbed from a pub garden planter back in the first tip (and the only reason it’s not listed as “no cost” is because I’m presuming you were at least decent enough to buy a pint before pilfering their planters). It’s one of the easiest tricks, it’s almost free, and it makes for a great looking hero.
Complimentary colours
Nothing like a blue base for a red dude
In the same way that “rocks aren’t grey”, it’s worth thinking more about the colours of your bases. Those martian paints always seem to work best when the army standing on them isn’t somewhere on the red spectrum. Dark minis look best on light bases, and visa versa. And this should flow through to anything else you’re adding to the base. Making some mushrooms for a red space marine? Don’t make them red. Adding some tufts to a green nurgly dude’s base? There are other natural colours than green? Use your basing to compliment, border and frame your miniatures to help them stand out from themselves and spark the imagination in yourself and others. Opposites attract!
Kinda dusty/dirty round here
It’s an easy and obvious trick to put in there but one that is one of the most successful at grounding your toy soldiers in the base you’ve built for them. Got an ash-covered base? The drybrush some grey going up the mini’s legs. Are they marching through a muddy plain? Drybrush some brown onto his or her lower legs. it really is one of the best uses of drybrushing and it’s easy, but it kind of gets overlooked when talking about the most effective ways of making your toy soldiers part of the world you’ve placed them in. Simple as anything, it can make the biggest of differences, so, if you want your basing to do the most for your minis, make sure you do it!
=][=
So there you have it. If you knew all of these, then well done, but I hope you at least got some insight from this post. Basing can be so much fun and with a little know-how and not much money, you can transform your miniatures. And I got to show you a few of my minis that I haven’t shared here for a while. Anyway, I hope this gave you some ideas, and until the next time, dear readers, Onwards!
Well, it has certainly been a year. While one of Nurgle’s more annoying and virulent blessings continues to frustrate the planet, it’s been another interesting 365 in the hobby, and a very interesting year for me personally. I recall that in the olden days, I would often do a year in review post for my hobby here and thought I’d bring the tradition back, as well as look forward to what my hobby plans are for 2022 – I’m quite excited about those! But before dreaming into the days to come, I need to think back over what I accomplished this year. Cue the screen going all wavy, and the twinkly music of remembering…
*at this point I spent ages looking for a good gif of time going backwards and they all suck so have this unnecessary line of explanatory text instead*
Let me take you back to January, 2021. We had just come out of a global pandemic a- no, wait, we were still right in the middle of the damn thing. The pubs were all shut, the bars were all shut, but thankfully the off-licenses (that’s a liquor store for my readers across the pond) were still open. I was enjoying my first winter in my new flat, and I was a Games Workshop employee too. Things were fine, though this blog still slumbered, and that was starting to irk me a little bit. I was painting some things I was really proud of and I wanted to post them on here, and that’s when I decided that I was going to leave GW, and get back to having my hobby be my hobby, and get the blog up and running again.
The first thing to get finished in January was my Lord of Plagues, a mini that had been part of my yearly totally random hobby project (I’ve got another one coming very soon!) and I was pretty pleased with what I’d accomplished with my limited palette. I was satisfied with all of my painting at that point to be fair, and I was regularly contributing to painting challenges at work, and things were going well with my brushes in general. And by the end of January, I had painted my Grot Tank – a model that I loved with a paintjob I was really proud of.
Though of course I was still struggling with my camera – some things never change. This was now really starting to fuel my desire to enter Golden Demon again and really push to get me a statue. On a lucky day, if a few very talented people didn’t show up, I thought I could squeak a bronze. Maybe. But I couldn’t enter the categories I wanted to enter while working for GW, so this further egged me on to find a new job.
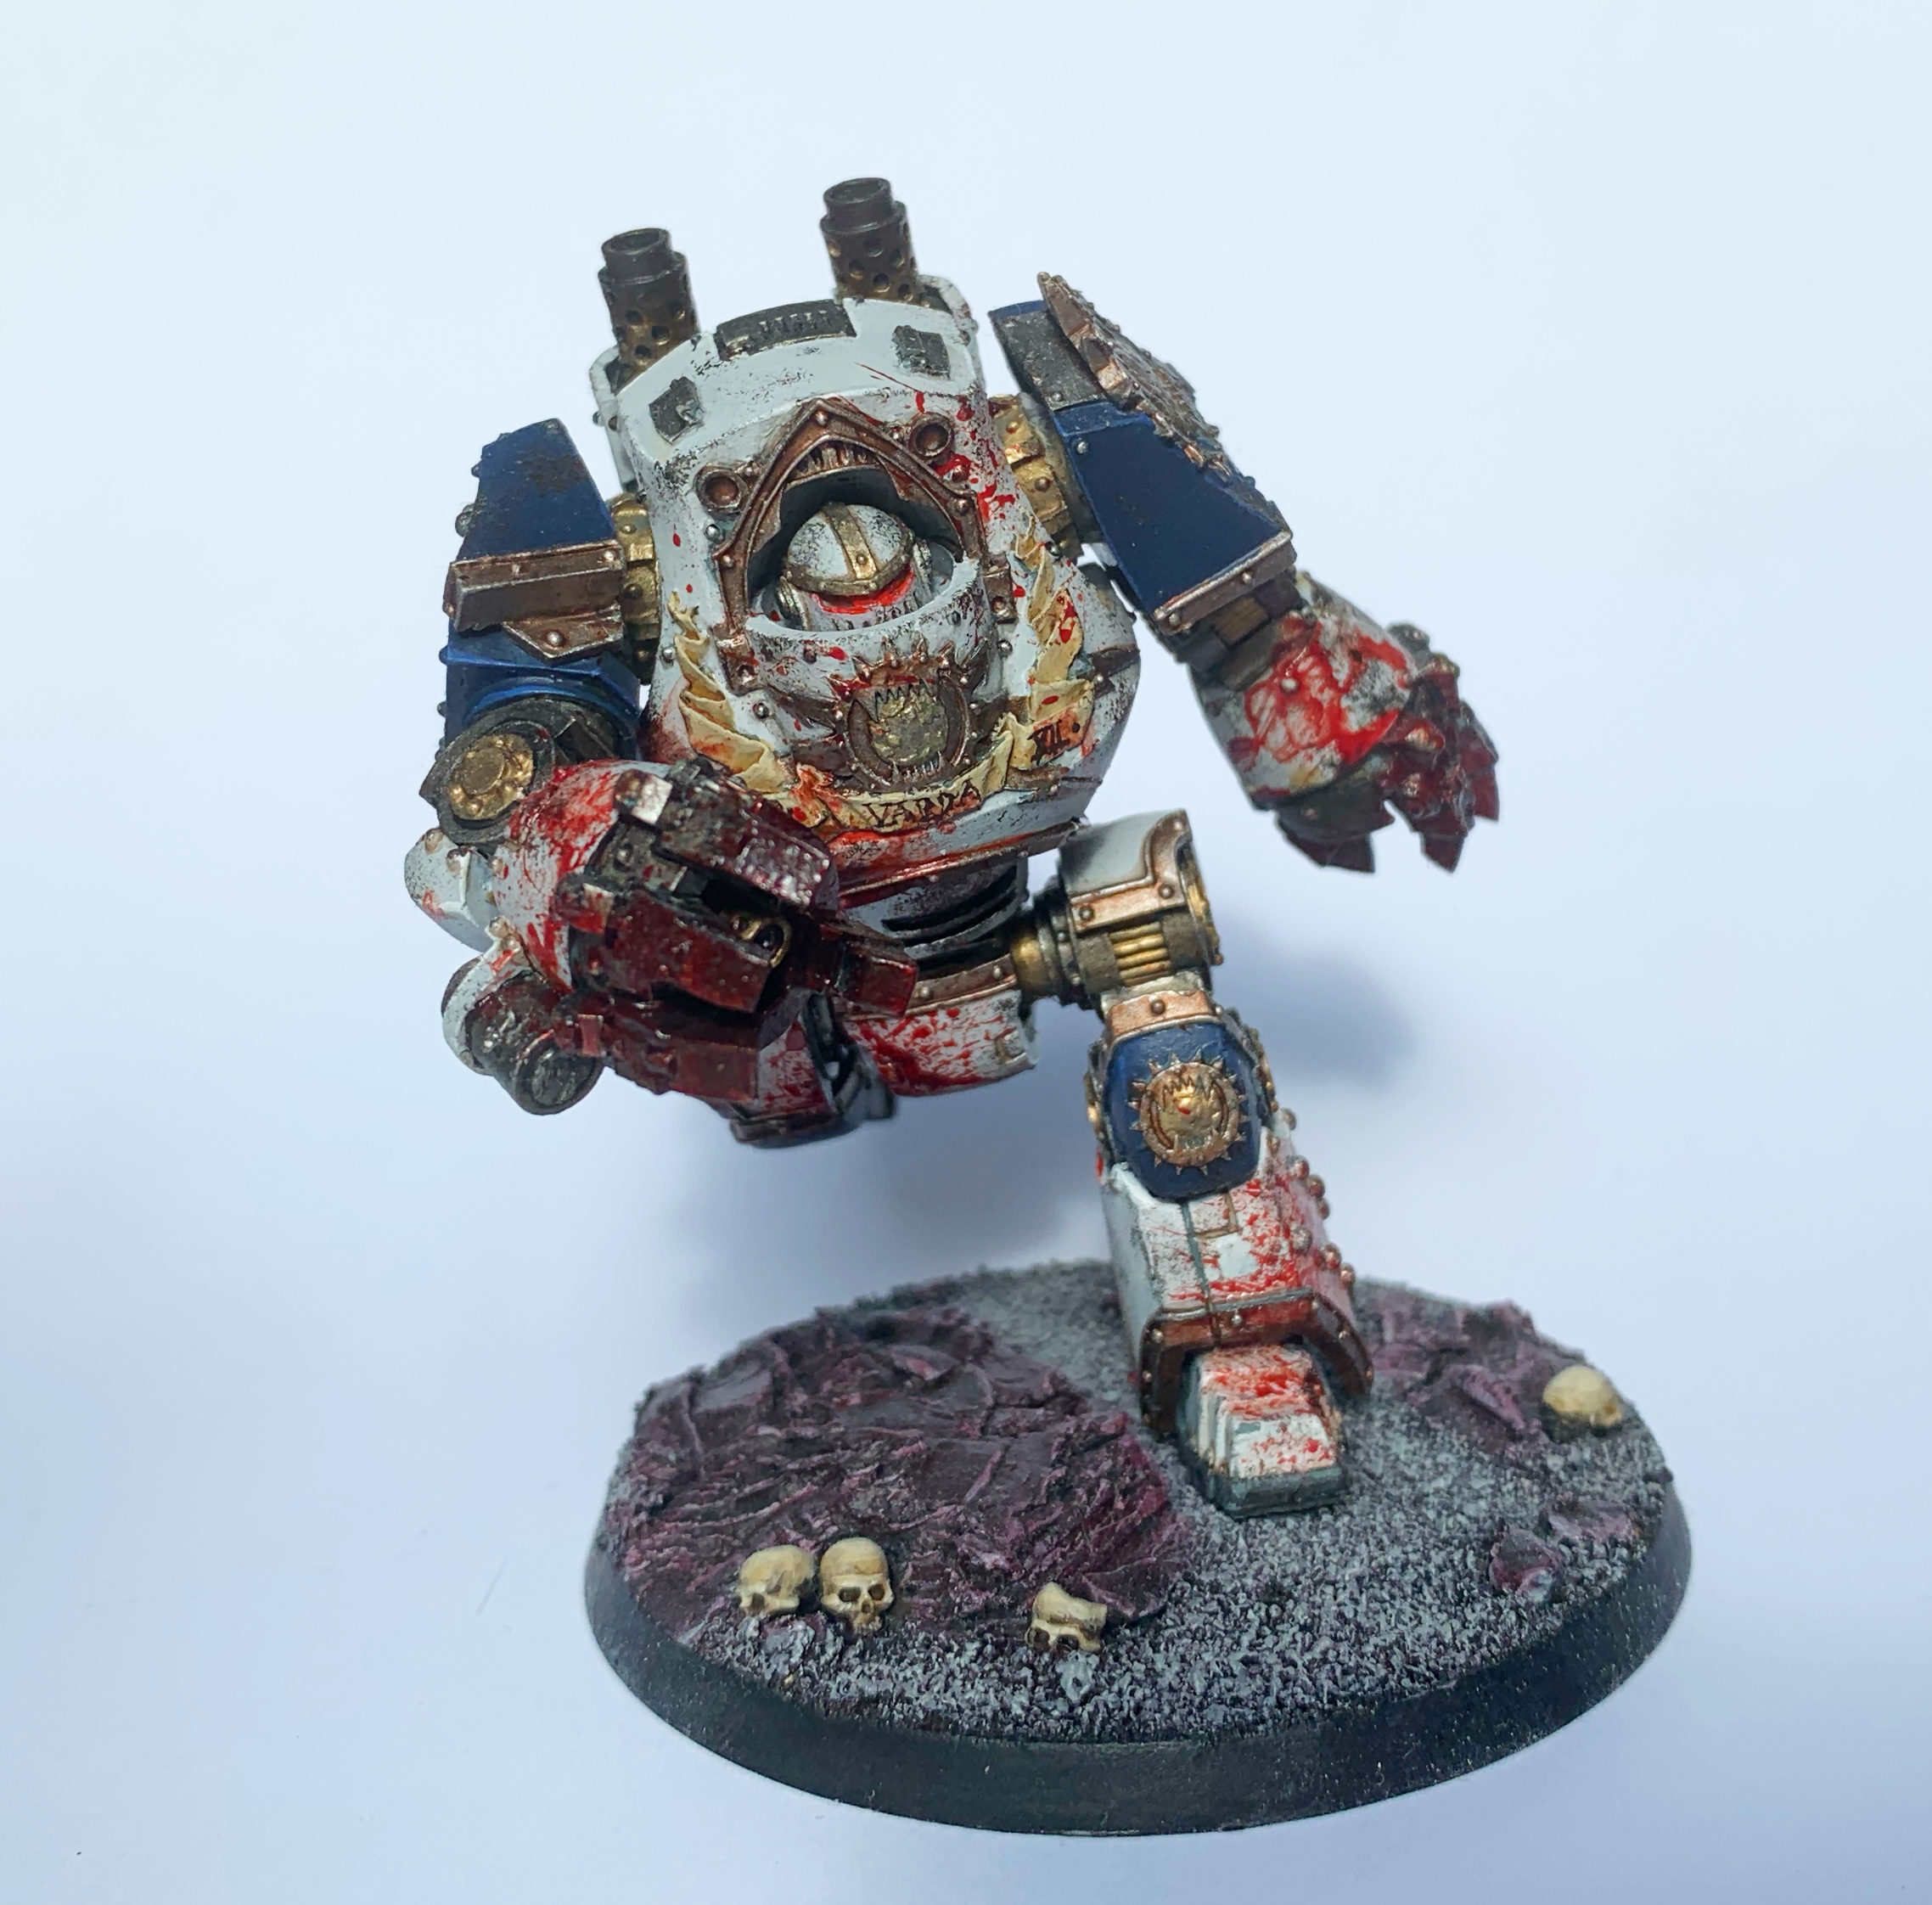
I pushed myself harder in February and it would also be in this month that I secured a new job at a huge company, with a nice pay rise and my notice would be handed in. It was really sad leaving, and in March I would say goodbye to a lot of wonderful people that I had worked with for the last few years at a company that I still love. I would get as good a sendoff as one could hope for in those strange times when we were all stuck working from home, and between all of that, I got the above Slaughter Priest finished too. But before I left, I’d finish up working on my first ever Salamander:
I was so proud of this one. It’s by no means perfect, but I thought I was hitting my marks with contrast, freehand, my metallics, blending… I was pretty damn happy to be honest. And then, riding a wave of confidence I decided to torture myself by dipping into the longest running project ever, my Warhound Titan…
That head took me a 3-day weekend of dawn-to-dusk painting and it damn near broke me, again. Guess I’ll soon have to figure out which panel gets some attention in 2022! By this stage, I had left Games Workshop and had started at the new place and I hated it. It started off ok, but the culture was all wrong, and it just felt soulless and weird. In April, I kept telling myself to just stick with it, and that it would get better, and that I only needed to do a year there for my CV and then I could move on…
I lasted 6 weeks before I handed in my notice and by May, when we could sit outside pubs again and enjoy life a little more as the virus seemed to be slowing down thanks to our vaccine appointments, I was, for the first time in my adult life, unemployed. And that, I loved. What’s more, in May, I painted the best thing I ever painted:
And, with everything I was going through, painting this mini broke me a bit. I don’t really think it was this mini, I just think it was a culmination of a year and a half of pandemic, changing jobs, various other things going on, but I quit the hobby and at one point I was genuinely thinking about selling all my minis and painting stuff. I’m not going to go through all of my mad thinking again, but if you want to read more about it, you can go through it all here. So because of all that, this place was a bit quiet for a big chunk of the summer…
I wandered in the hobby-less wilderness for a while there, but it wouldn’t be long beforeI would return, and when I came back, I would be coming back with some of the most popular posts of the year – the very first of the Lazy Painter’s Army List posts. I love creating these and they really helped get me back into the hobby, and finding my love for it again.
The other thing that really got me back into the hobby was gaming. I finished an army this year – my Necrons – and I’ve had a huge amount of fun with them in the second half of 2021. This may not be the most optimal list, but it’s been great getting back to the tabletop, and I’ve got a real urge to play against friends most of the time. I also joined an awesome Crusade group with a bunch of friends and it has been a source of enormous enjoyment all year round.
Painting this army to a nice tabletop standard also rekindled my enjoyment of painting in general and it wouldn’t be too long before I’d be picking up my brushes again. September was a particularly productive month, with me first satisfying my near-permanent itch to do some fun freehand with my Saint Katherine…
…before then working on one of my favourite projects of the year – my Blight-Hauler…
…so despite my desire to throw it all away, I was back with a vengeance and loving the hobby again. I guess it goes to show that we all have highs and lows, and in times of global plagues, isolation and upheaval, it’s easy to ride the lows a little too hard. Therefore, you need to remember that there’ll be highs again soon. Just worth keeping that in mind.
October was a little quieter, but I did get to paint the devil you see above and his heavy metal-inspired shield there, and this might have been the most amount of fun I had with freehand all year. Thank you for everyone on twitter who voted for me to use a Heavy Metal album cover for the shield – I hope you’re happy with my choice of Slayer’s Season’s in the Abyss as the source material. I also started my new job around this time and I’m happy to report that I’m still loving my new gig. Long may that continue.
I also got to complete a project that had been living in my head for years and years, by converting and painting the Stalking Scorpion – track down the full article on this blog for all the details, but it made me very happy.
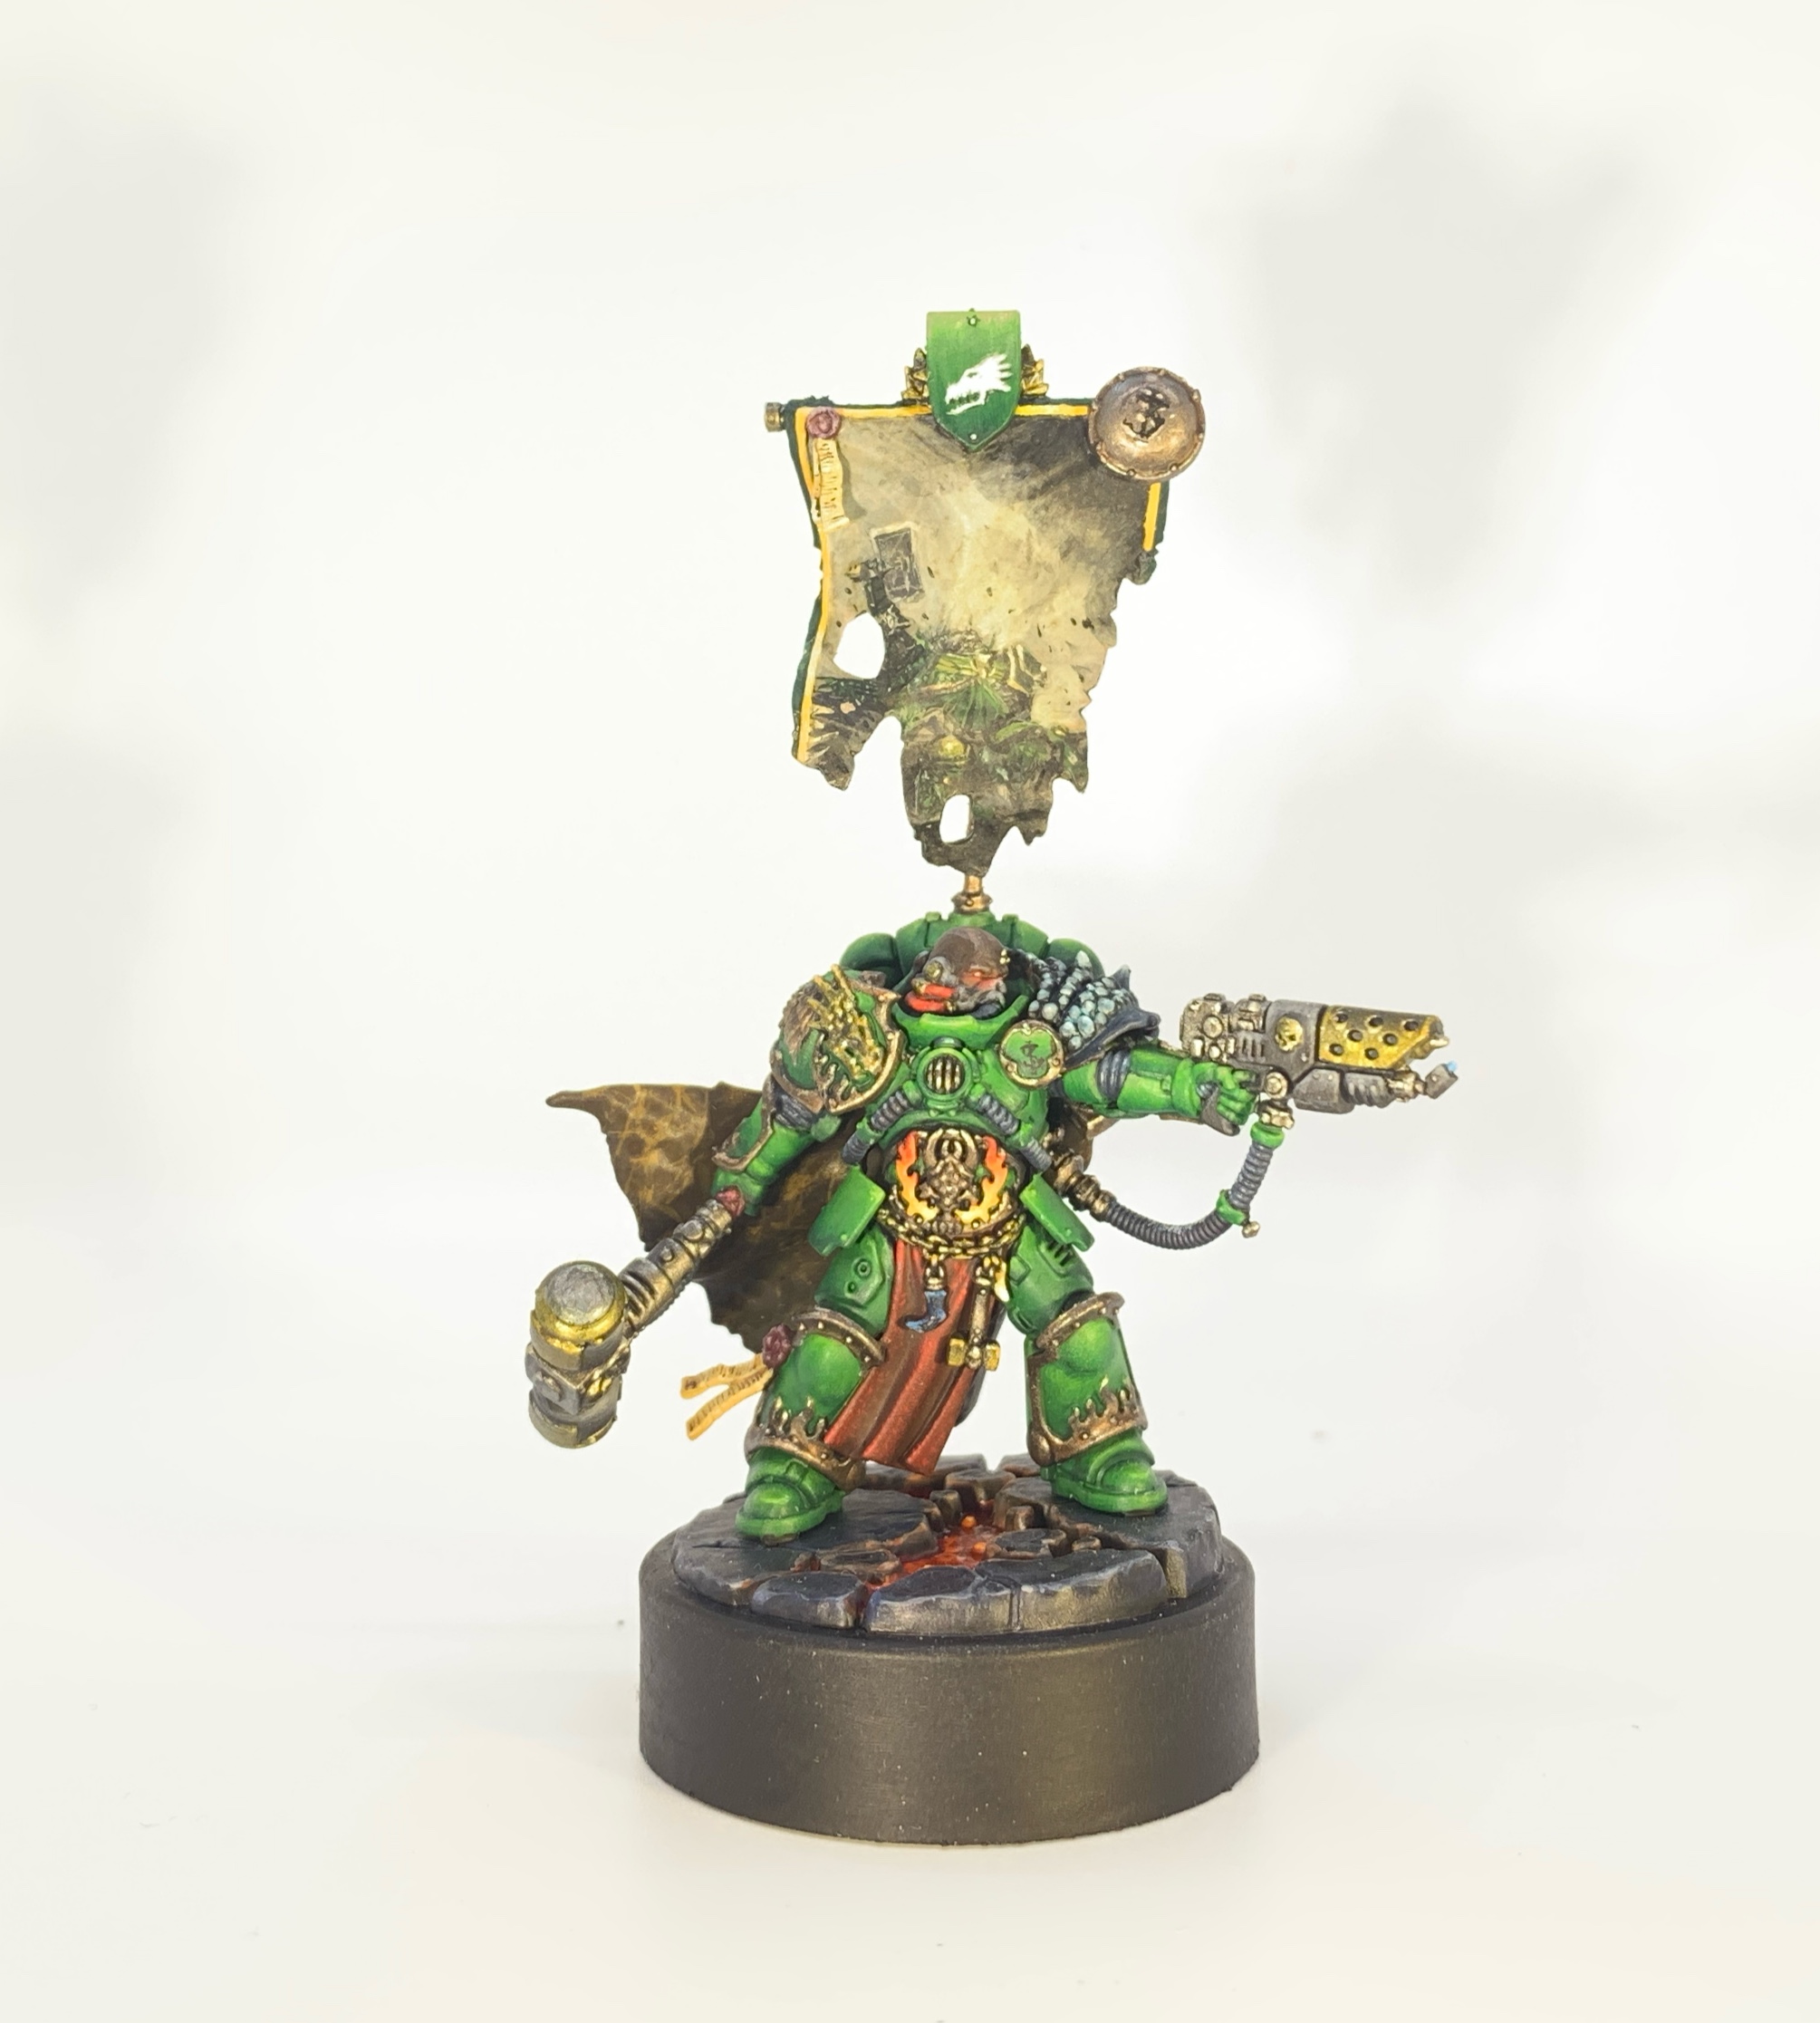
The big star of November was almost certainly High Marshal Helbrecht which featured a bit more freehand, and while I had to rush it out at the end, I’d rather have had another week to work on it. But I had so much to do and I got to post it on the same day that I attended Salute so it was lovely to see all of the positive feedback come in on a tiring, long day.
While there are a lot of floors in the above miniature in terms of how I painted it, there’s nothing that I can’t fix, and I really like how brave I was with some of the choices. I’ve never done OSL that strong, or attempted a banner quite like that. That’s something I want to take into next year – be braver, and take some more chances. A little less time in my comfort zone would do me good, right?
And here we are in December! It’s cold and wet, there’s a new variant of Corona doing the rounds, World War 3 might kick off any moment and here I am still painting! These dragons got done and a handy tutorial to accompany them came out on the blog just a little while ago. Those are likely to be the last things to get finished this side of Christmas given everything that’s going on (as ever, it’s a busy time of year) but I’ll still be painting through to new year, so expect to see more from me before 2022 goes live. As ever, you’ll hear about it here first. I’m hoping I get some time to finish off this guy…
Who Games Workshop were kind enough to send out to me, and I think he’s such a cool mini that I want to do him justice and paint him in a fancier style. That’ll take me some time, and I just want to say if you’re an aspiring painter, the Shadow Throne box offers you a great selection of amazing units and characters to test out schemes and styles on with a lot of variety on offer. But I digress, because I’m also happy to have these guys to work on too:
And while these Vindictors won’t be as fancy as the Custodes chap above, they are the penultimate piece of my Stormcast jigsaw puzzle, and by the new year, I’m hoping to be able to field my Ashen Stars as a 2k point army and get back into AoS (it’s been some years). And speaking of plans for next year…
Heresy & Heroes in 2022
It’s about time for me to be thinking about my hobby plans for next year. As ever, with any plans I make, some of these are bound not to happen or go wrong, and I’ll probably quit the hobby and come back later or something like that. But these are my good intentions that the roads to hell are bound to be pathed with come this time next year. To start with, I want more armies…
First up (and thanks again to twitter for helping me decide the order of this), I am going to embark on a Maggotkin of Nurgle army. I love painting gross and gribbly things, and the new book is the perfect chance for me to dive into this army. I’ve worked out my list and will be sticking to that.
Then, I’m going to paint my first Primaris Blood Angels. Long time readers will know that I love this army, and I now have all the pieces I need to put together a 50 power level list. Well, I actually have plenty more and could probably put together 100 power, but 50 power is a good place to start I think. Now, the crazy part of this plan is that I want to have both of these projects completed in 26 weeks. By the end of June, I should have both to play with if I stick to the complicated spreadsheet that I’ve been working on. Will all of that actually happen and be on time? Who knows!
My quest to do better than a finalist pin at Golden Demon will hopefully continue. It’s great to hear that there’s a US version happening at Adepticon, but I’ll be waiting for a UK one to crop up again and hopefully it won’t be too long before we get word of this. Will it be in May as per? We’ll have to wait and see, I guess. And once those armies above are done, I intend to get to work on my 2023 entries. After speeding through two armies, it will be great to spend months on a single mini again!
I’m almost a bit nervous about putting this one out there, but why not I guess – but just know that I’ve been playing with this idea for a year now and still haven’t done anything with it, so all bets are off. I may *MAY* start a podcast. We shall see. No promises but if I can get my head around it all, and get everything I need together to make it happen, you’ll hear about it here first. If I do do it though, this could be a lot of fun!
And of course, you can expect plenty more of the usual throughout 2022. There will be reviews, analysis, lists, painted minis, reports from events and everything else you have come to expect from this strange little blog of mine. I hope you’ll tune in and enjoy it all, and as ever, I look forward to getting the content out to you. Onwards (to the new year)!
It’s time to get gross and gribbly, folks. Games Workshop were kind enough to send me a copy of the brand-spanking-new Maggotkin of Nurgle Battletome and I’ve now had the time to get my head around this disgusting book and I’ve come up with a stomach-churning army list for all of you nauseating lazy painters out there.
Before we crack on with the post and the list, a quick word about this book, and that word would be, in the very best way; yuk. It’s a well put together battletome and a book packed with all the grossness you’d expect from a Nurgle product. The list of units is tight, the rules are very fun, and I’ve had a lot of fun reading this book, even if I have to put it down every now and again because it makes me feel queasy. Now, let’s make a list.
If you’ve not read one of these posts before, here’s the deal; I take a brand new battletome and try to create an army that is low on model count, packed full of interesting things to paint and with little duplication. I do this so that all of you lazy painters out there (don’t worry – I’m a lazy painter too) can put together an army that you can paint quickly to enjoy games with it on the tabletop. That’s why I’ll also talk tactics a little bit here and I always try to find some synergy with the units. I doubt I’ll help you win tournaments, but if I can help you pick out a low model count army that will be fun to play with, then I’m doing my job.
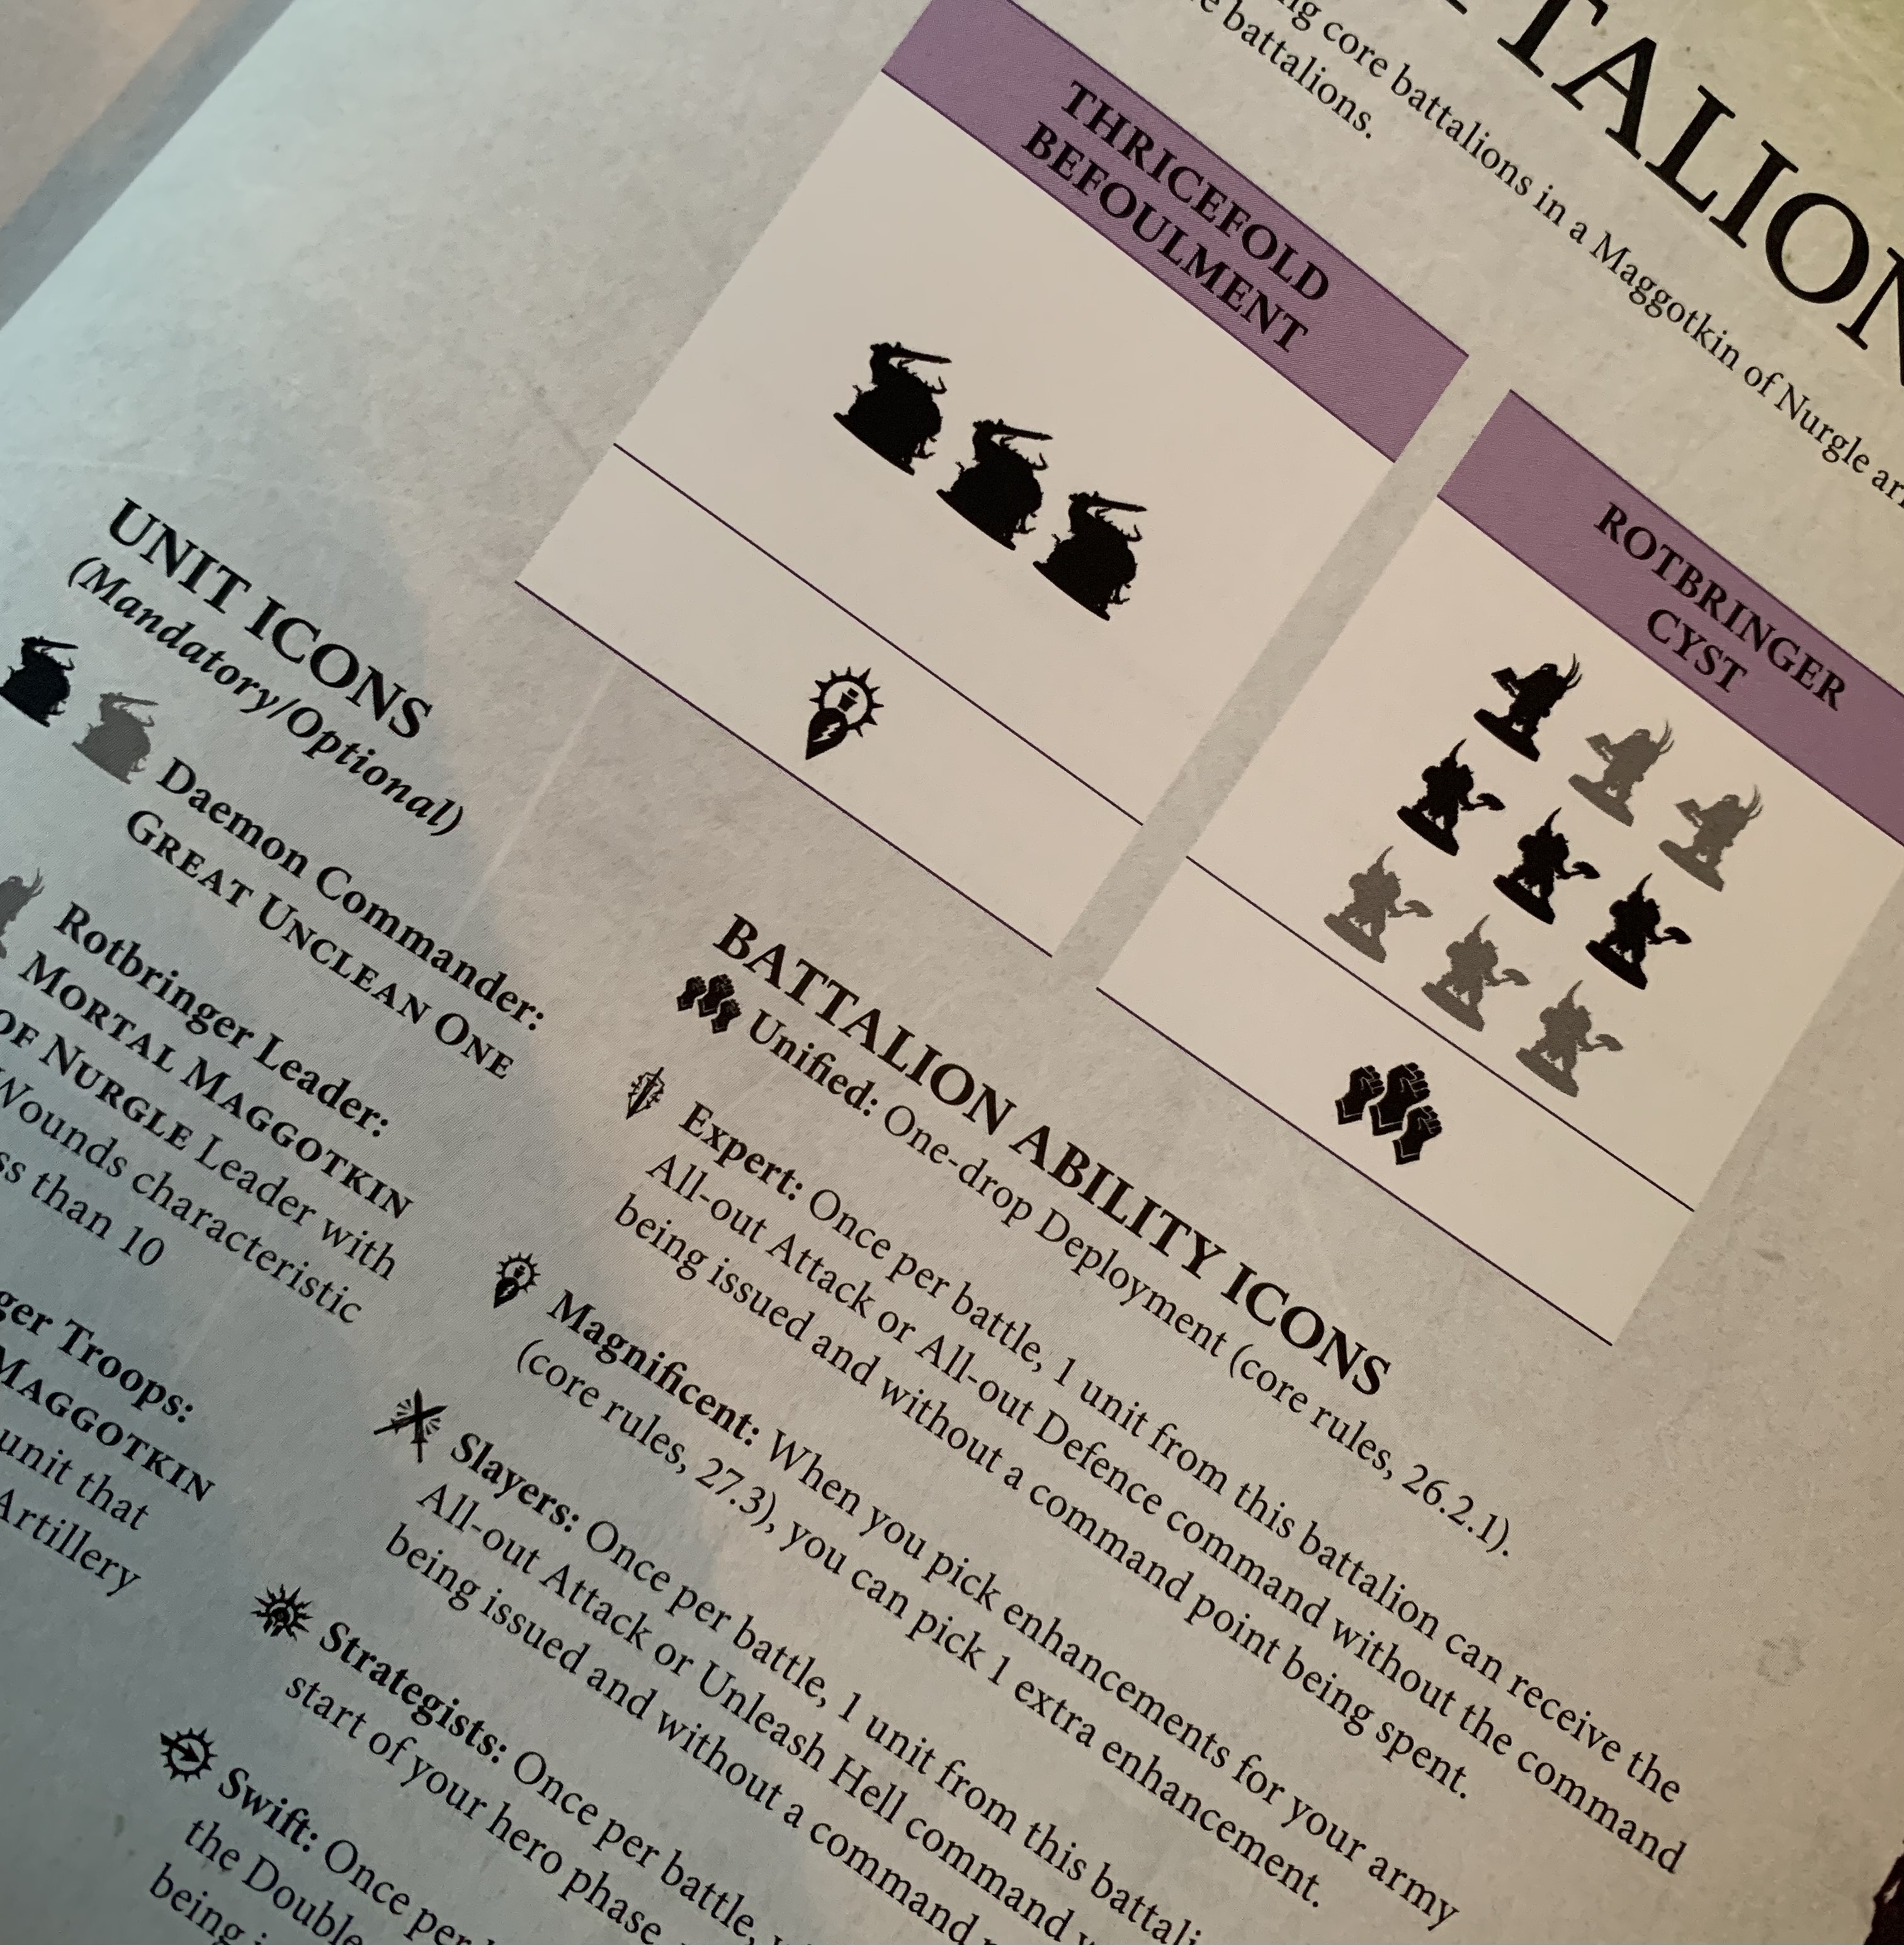
Now, you may be thinking that I’ll be going down the “3 Great Unclean Ones and a bunch of plaguebearers” route but I won’t be. For a start, I wouldn’t have the patience to paint 3 Great Unclean Ones, and the 30 Plaguebearers you need to bring for matched play is far too many of the same mini for my liking. Also, if you were running that list at 2000 points (that’s what we aim for here), you could also squeeze in an endless spell and if you take the Befouling Host Plague Legion rules (which you would), you’ll have two Feculent Gnarlmaws to work on too. That’s 36 models! Those are rookie numbers! Also, it’s a bit beardy for me, though it does allow you to use the Thricefold Befoulment Core Battalion (which is pretty decent):
So instead, I’ve put together a list that puts that to shame and gives you a lot of fun painting challenges, variety, and far fewer models too. What’s more, I reckon it will do ok on the tabletop. Let’s take a look…
Leaders
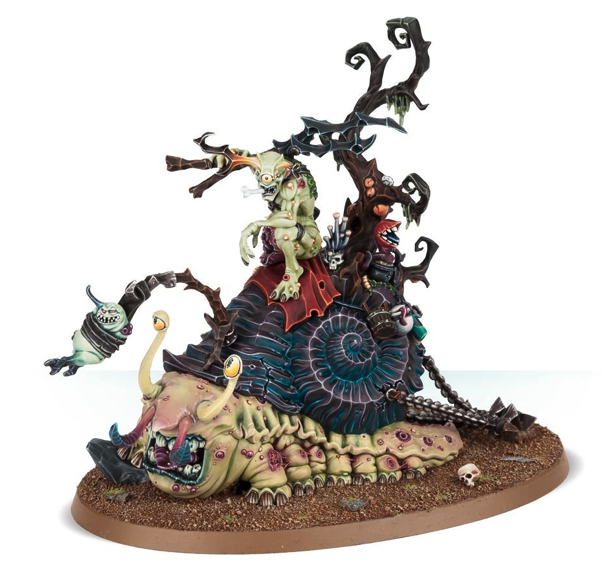
Go big or go home, I say. That’s why the Glotkin is my first pick. They use up a ton of points, but given that this is a Nurgle list, the fact that they clock in at 700 is very pleasing. Also pleasing are the 20 wounds, the sheer damage it can do, and the Abundance of Flesh spell is a particular favourite of mine – on a 6+, one friendly unit within 14” gets to add 1 to their wounds characteristic until the start of the next hero phase. Very tasty (in a vomit-inducing kind of way). I’m also throwing Horticulous Slimux into the mix for the painters to enjoy. His Beast Handler rule is wasted a bit here (as I’m not taking any beasts) but we’re taking him for his ability to help us plant another Gnarlmaw and, well, because he looks cool.
Battleline
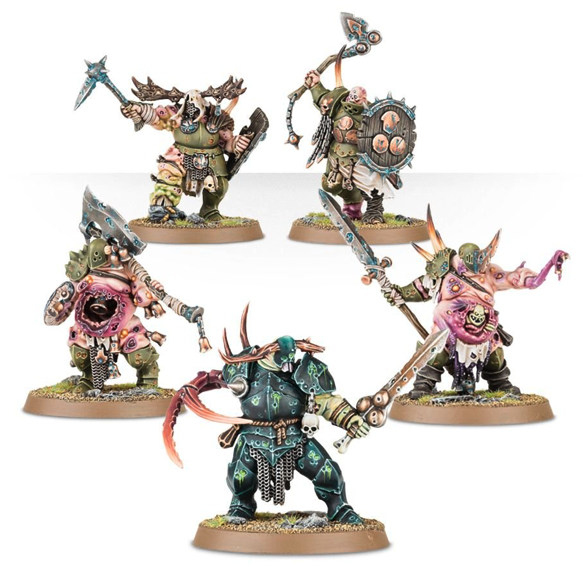
We will be taking two units of 5 Putrid Blightkings. These chonky chappies are just nasty (in a good way) and at 4 wounds each, with their 4+ save and of course Disgustingly Resilient, they should be hanging around for a while. And for a bit of variation, we’re going to bring 10 Plaguebearers – they’re literally here so that you don’t have to paint a third unit of Blightkings, you get a third battleline unit, and they look kind of nice too (the models may be old, but I think they’re more ‘classic’ these days).
Other Units
We’re going to take a pair of Pusgoyle Blightlords because anything that moves more than 4” base in this army is a boon, and they can deal out some mortal wounds if you buzz them into the opponent’s chaff units. And because we can take one for free, we’ll have a Feculent Gnarlmaw too – it’ll be handy with how this army plays once we rack up some disease points to bring it forth.
Army List
The Glottkin (Leader, Behemoth)
Horticulous Slimux (Leader)
5x Putrid Blightkings (Battleline)
5x Putrid Blightkings (Battleline)
10x Plaguebearers (Battleline)
2x Pusgoyle Blightlords
Feculent Gnarlmaw
Points: 1995
Model Count: 26 (25 above and a second Feculent Gnarlmaw that Horti plants)
Army Name: Slow & Spready
Additional Stuff:
This army is really all about sitting back and letting the enemy come to you. Spread out and get the objectives you can, but you will not be racing up the battlefield with this damn slow army. What you have are a lot of wounds, decent saves, ways to improve your units’ durability and an army that your opponent won’t want to get anywhere near. And with Disgustingly Resilient on your side too, you should be able to take a lot of punishment, and once your opponent reaches you, they are in for a really hard time. You’ll be healing your own wounds while inflicting a lot of damage on them. You will need to bring some tracking tools with you to keep an eye on disease points and contagion points, so there’s some maths to be done here, but anything getting too close to you will very much regret it.
I should also say that if you wanted to make it slightly more competitive, I’d probably swap Horti out for a Lord of Afflictions who will give you a bit more movement and buff your Pusgoyles too. But I think that snail riding gardener is one of the most characterful models in the army (maybe even the game) and I’d be loathe to leave him out. Or, if you want to make him play a bit more of a roll, drop the Pusgoyles for a pair of beasts. You’ll lose a lot of manoeuvrability though if you do that, but it might not be a bad call if you’re happy to sit back. Either way, you still won’t need to paint more than 26 models for the army (even if one of those is the monstrous Glottkin).
I’d also give this army the Blessed Sons Plague Legion rules as it will help to infect all of your enemies and when combined with the Spread Rampant Disease Grand Stategy, this could be a real winner in matched play games.
It’s also worth stating that while this book definitely rewards you for taking either mortal or daemon armies through the buffs and boons characters confer on other units, you don’t get the sense that you lose out by taking a blend of mortal and daemon. There are plenty of buffs in this short but flexible roster. It’s really nicely balanced in that sense, and it gives you lots of options depending on how you want to build things. A very well done to the writers on that score.
One last note from me – I am going to be building myself a Maggotkin army in the new year. My Stormcast are nearly done and I like the idea of not really having to worry about a movement phase. Plus, I have so much fun painting gribbly things, I know I’ll have a blast. When work get under way in the new year, you’ll hear about it all here first. Onwards!
Well, the last painting tutorial I put up here went down rather well, so I thought I’d chance my arm at another one here on the blog and this time, I am going to show you, through the medium of my questionable photography, how to paint a “Star-field” cape – a cape that looks like it’s showing stars in a galaxy. Something like this:
Obviously, I’ve used this technique for Aeldari things, but it could be used on Chaos Space Marines or even loyal Space Marine capes. It’s a fun little technique that once again uses the “Drab Four” – Abaddon Black, Eshin Grey, Dawnstone and Administratum Grey, though we’ll also be adding in the 5th Beatle of this group; Celestra Grey later on. It’s a fun effect, and I hope you’ll find it useful in the future.
So how are we going to use our Drab Four? Well, first off, we’re undercoating with Abaddon Black – a smooth coat over the whole cape is what you need. But it’s also worth considering that this tutorial is also going to get you away from the idea of ‘Black and White’. Pure black and pure white don’t really exist in the real world, and it’s a bit of a trap that many a hobbyist falls into – thinking that the lightest point is white and the darkest point is black, and that’s very rarely true. Actually seeing colours and shades is a hard trick to learn and very few of the painters you really look up to will push the tonal contrast quite this far unless the particular style dictates. With all of that being said, Abaddon Black is considered quite a weak black (more of a very dark grey than anything) so that’s why we’re ok to use it here. And besides, we’re going to cover it with something else later. Here is our “black” cloak:
I’m not entirely sure why you needed a picture of a black-painted cloak, but I took the picture so you’ll have to put up with an image of my gross hand. But this is going to form the basis of our cloak before we start mixing paints and adding them to what we’re doing. First off, here’s how we’ve mixed things up:
Now, I promise this will make sense in a second, but we’re going to use the Black-Eshin Grey mixes to give us the “clouds” that we associate with galaxies. Then we’re going to use our lighter greys to create the actual stars. Here’s what we do with those darker shades:
I know the above is very subtle but trust me, there’s some different paint on there – this is why I didn’t do full step-by-step photos of the last tutorial because so many of the steps just looked black. But I picked out a rough pattern and then for the next couple of steps, using the above mixtures, I reduced the coverage – painting inside the shapes that I began to define in the above image.
Do you see how I kept the shapes loose and rough here? There are no straight lines in the brush-marks there. Now, You could take this one further with a 1:1 Dawnstone/Eshin Grey mix if you wanted to push the contrast a little harder, but this will do for me here. Now it’s time to paint some stars.
I’m not often an advocate of using a size “000” brush, but whatever helps you get the finest point is worth it here – if a tiny brush gives you the confidence to do this, have at it. You just want tiny dots, and you want them to not have any sort of geometric pattern – pure randomness is better. The above was done with pure Dawnstone, and next, we move on to pure Administratum Grey:
Some stars shine brighter than others, and predominantly here, you’re going to be placing tiny dots of Admin Grey inside bigger dots of Dawnstone. Again, use the best, sharpest tip you have on a brush for this work. Don’t press into the mini – just let the very tip of the brush give the mini the tiniest peck. A soft little kiss is all you need.
Then you’re going to cover it all in a shade or a very-thinned-down contrast paint. This will help to blur the edges even more, and make it more… I don’t know what the word is… “galactic”? Those images you see from Nasa don’t show grey galaxies, right? They are often in different hues like pinks, blues, greens, purples, reds… and while I used Carroburg Crimson on the above, you can use any shade of paint you want. But it needs to be as thin as a Citadel shade paint or you’ll lose a lot of the detail you’ve put down.
And finally, you’re going to pick out a couple of these stars (or a few) and you’re going to give them the tinniest dot of Celestra Grey, because again, some stars shine brighter. And that’s how I do star-covered cloaks or capes. maybe the above images don’t sell it enough thanks to my manky fingers and the fact that the mini is going to be several times as large as it actually is, but look at those two minis at the top of this post again – that’s what it will look like in real life. And if you want to push it, you can add more steps of grey galactic cloud, make the patterns more intense… have a play. I’m sure you’ll have some fun.
It’s nice to get some tutorials back on the blog, and if you have anything you’d like me to make a tutorial of, just let me know on Twitter or reply to this blog post. More than happy to do more of these for those that want them. Onwards!
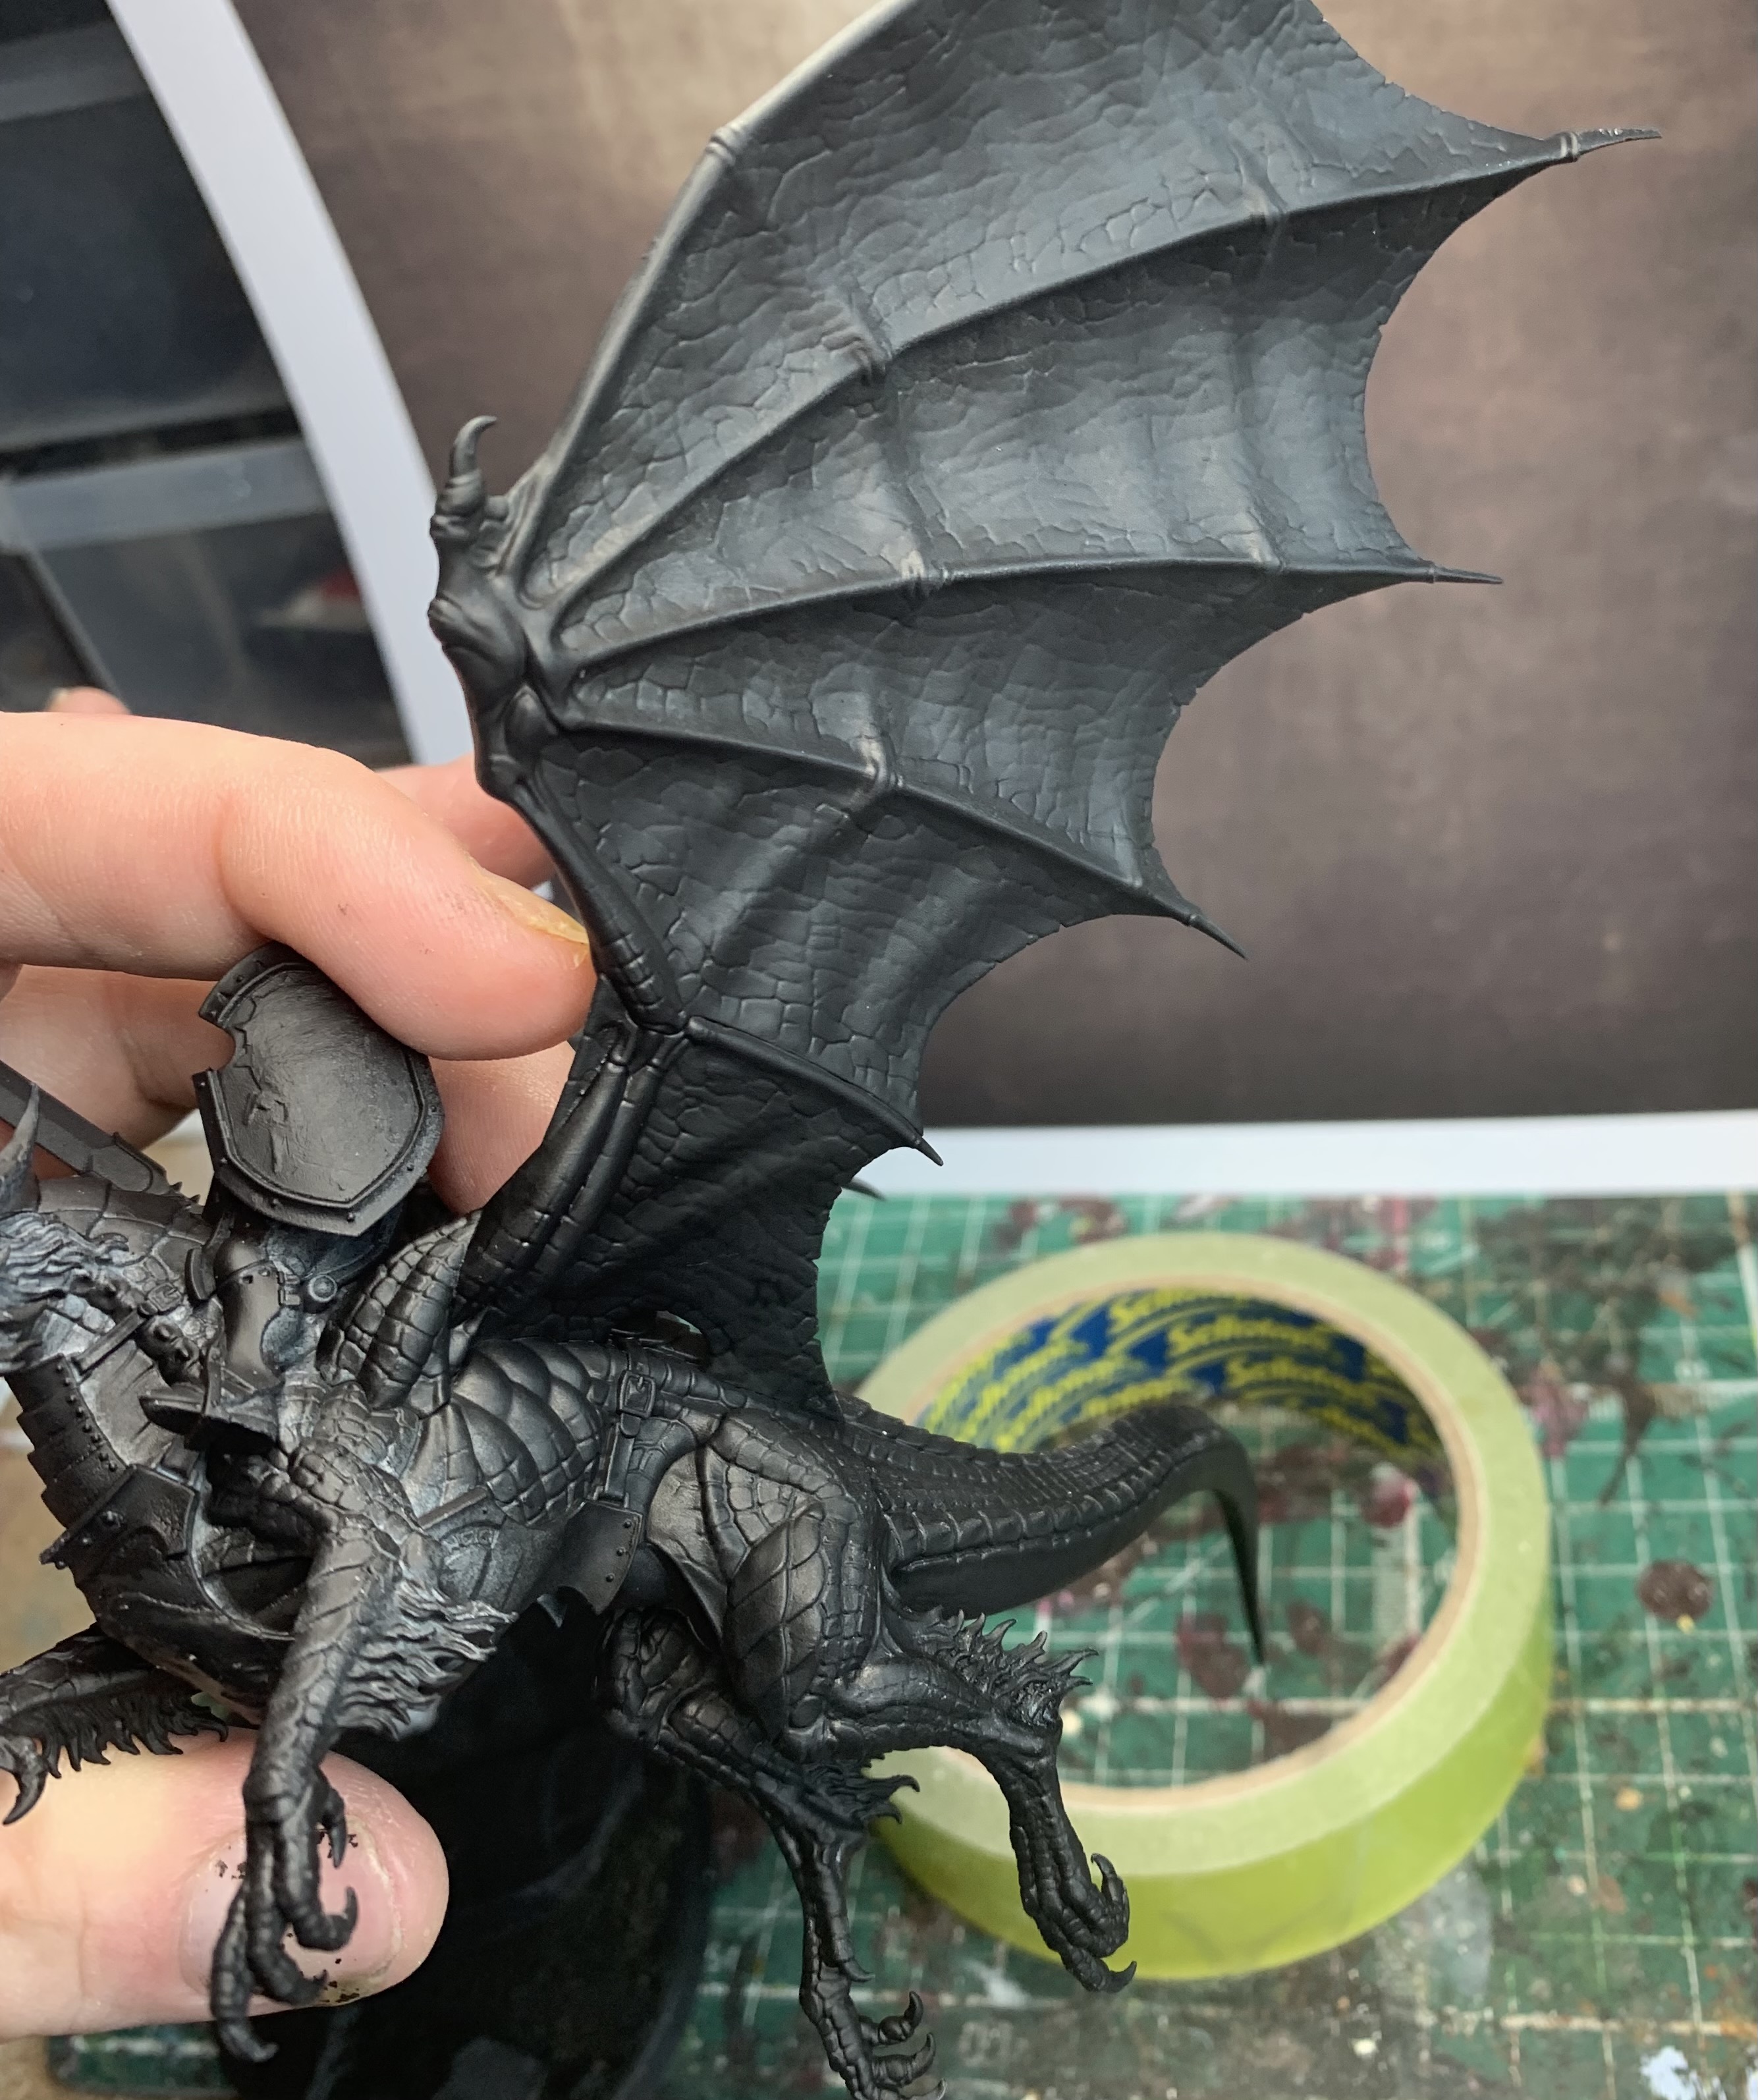
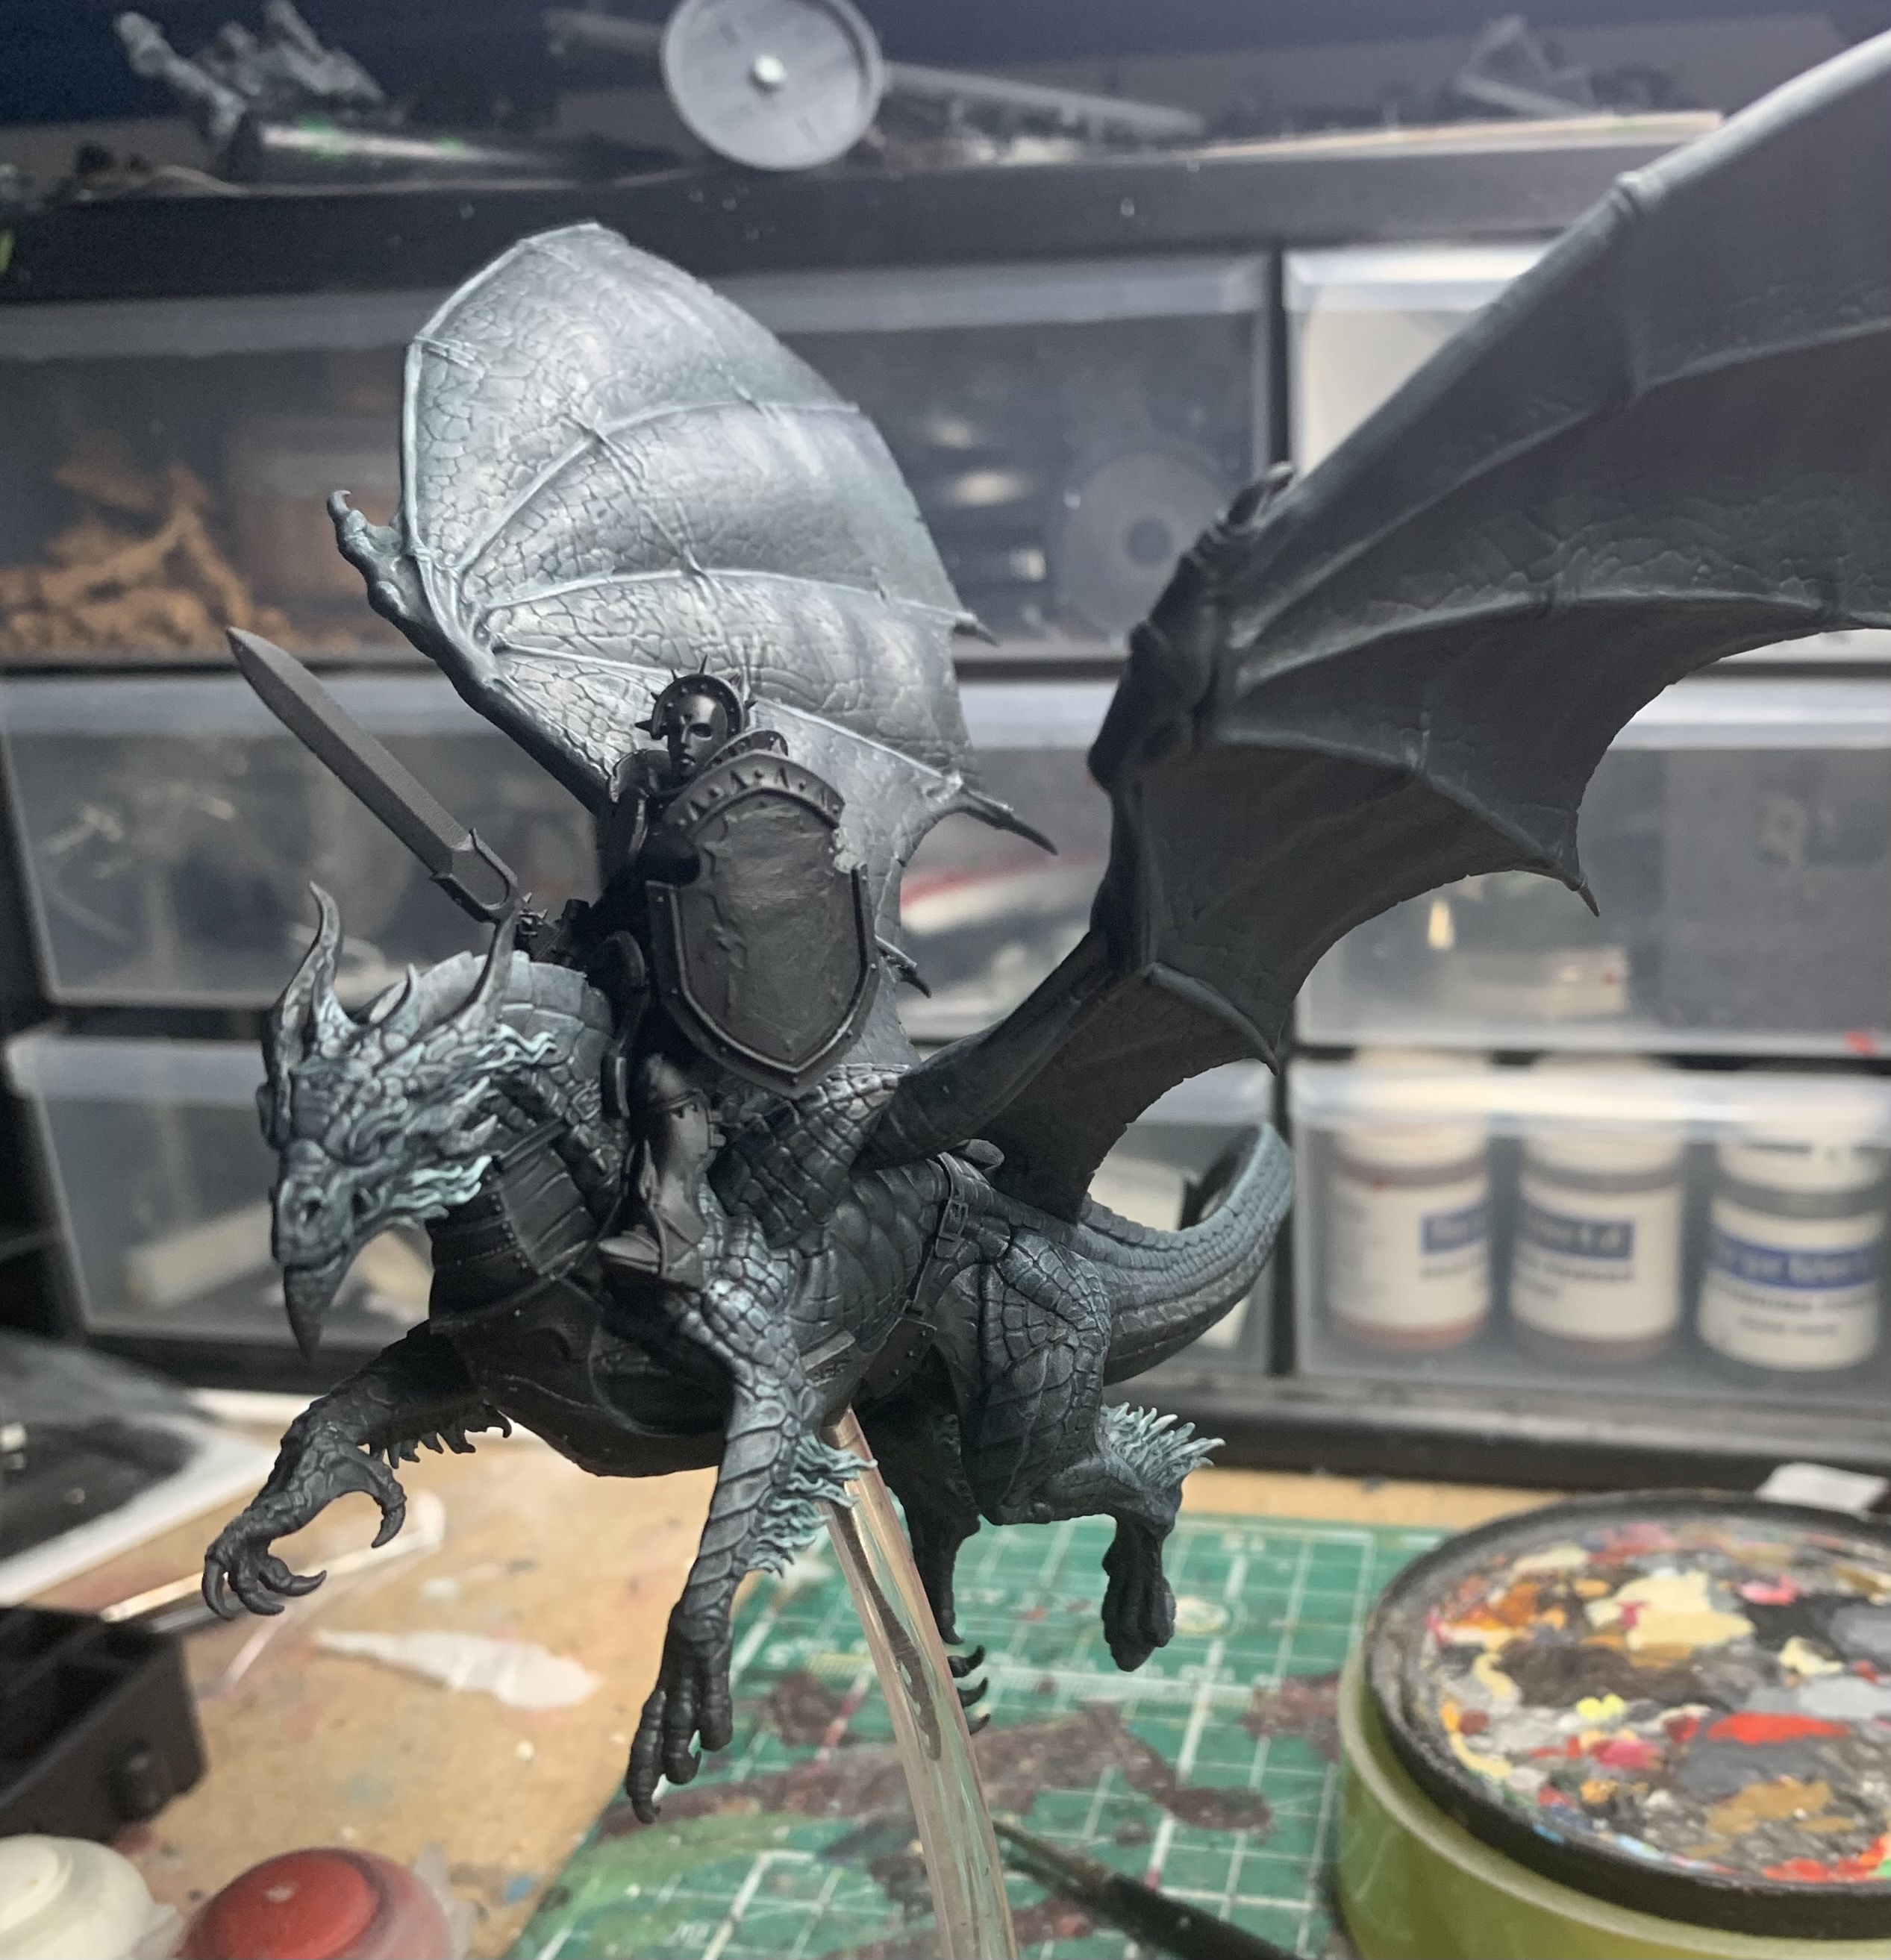
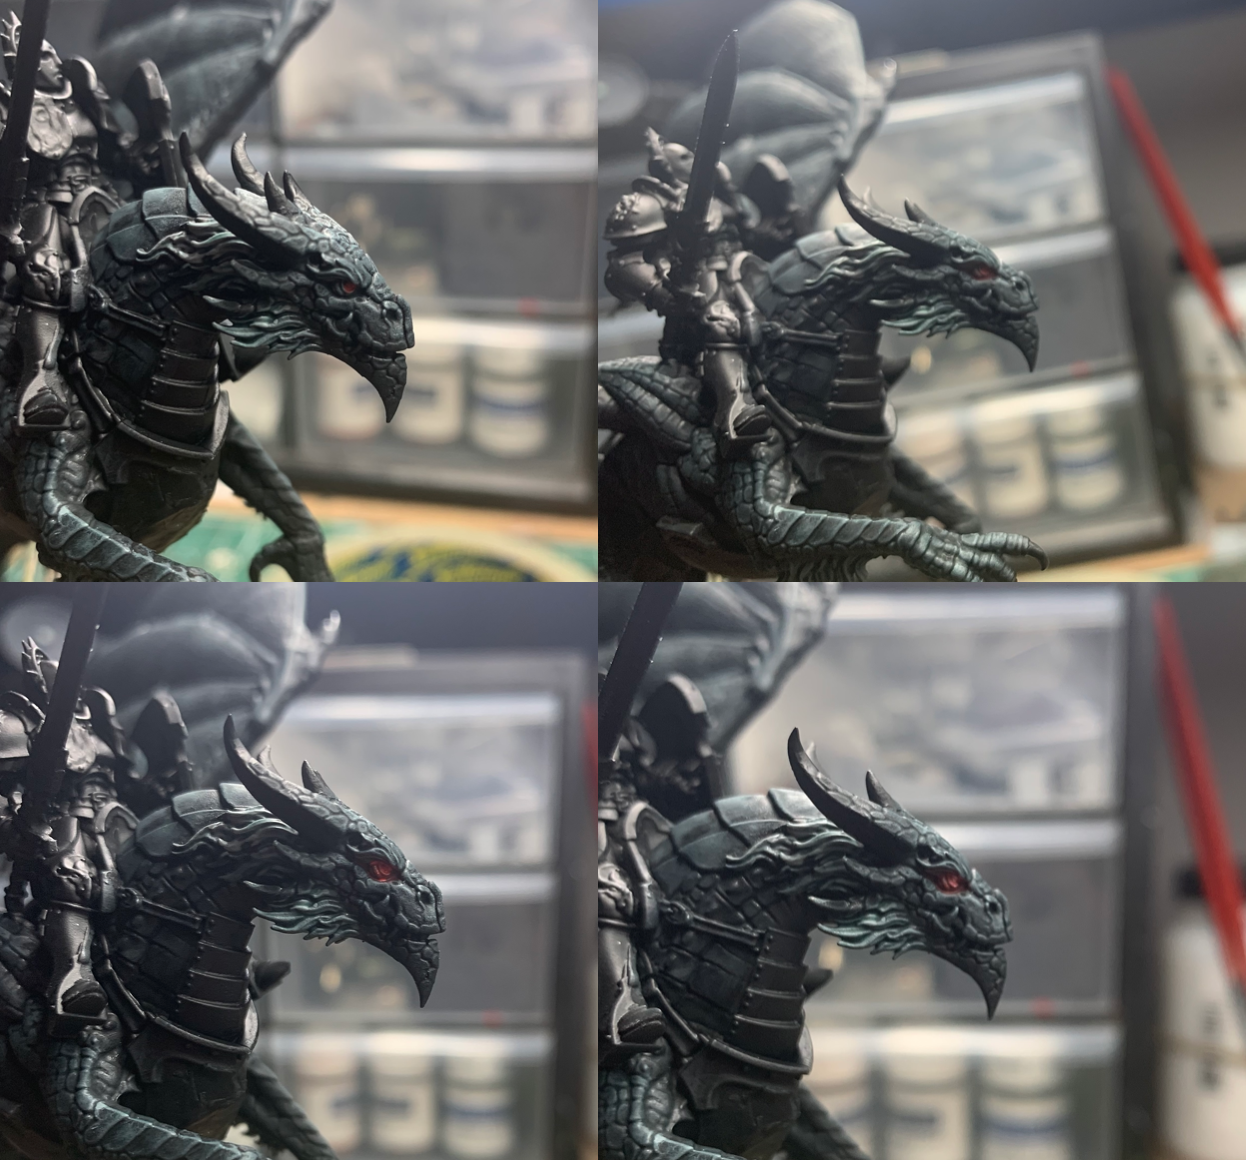
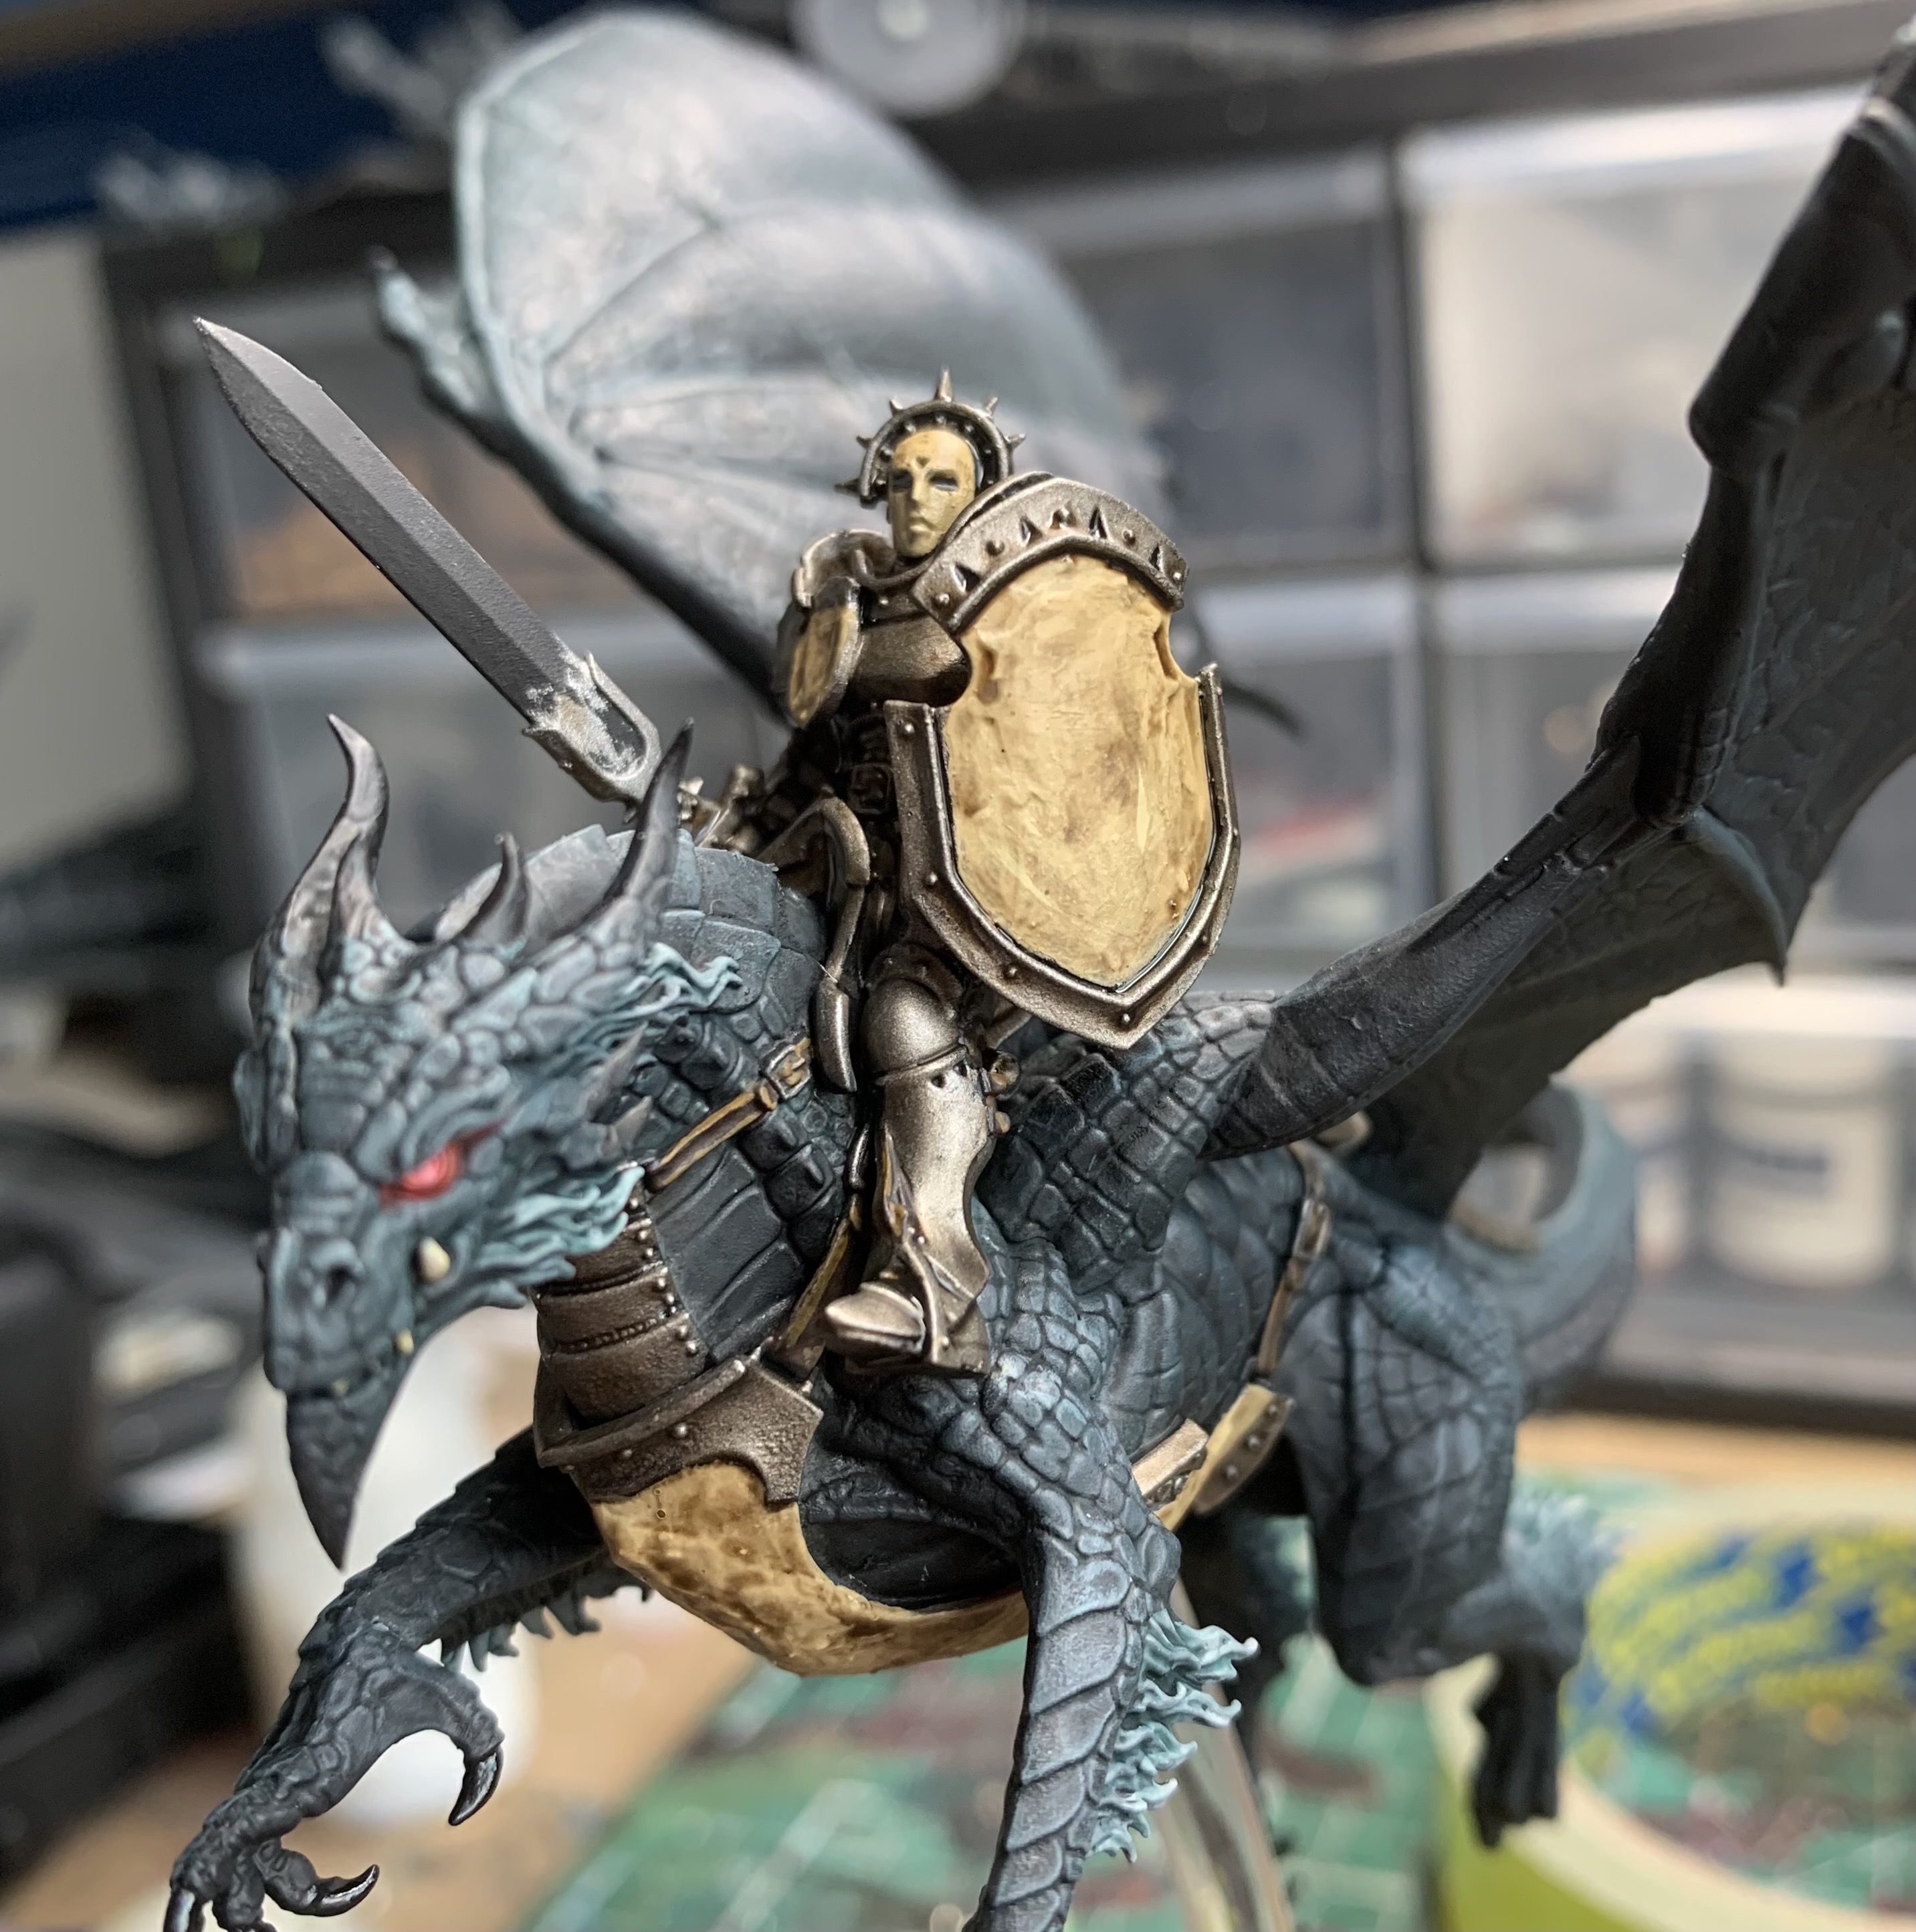
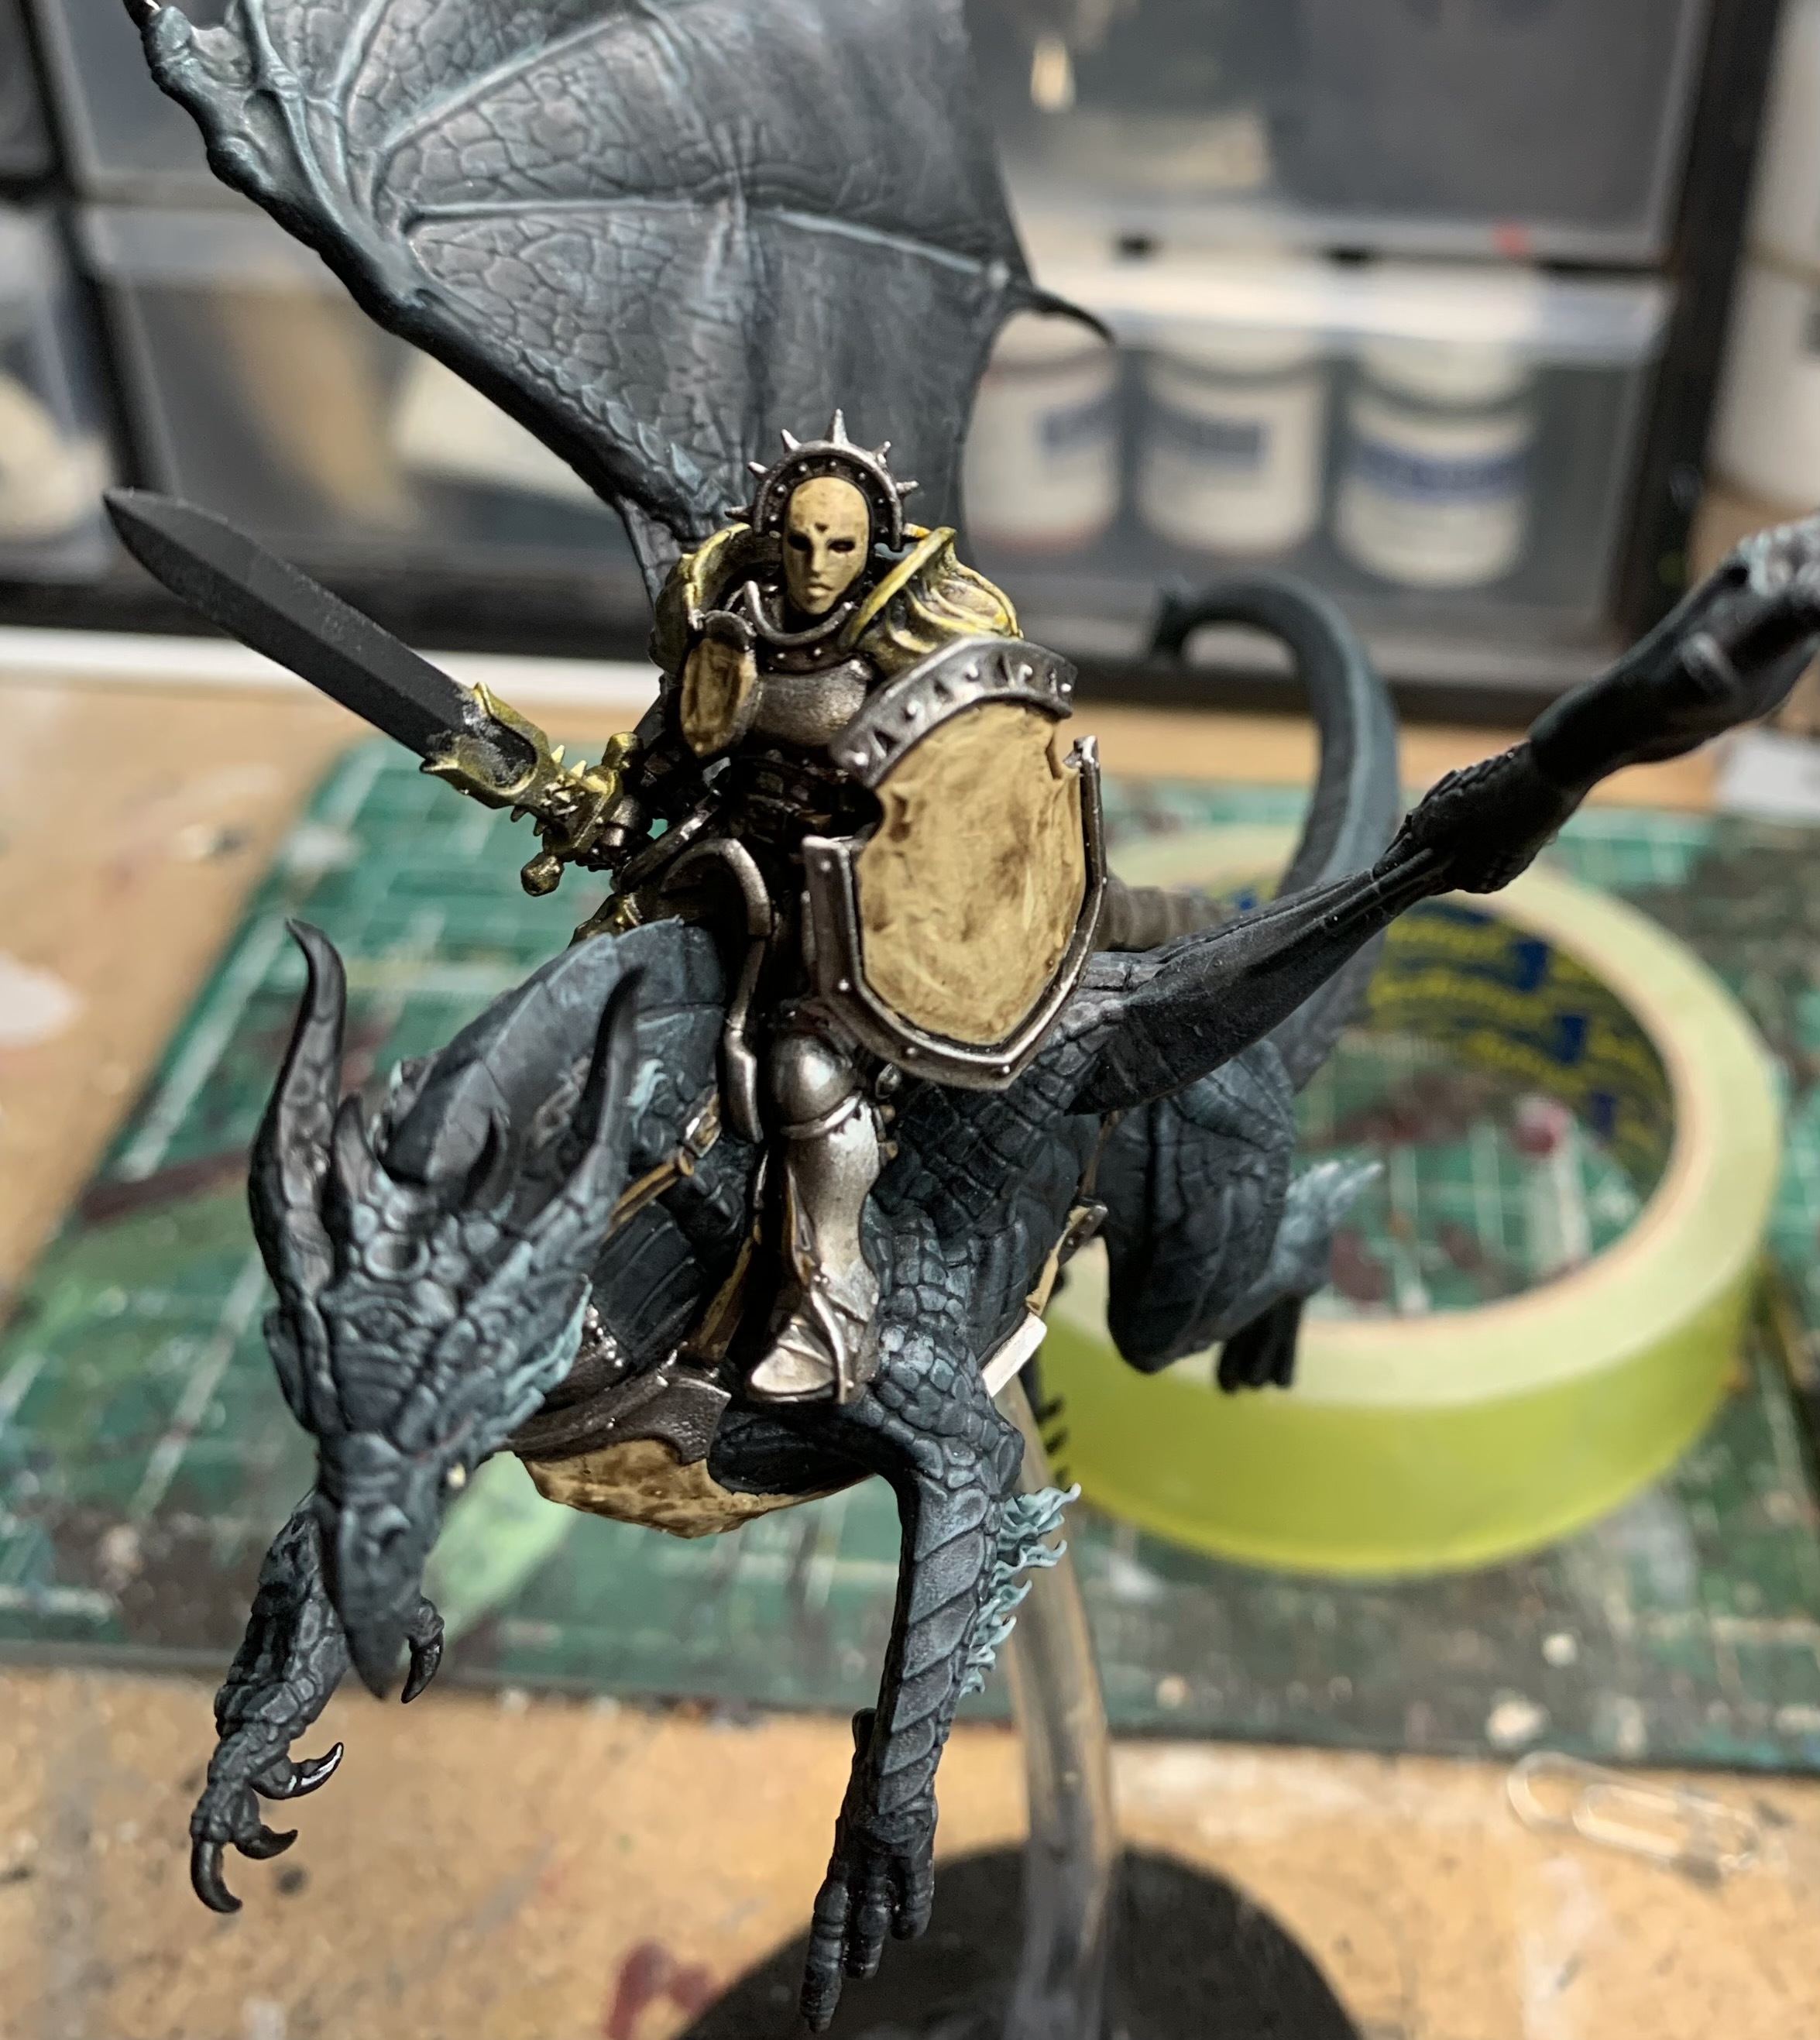
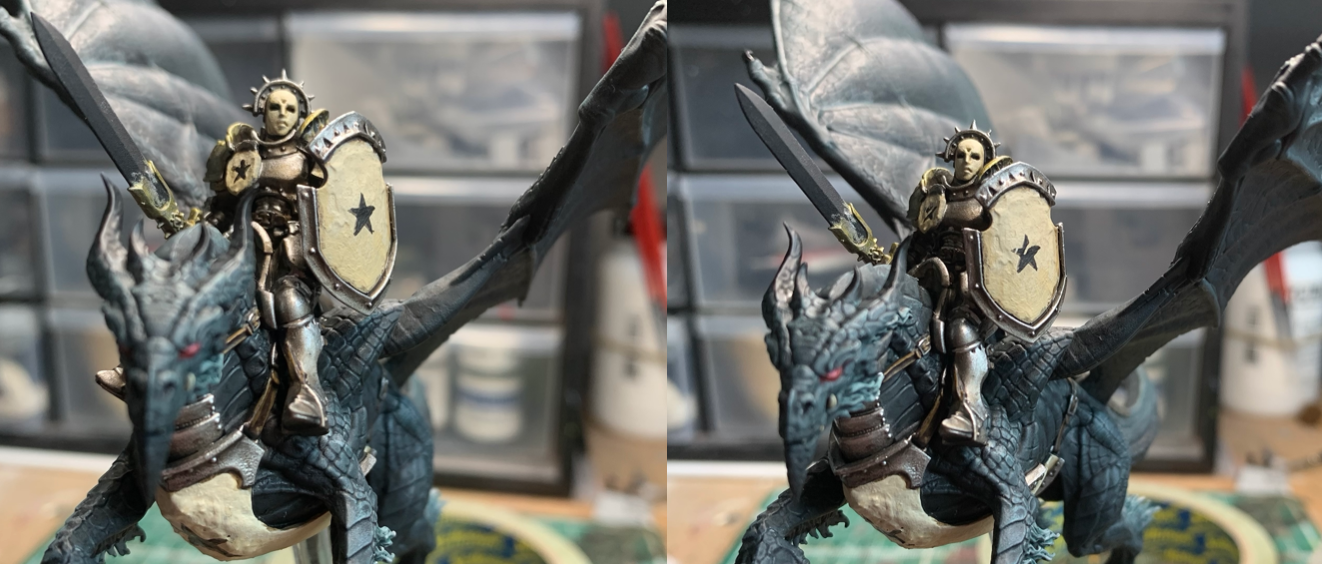
Games Workshop were kind enough to send me some of the brand new Stormdrake Guard recently and I have added them to the ranks of my Stormhost – the Ashen Stars. I showed the first one I painted off to the folks on twitter and asked if people would like any tutorials based on the model and I got an emphatically positive response. So, here we are – that’s exactly what you’re getting today. I will show you how to paint black dragons and rusty old armour and I promise you that these are very simple schemes to work on. I painted my Stormdrakes like this because I have very little time to dedicate to this army, but I still want it to look good, so I went with a down and dirty set of methods that do the job. Will these techniques help win you any awards? No. But can they help to create something effective and striking on the tabletop? I hope so, yes.
How To Paint A Black Dragon
First off, we’re going to tackle the dragon skin and we’re going to be using the age old technique of drybrushing. While some people look down on drybrushing, it’s a great way for a painter to achieve organic transitions and cut down time when painting a big mini like this. You can get a very nice effect and as long as you remove most of the paint from your brush before putting it to the mini, it’s very hard to make it go wrong. Just keep a very light touch and use the right sort of brush, I use something like this:
Well, for the larger areas anyway. Stiff bristles with a broad tip, this brush is perfect for this sort of work. And now that we have our brush, we need to meet our paints that I think of as the ‘Drab Four’ (a slight nod to Type O Negative there too). As we’re working on a black base, we’re going to use Abaddon Black, Eshin Grey, Dawnstone and Administratum Grey (you can of course use similar paints from other ranges – this is just what I have). All of our drybrushing is going to be done using these paints in various combinations. But before we get there, we have to get our base colours down. It’s also worth knowing that we’ll be thinking of our light-source being overhead. To that end, after giving the whole model a nice even spray of Chaos Black, we’re going to coat the underside of the model in Adaddon black because it is a little darker.
Because we’re now treating this as a miniature of two halves, we are going to drybrush the underside and the top side with different shades using our ‘Drab Four’. Now, I was going to show you eight different photos of a black dragon becoming slightly less black but that just looked stupid so instead, we have what every fun blog post needs; a diagram:
So the Underside will never get lighter than Eshin Grey, while the top side will go all the way up to Administratum Grey. You start with the darkest shades and cover the whole area you’re working on (top side or underside) and by the time you’re using the lightest shades, you should only be hitting the most prominent parts. It looks very subtle on the underside, but subtle is good on organic things:
Then, above the wings, it can look a lot more vibrant even when using these greys:
Next up, you want to take a smaller brush and apply that last high light of Administratum Grey to the highest points and also paint the ribs in the wings – the bits that lead to each of the individual talons (Eshin Grey Underneath, Admin Grey on top). You’ll also want to paint the hair, using Dawnstone as a base, and Administratum Grey as a highlight colour.
Almost done. One last step and our dragon scale is complete. All that’s left is to cover this in an even coat of, well, it’s up to you. Using the Citadel paint range as a guide, Shade paints will give you a subtle tone, but if you want something more vibrant, a slightly thinned Contrast Paint will do the job too. For this dragon though, I used Coelia Greenshade to get a nice, dark look – perfect for a black dragon.
Like I said, you could use other paints (I think Druchi Violet or Carroburg Crimson would look amazing as alternatives), but I’m very happy with this. I suppose technically this means it’s only “Battle Ready” but I’m ok with that.
Anyway, now that the bulk of it is done, we don’t want to linger too long on the rest of the details. Next up, I’m going to give this dragon shiny black talons, and I’m going to let actual light give them some very smooth highlights. I went around all the talons (on the feet and the wings) and blocked them in with Abaddon Black. After this, I gave each a coat of ‘Ardcoat. Done. Why highlight these naturally shiny parts when the light bouncing off them can do all the work for you?
I also blacked out the horns on its head at some point though I didn’t add ‘Ardcoat to those – I just wanted to set them apart a little bit.
Next up it’s time to do the glowing red eyes. Take Mephiston Red and put some of this on the actual eyeball. Next, thin that Mephiston Red down plenty and paint it into the the recess that the eye sits in, always drawing the paint back to the eye itself – this is our glow. Do the same two steps next with Evil Sunz Scarlet but don’t go so far away from the eye with this paint, and again, draw it back to the source of the glow. Now add some White Scar to some Evil Sunz Scarlet and just hit the eye with this. Give it a second highlight if you like with a bit more white in the mix for a spot highlight.
The last thing I did was the fangs. A little Ushabti Bone, then a wash of Seraphim Sepia, before bringing it back up with Ushabti Bone and a Spot Highlight of Screaming Skull.
There you go. Dragon is done. Quick, easy and it doesn’t look too bad either. Like I said, you won’t win awards with this, but it does end up looking quite striking on the tabletop.
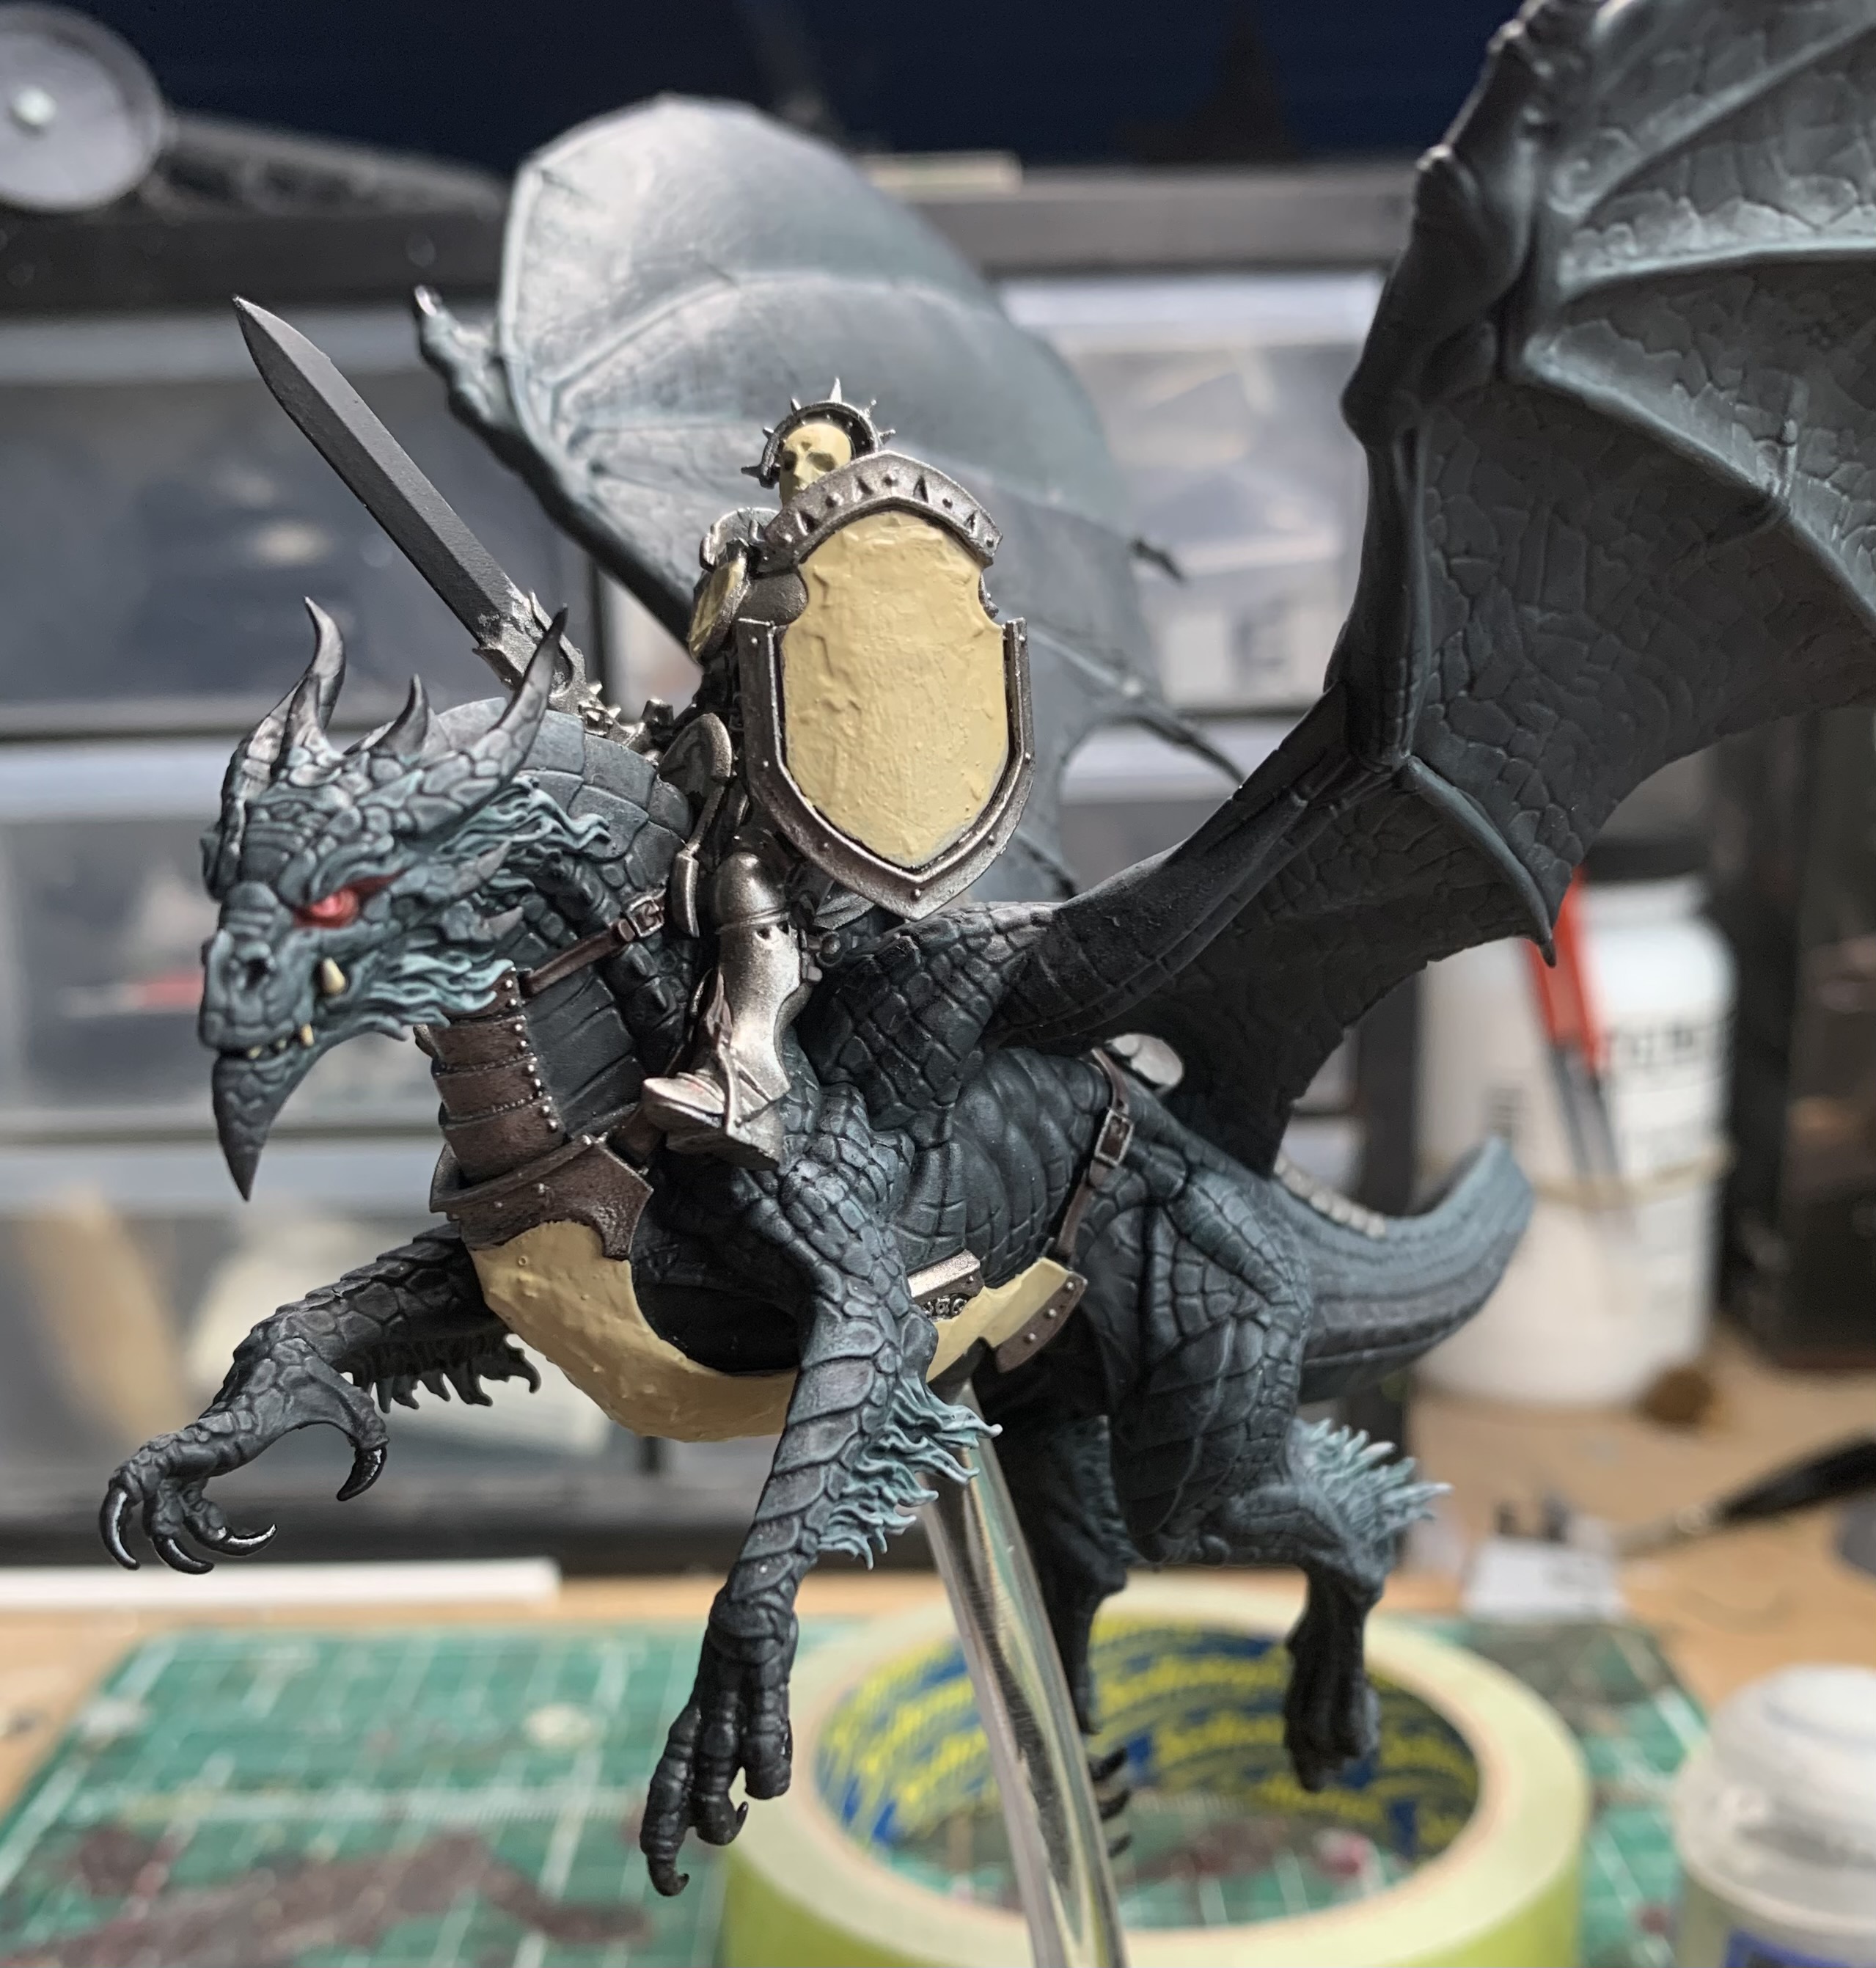
How To Paint Rusted Armour
Now I’ve been painting up this rusted armour in this way for 4 years now and it serves me well enough. I mentioned in another post not too long ago that it’s sometimes hard to get back into the habit of painting metallics like this after my personal preferences have changed quite a bit over that time, but it’s a nice, easy way to do things and it holds up just fine if you don’t glare at it too closely. Also, if you’re going to be quick, remember that weathering hides a multitude of sins.
First off, we’re going to put down three base colours as seen above. We have Ushabti Bone, Leadbelcher, and Rhinox Hide for the leather areas. A couple of coats should do. Be as neat as you can, but we have ways of fixing things later so don’t worry if you miss a spot, but try and stay as clear as you can from the dragon skin – much harder to touch up.
I got the leathers out of the way next. Edge highlight with XV88 and then coat with Seraphim Sepia. Done. This is a very simplified and quick version of the same technique I use for most of my leathers and it works just fine here in this very basic form.
Then the bone and silver areas get a nice coating of Liquid Talent (Agrax Earthshade) before leaving it to dry. Don’t let it pool too badly though – we’re going for quick not (figuratively and literally) sloppy.
Next we’re bringing the Silvers back up. Focussing on the higher areas (that might catch the light source from above) we use Leadbelcher again, before applying a spot highlight and fine edge highlight of Ironbreaker at those high points. Make sure you hit those rivets with Ironbreaker too.
Now we’re going to use a Contrast Paint to make some areas a nice brassy/gold colour. I used a mixture of Contrast Medium and Nazdreg Yellow (about 3:1). Seriously, since Contrasts came out, I have painted nearly all my metallics with this method and it just makes everything so much easier.
Then we’re going to do something similar with the bone colour that we did with the silvers. Bring it back up with Ushabti Bone, leaving only the recesses with a sign of Agrax, and then use Screaming Skull on the higher areas and areas that would catch the light.
Now, I can’t not freehand something on a miniature ever, and this army does have its black star motif. It’s a good time to practice your freehand here as you’re going to be able to scuff up any areas you’re not happy with. I really messed up the one on the tilting shield, but hey, that’s what weathering is for, and you can see in the second image above that I just used some undiluted Screaming Skull to make it look like its been scratched. Now, let’s have some fun with weathering…
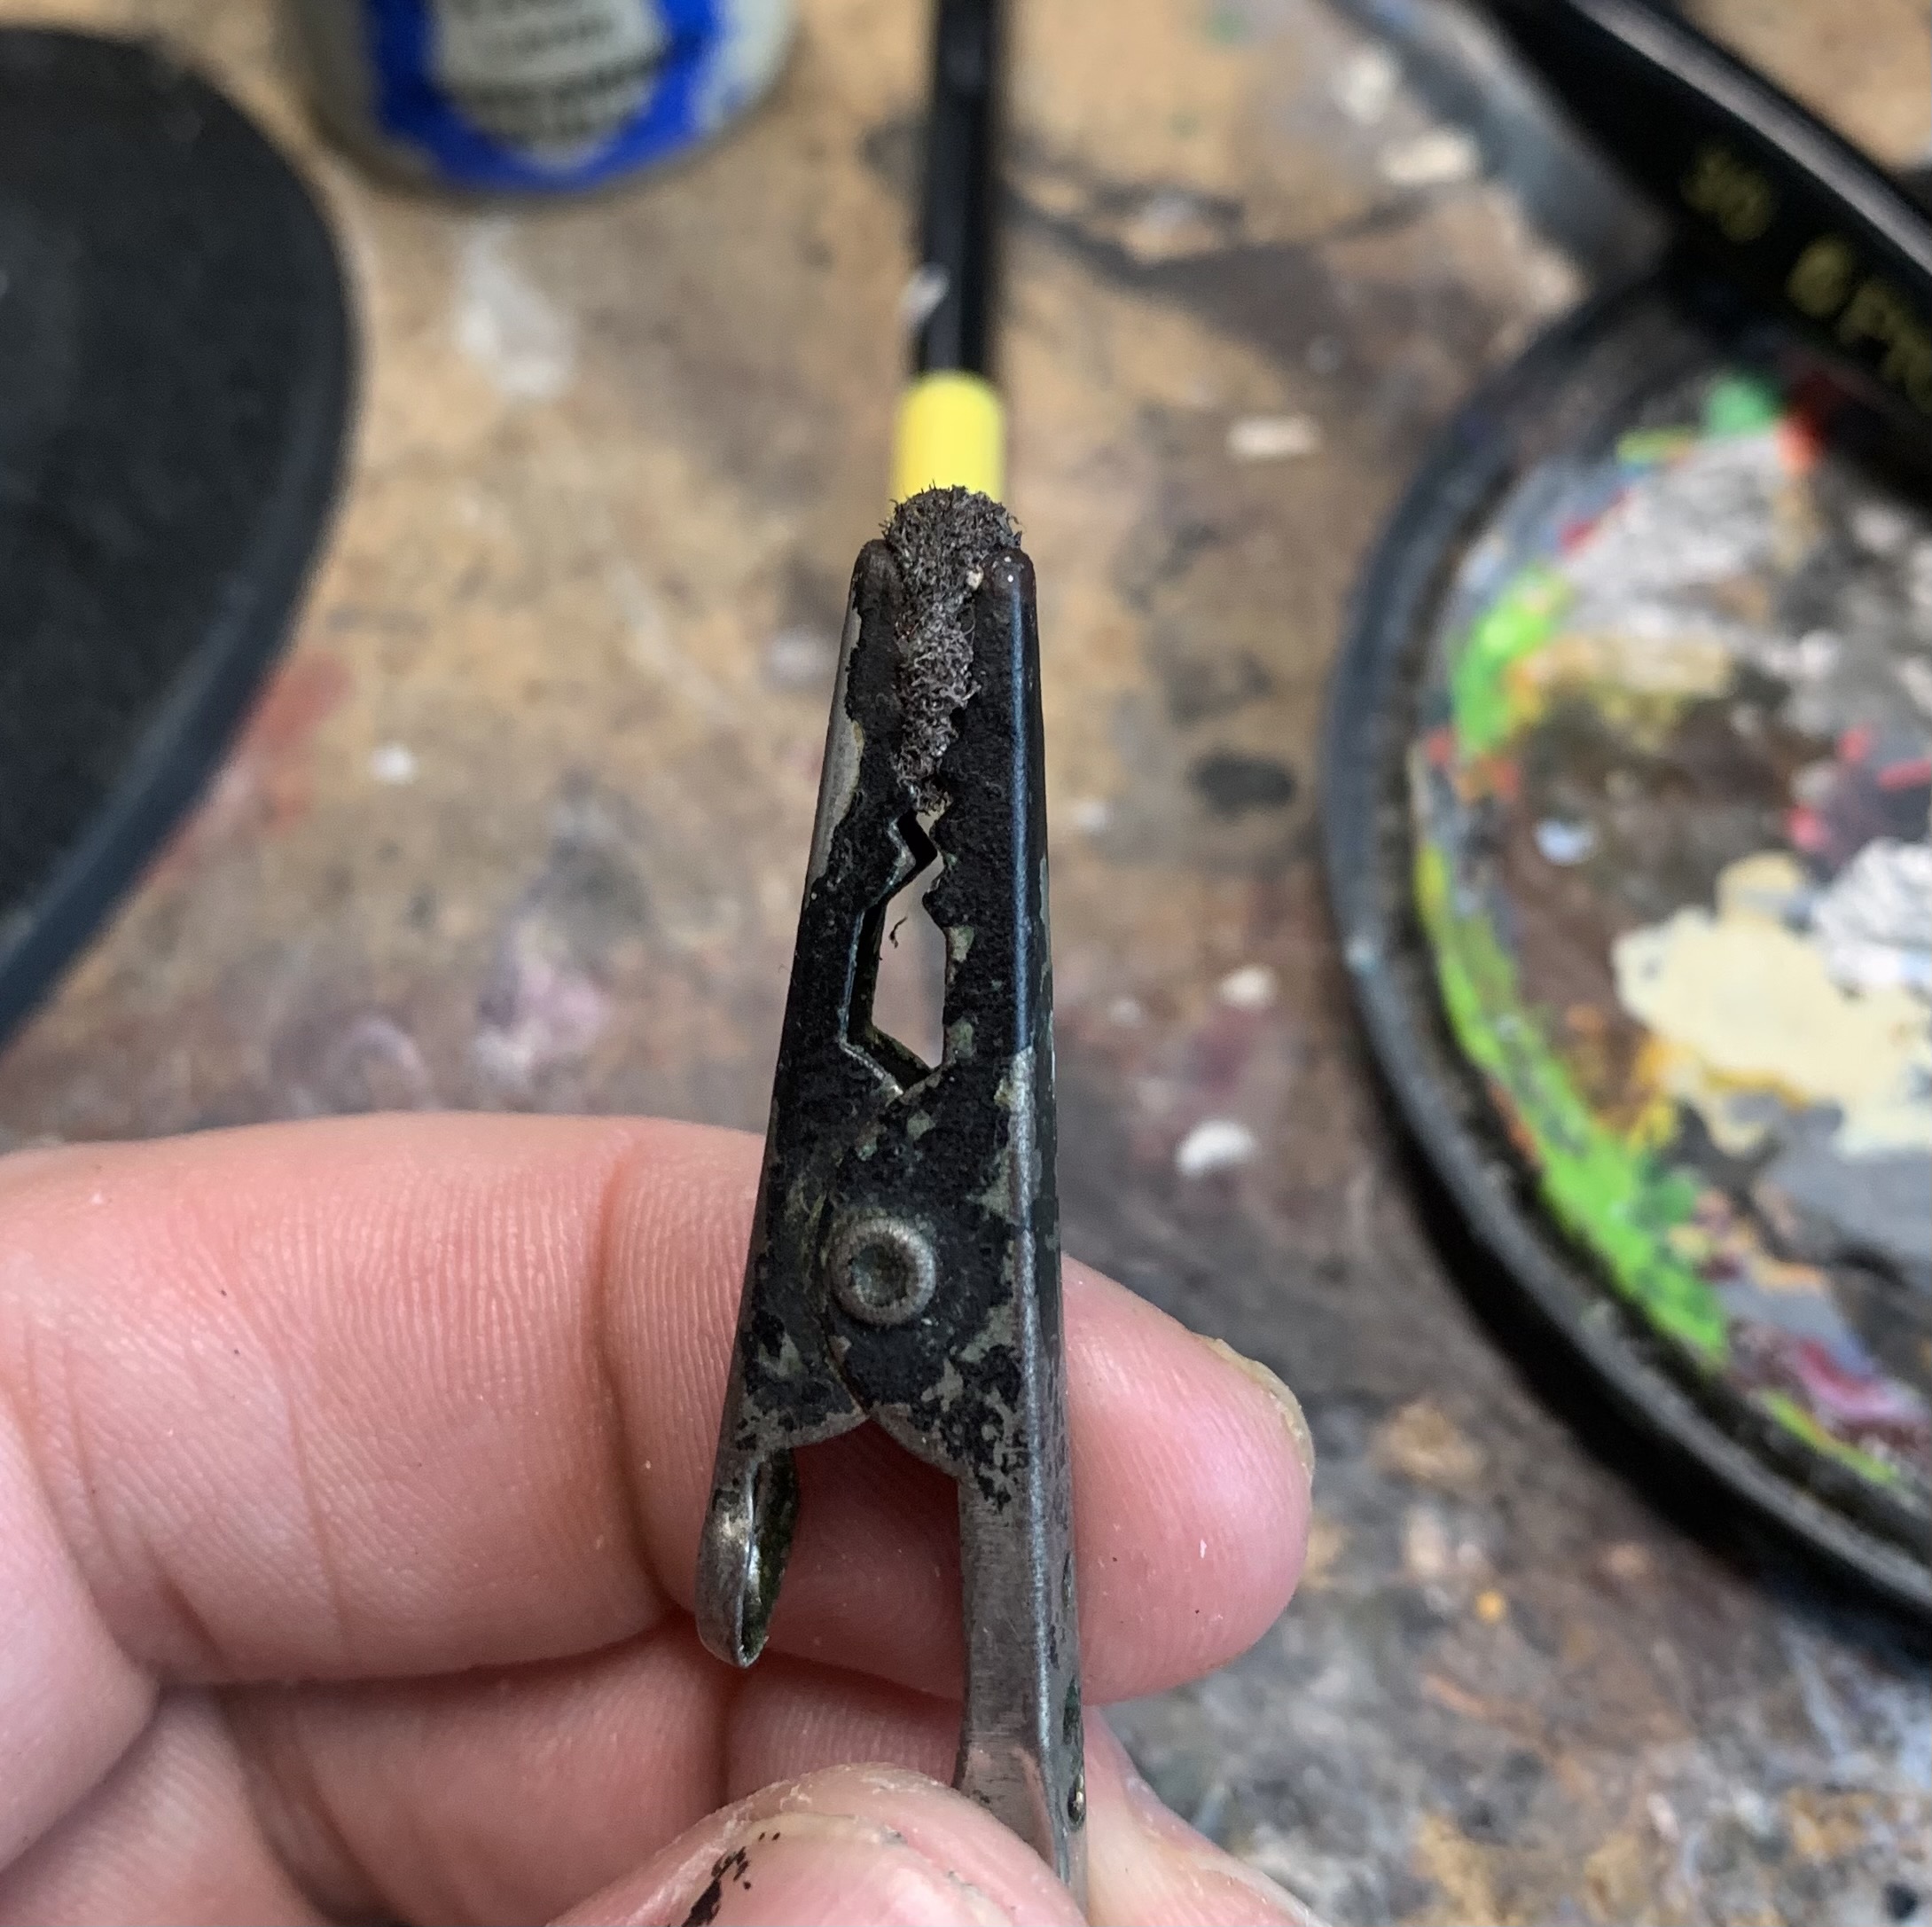
First off, we’re going to want a bit of sponge. This is some pick and pluck foam which I like to hold in a crocodile clip as it’s easier than smooshing my fat fingers against the model and it allows me to get into more crevices with the paint. Tweezers work too, but the good thing about a crocodile clip is that its resting position is closed and so you’re not squeezing it all the time.
And this is what we get. Hit all the different areas with Rhinx Hide (make sure you only have very little on the sponge and wipe off the excess) but there’s no need to go overboard – less is often more with this sort of thing.
Now, take a knackered old brush you don’t care about but that’s still got some stiffness in its bristles and splodge a few areas of metal with Typhus Corrosion. Try to keep the edges of these areas rough and once they’re dry, get a little Ryza Rust on your brush and smoosh that into those areas, and dry brush it around a little bit. This is also a great stage to cover up any areas you’re not happy with. Again, less is more with this step, but you can still have plenty of fun.
Pretty much the last thing to do on the armour, if you want to, is to add some drips. More Agrax Earthshade is applied in a downward motion, and then a little of the drip is lifted off at the top to help thin the original streams. And that’s us done. After these steps I painted up the sword…
…and did the base to match the army…
…and I’m calling this dragon and its rider all done! I really hope you found this tutorial useful and that you learned a couple of fun, simple and easy-to-do techniques from it. If nothing else, I hope it makes painting dragons a lot less scary in the future. These were great miniatures to work on, but just be warned that those talons like grabbing hold of anything and everything nearby – the wing from this dragon got snapped off at the beginning of painting because the little sod caught the sleeve of my shirt and jumped from my painting desk. I’m so close to being done with this army – fingers crossed I can have it all finished soon. Onwards!


 40kaddict
 4gotowar
 Castigator's Chaos
 convertorum
 darkfuturegaming
 ftgtgaming
 Mind of the Daemon
 taleofpainters
 talkwargaming
 Twisted Brushes
 weemen