
The hobby can be a weird place sometimes. And it gets in you brain, right? You see things that no-one else sees in the world because your head is full of paints and brushes and basing materials. You look at a twig like it could be a tree, or a rock like it could be a piece of crumbling rubble… and then there’s aubergine with black truffle. Right…?
Ok, some context would help. I was doom-scrolling through Instagram a few nights ago, and an advert caught my eye. Here it is:

Now, to most people, this would appear to be someone shaving black truffle on a piece of Aubergine covered in some sort of sauce, with sesame seeds, and whatever that green stuff is – is it cress, or a herb maybe? But did I see that? No. No, because my brain was in hobby mode, the black of the aubergine looked like a base rim at a fleeting glance and so my brain tells me that this is a display base someone’s working on. I also thought it looked quite cool – vibrant and wild, but realistic in a strange way too. Then I realised I was looking at an ad for a restaurant that I almost certainly won’t be eating at and I realised I needed a rest.
I put this onto my twitter and lots of people could at least see what I was getting at. I wasn’t totally in outer space with my thinking – it could be a base. So, well, despite having quite a lot on at the moment, I’ve written a step-by-step guide to help you create your own Truffled Aubergine base. Because that’s what I do, dammit.
I didn’t take any pictures of the base when it was just undercoated so I’ll tell you how I did it. I put down a relatively thick and uneven base of Armageddon Dunes, which I then sprinkled with some very small stones, before pushing in some of the smaller Barbed Bracken pieces. Easy. In hindsight, I’d have used a little super glue on those bits of barbed bracken to help steady them a bit, but you don’t need to if you’re prepared to be delicate with them. Then I undercoated the whole thing with black paint, and that leads us to…
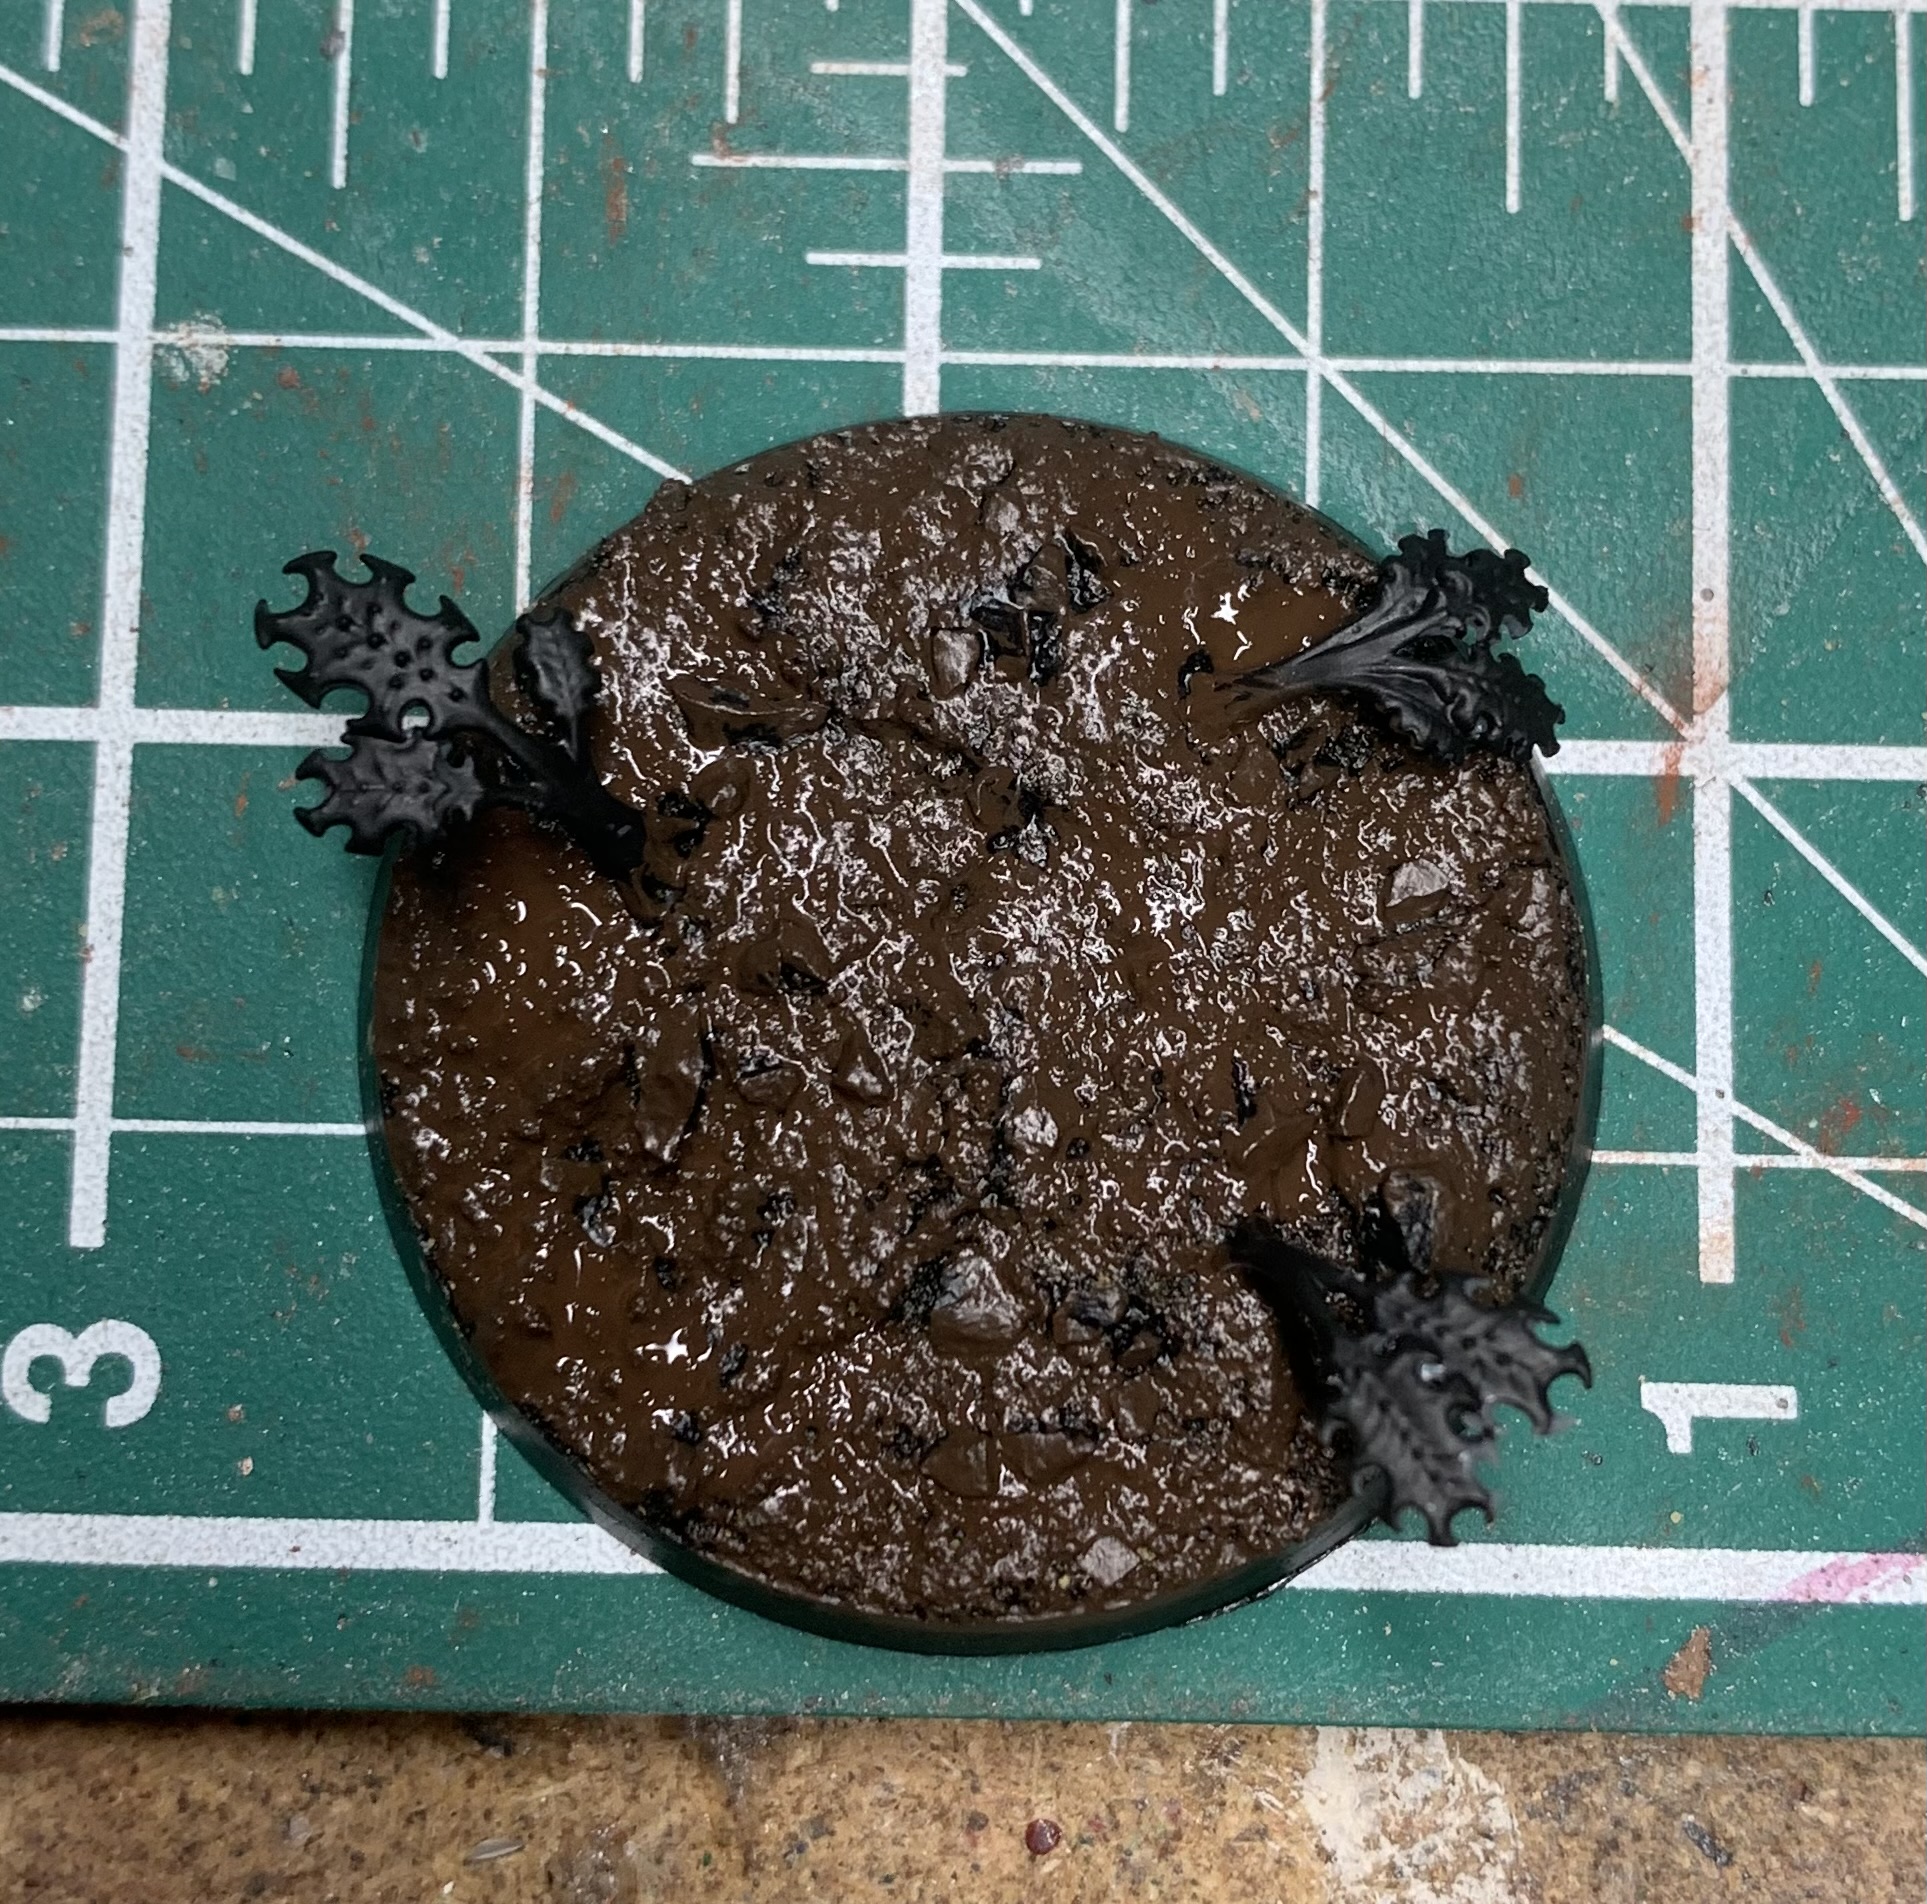
Step 1: Rhinox Hide – just cover the whole base in it. Doesn’t matter if there’s a little black left showing here and there though.

Step 2: Rhinox Hide/Skrag Brown (1:1) mix -Hit about 75-80% of the base with this mixture.

Step 3: Skrag Brown – Focus more on the centre and the areas where you put down the mix in step 2, and hit a little less again – make sure you can see all the shades coming through. You can work on this while the last stage is still drying too.
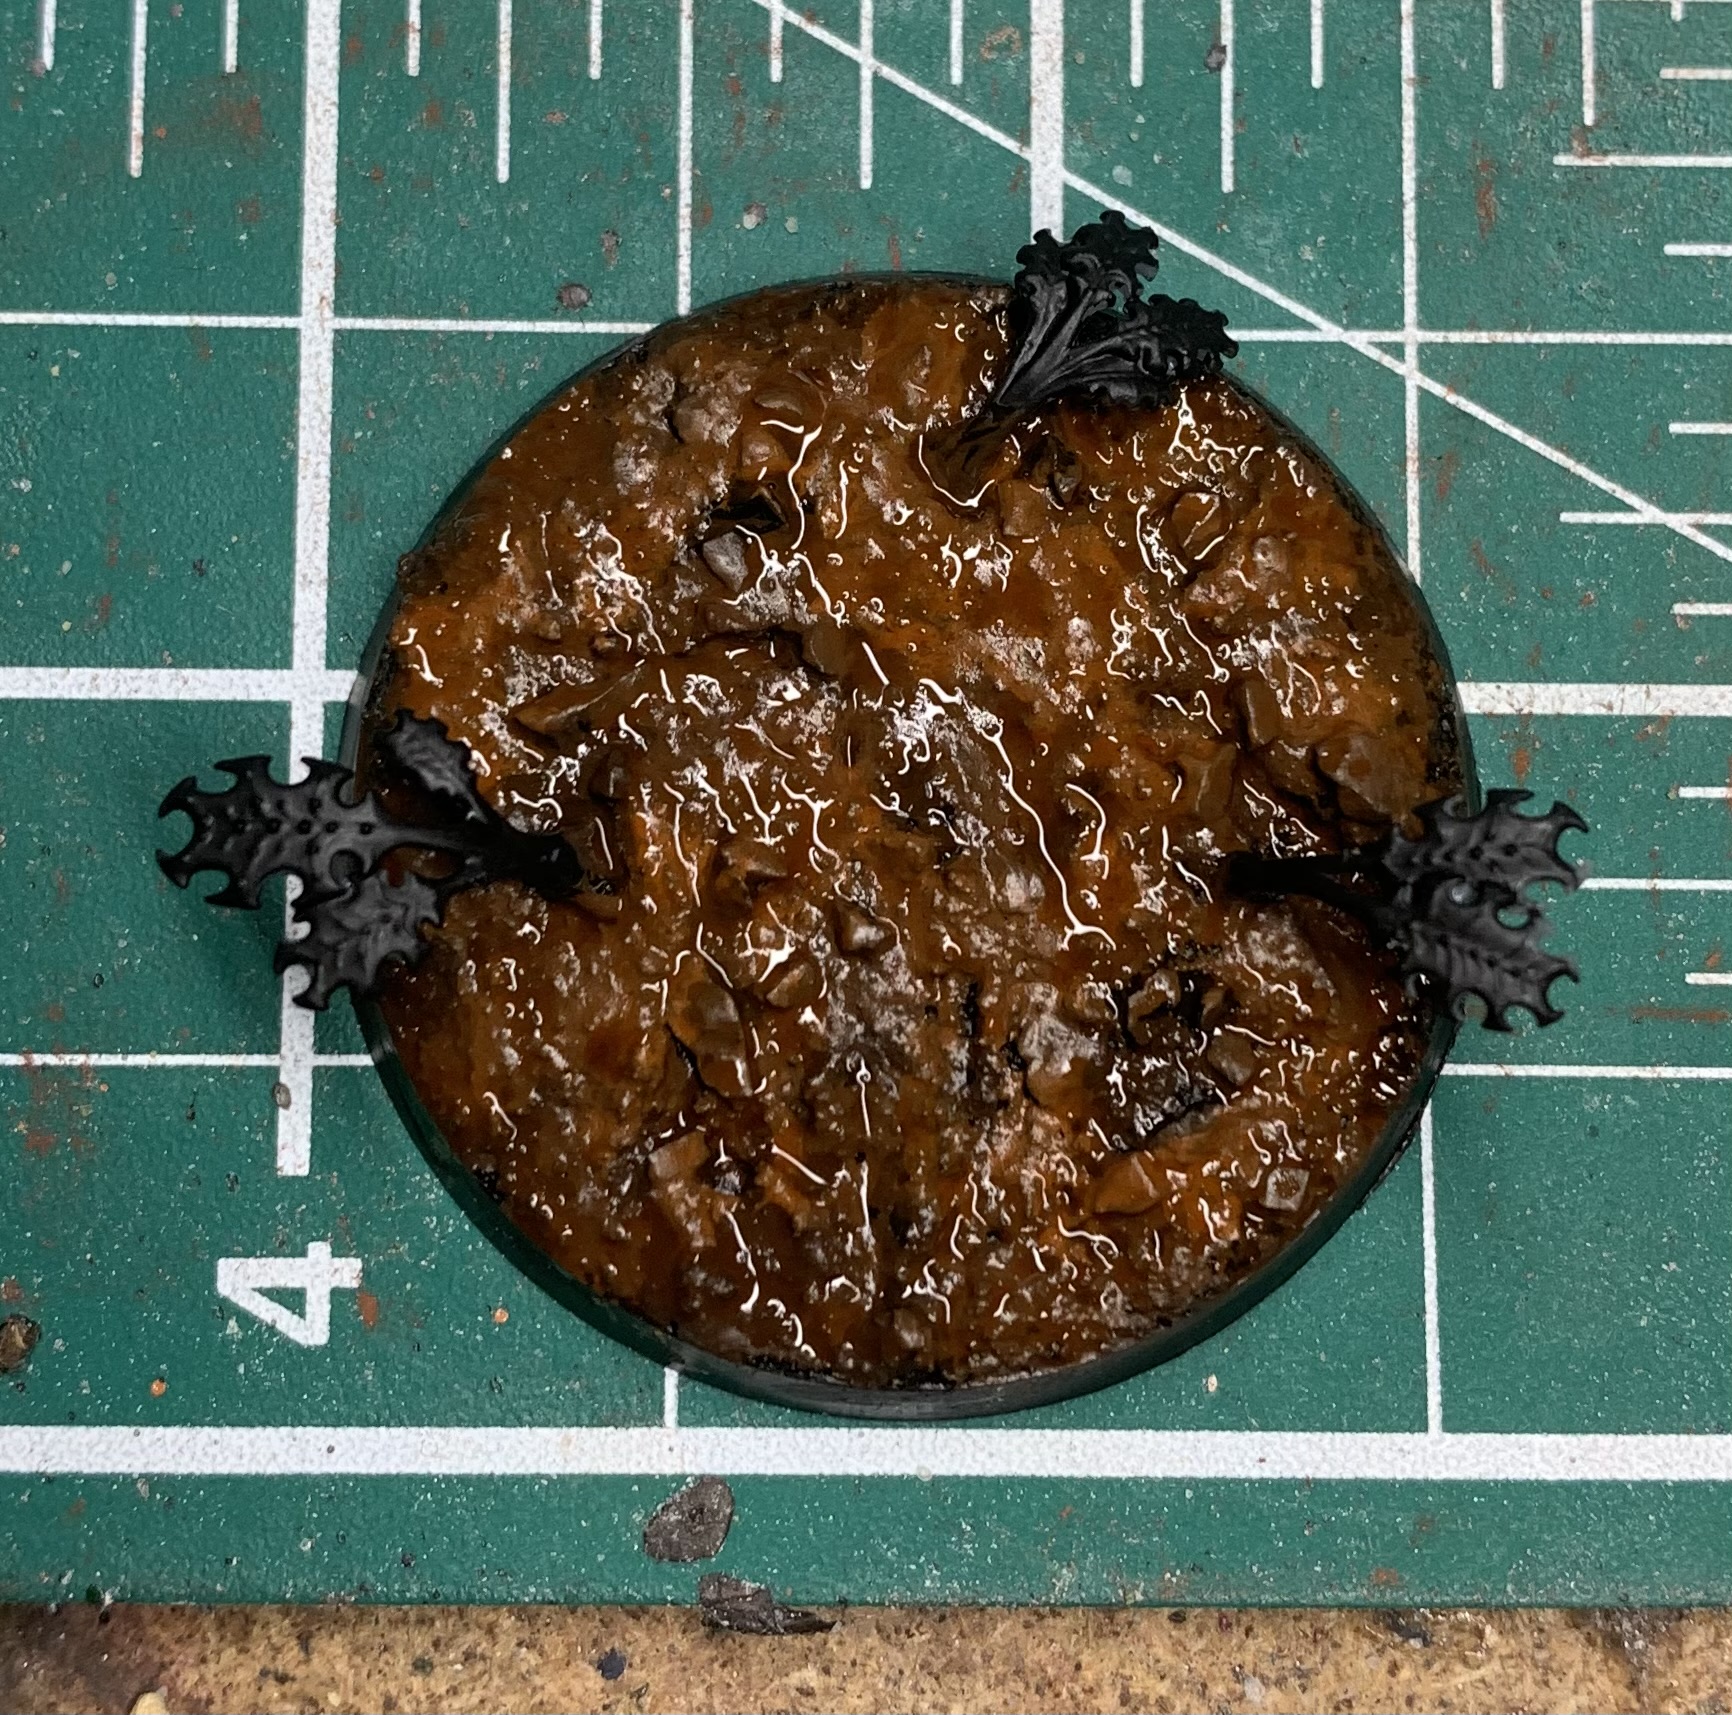
Step 4: Fuegan Orange – Once all the previous paints are dry, put down a layer of Fuegan Orange. I could have gone with a slightly thinned Gryph-hound Orange here to make it more orangey, but I like the subtleness that the shade gives me.
Step 5: Skrag Brown/Firedragon Bright (1:1) mix – hit some of the most raised areas with this mix. It’s fine that the shade is still drying in the recesses – you should just be dotting this around the higher up bits anyway in a non-uniform sort of way.

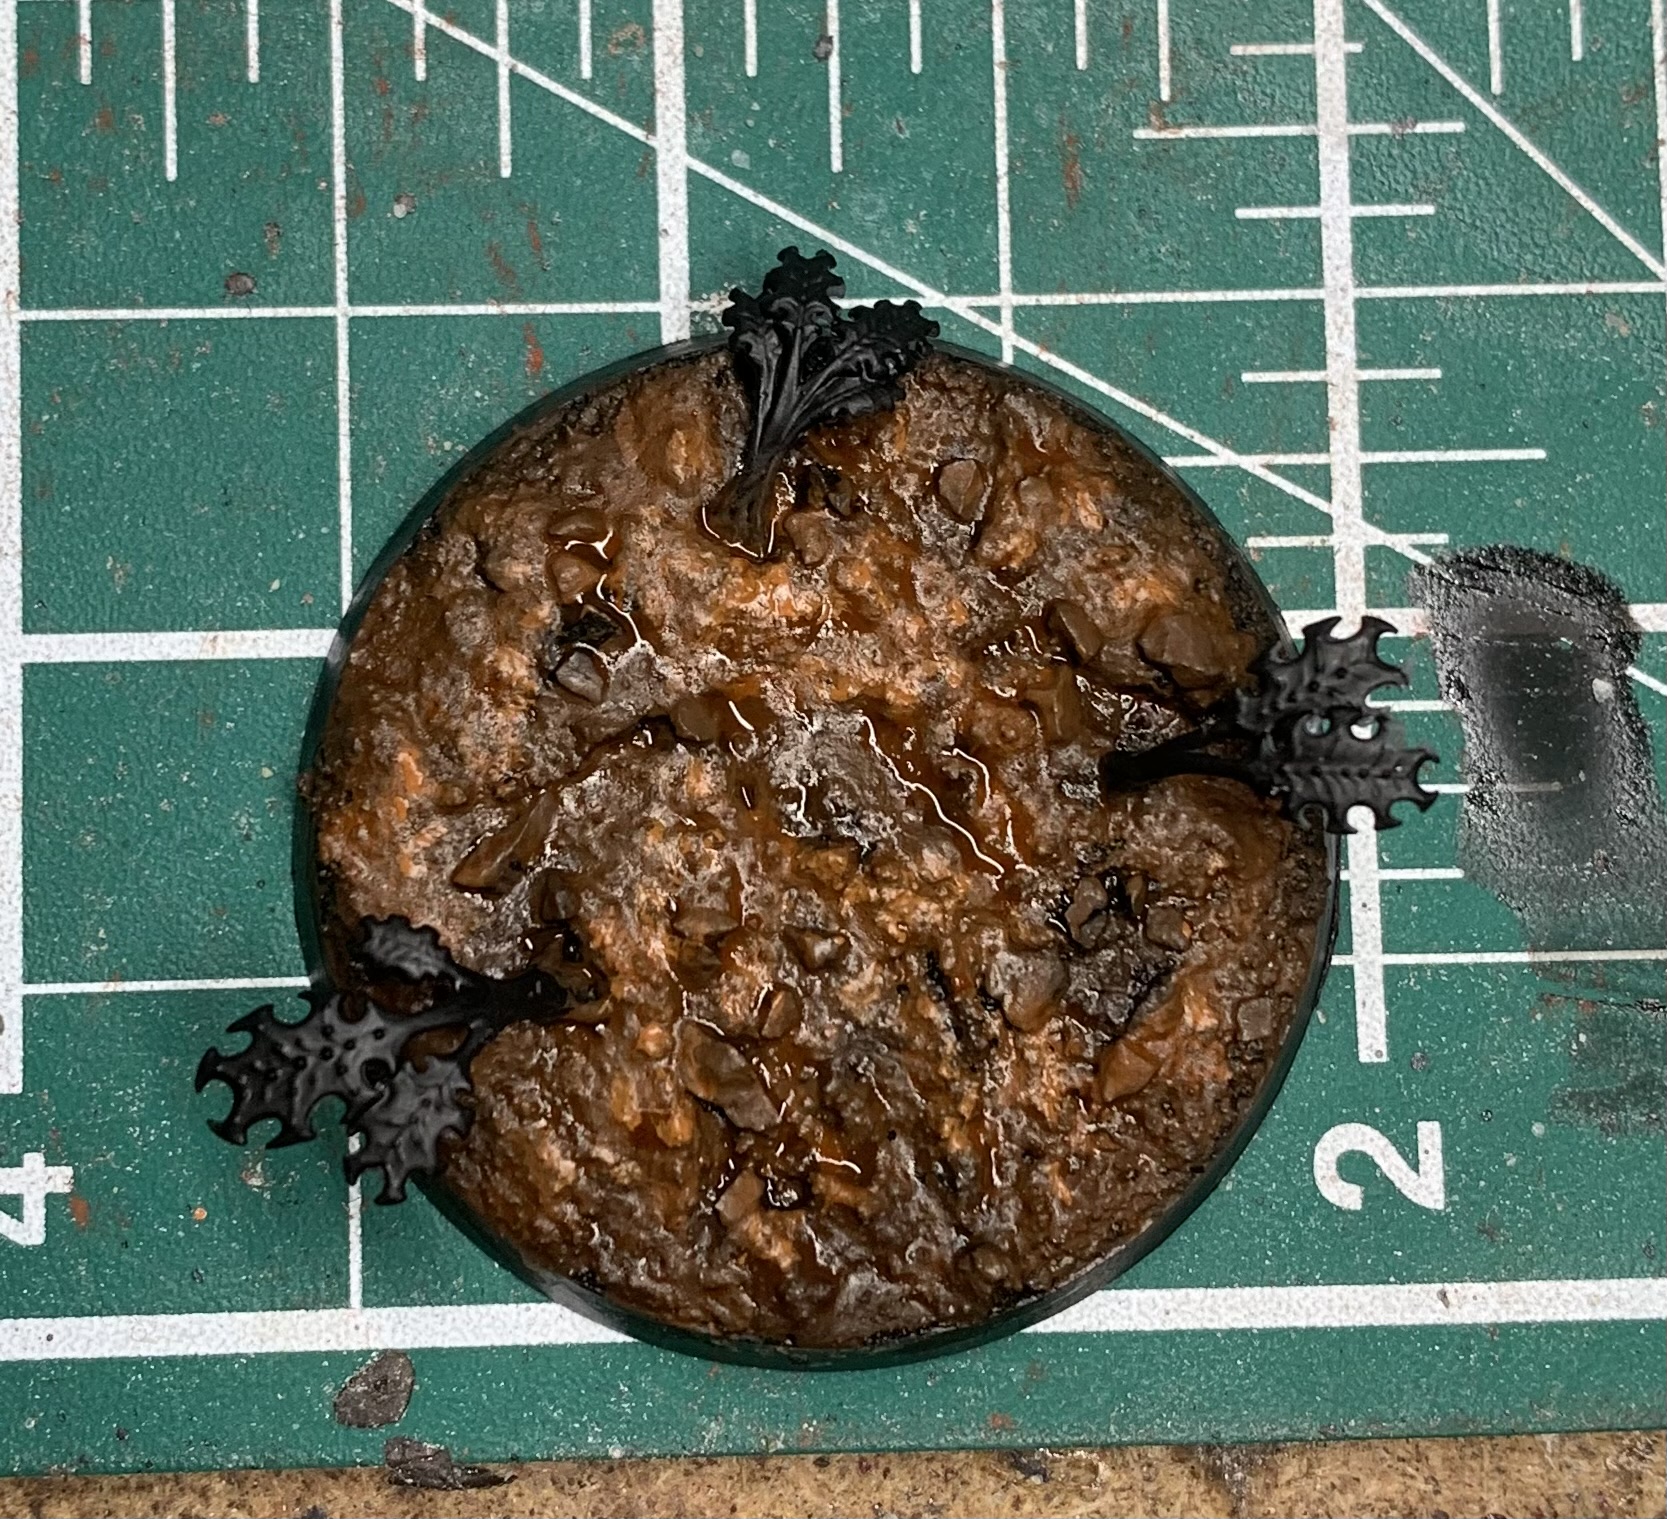
Step 6: Ungor Flesh – Time to pick out the little rocks we drizzled over the top of the base while the Armageddon Dunes was drying – these are our Sesame Seeds! One or two layers being careful not to get any onto the dirt.

Step 7: Feugan Orange – You could use Seraphim Sepia here if you wanted them a bit muddier, but it’s that dark orange look in the original image that led me down this route. Let that dry and more onto…

Step 8: Ungor Flesh (again) – just pick out the bulk of the Sesame Seeds with Ungor Flesh leaving the lower parts and any recesses still with the wash on them.

Step 9: Ungor Flesh/White Scar (1:1) mix – just hit the tips of these little stones with this to help make ’em pop! Now, onto those leaves…
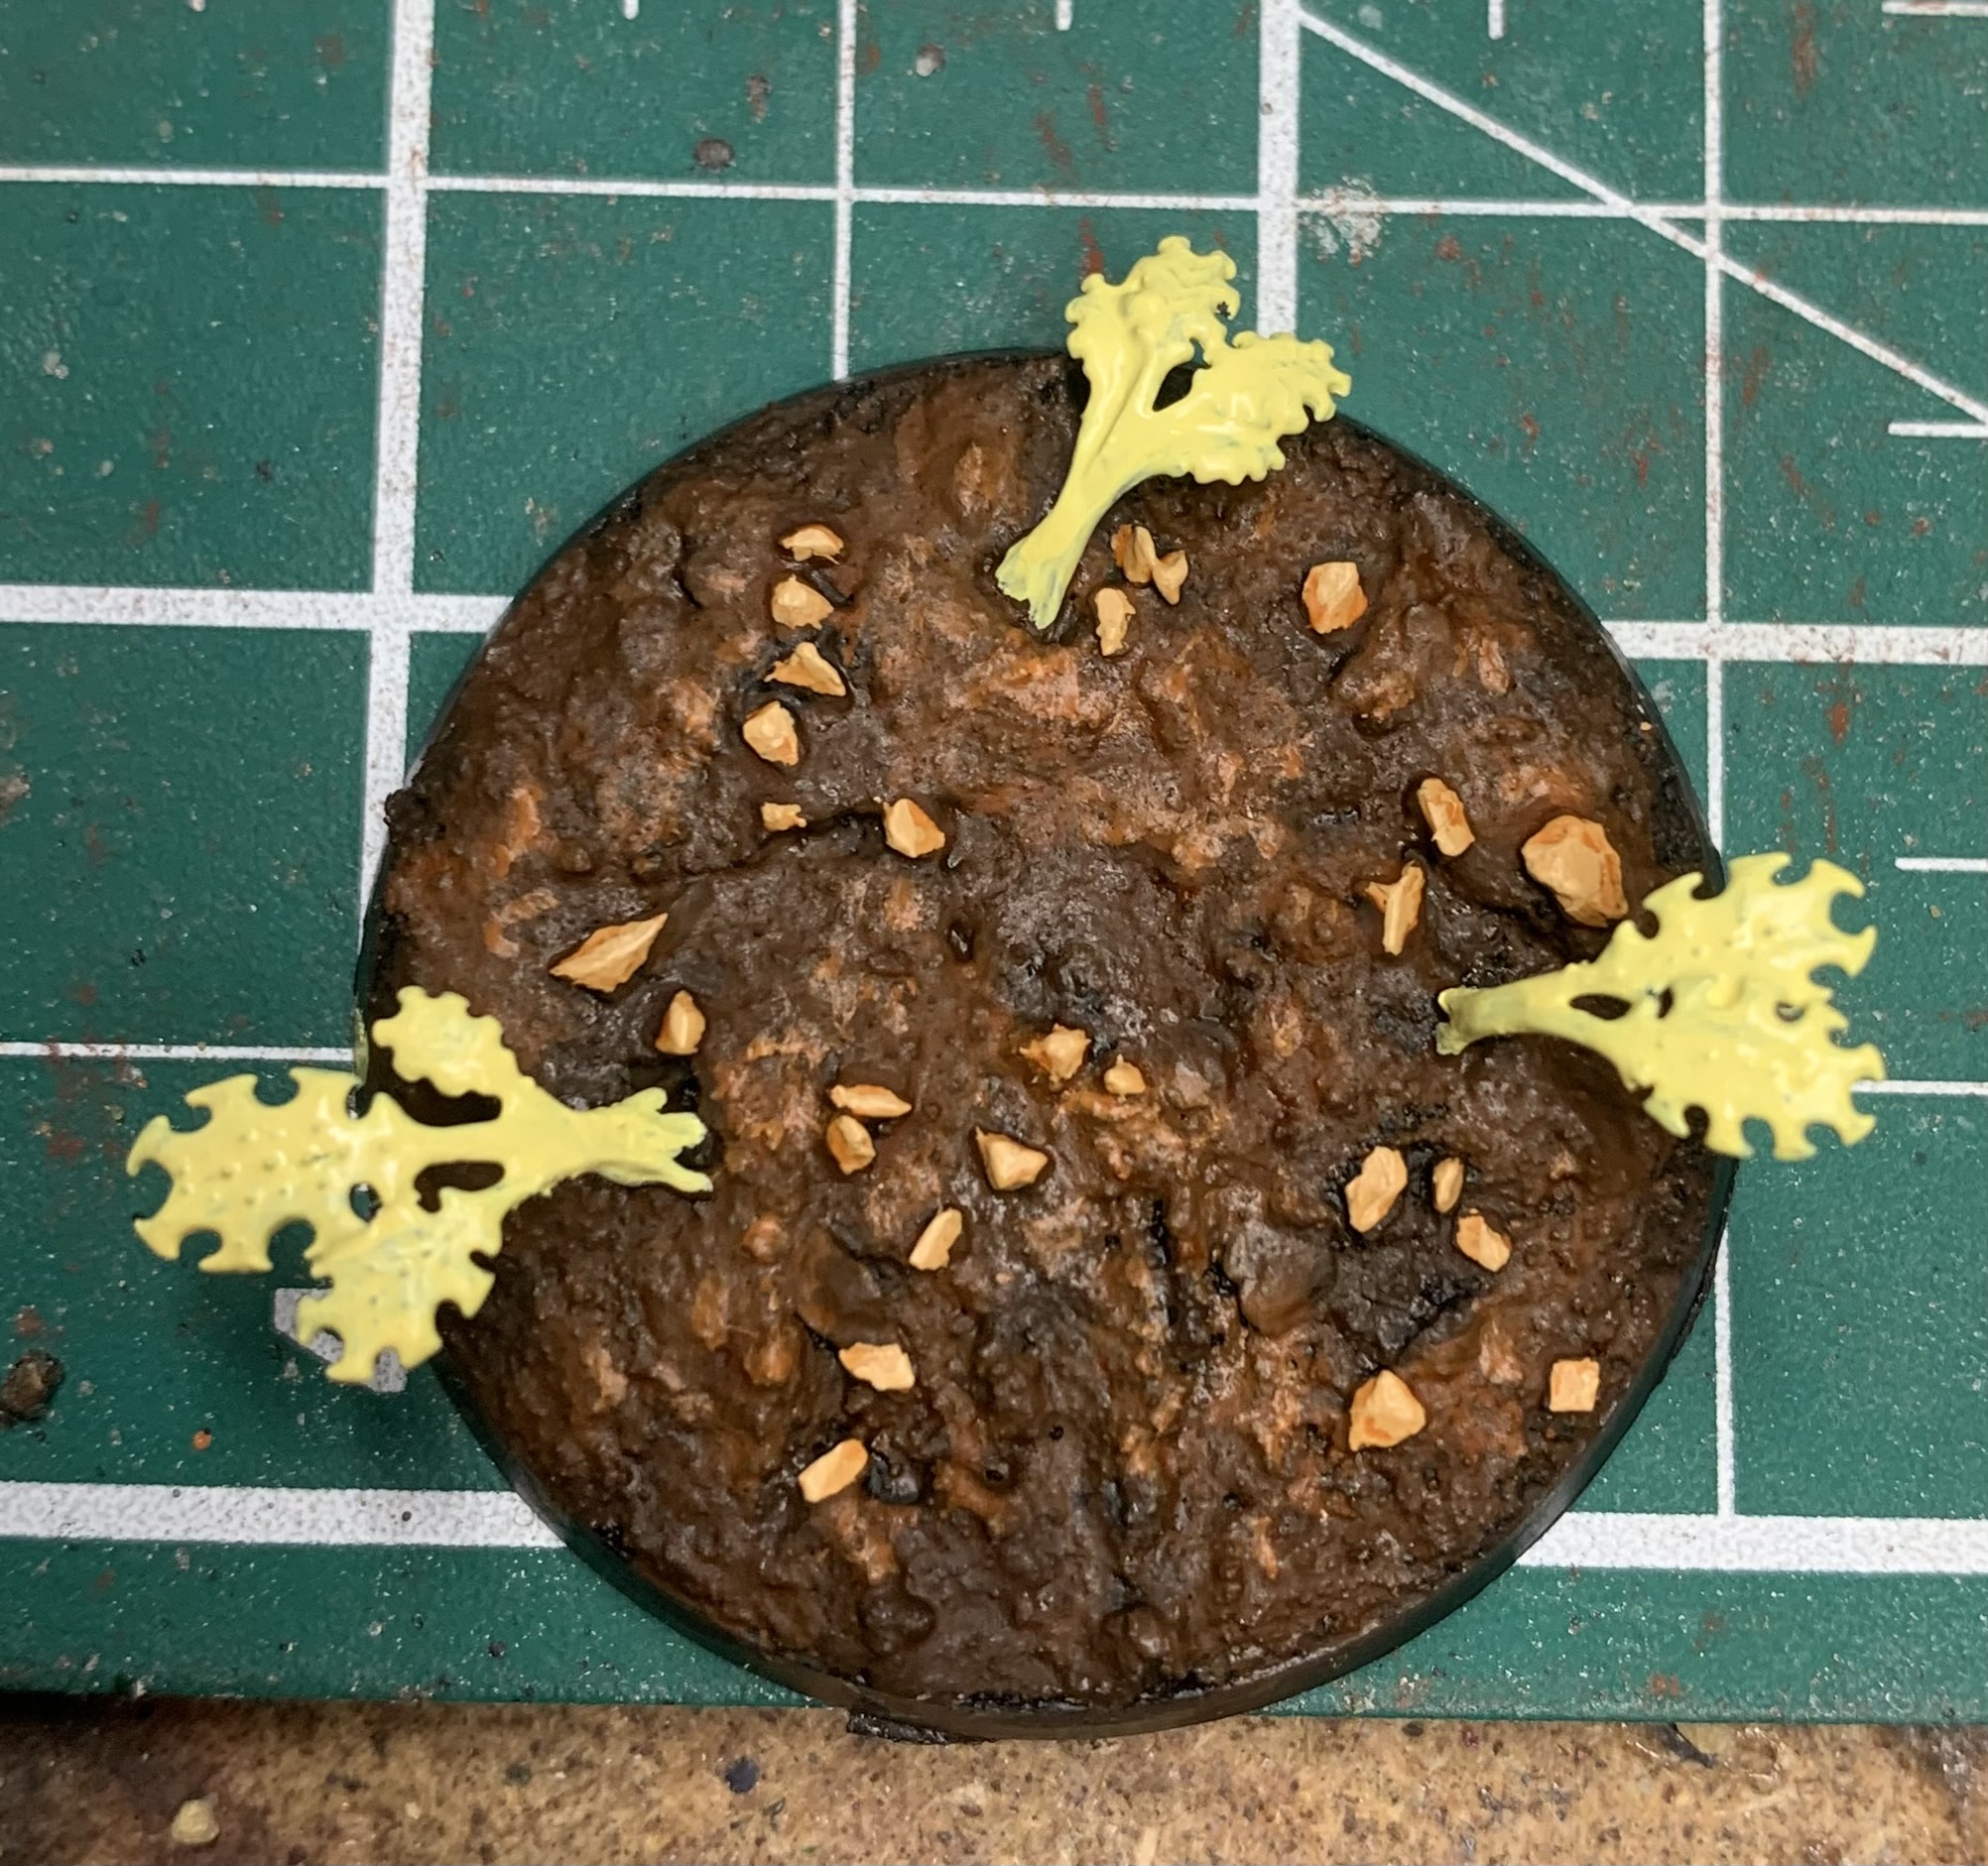
Step 10: Dorn Yellow – Start off by putting down a couple of layers of Dorn Yellow as a base. Be gentle with these if you didn’t use glue – they’re a bit bendy and fragile.
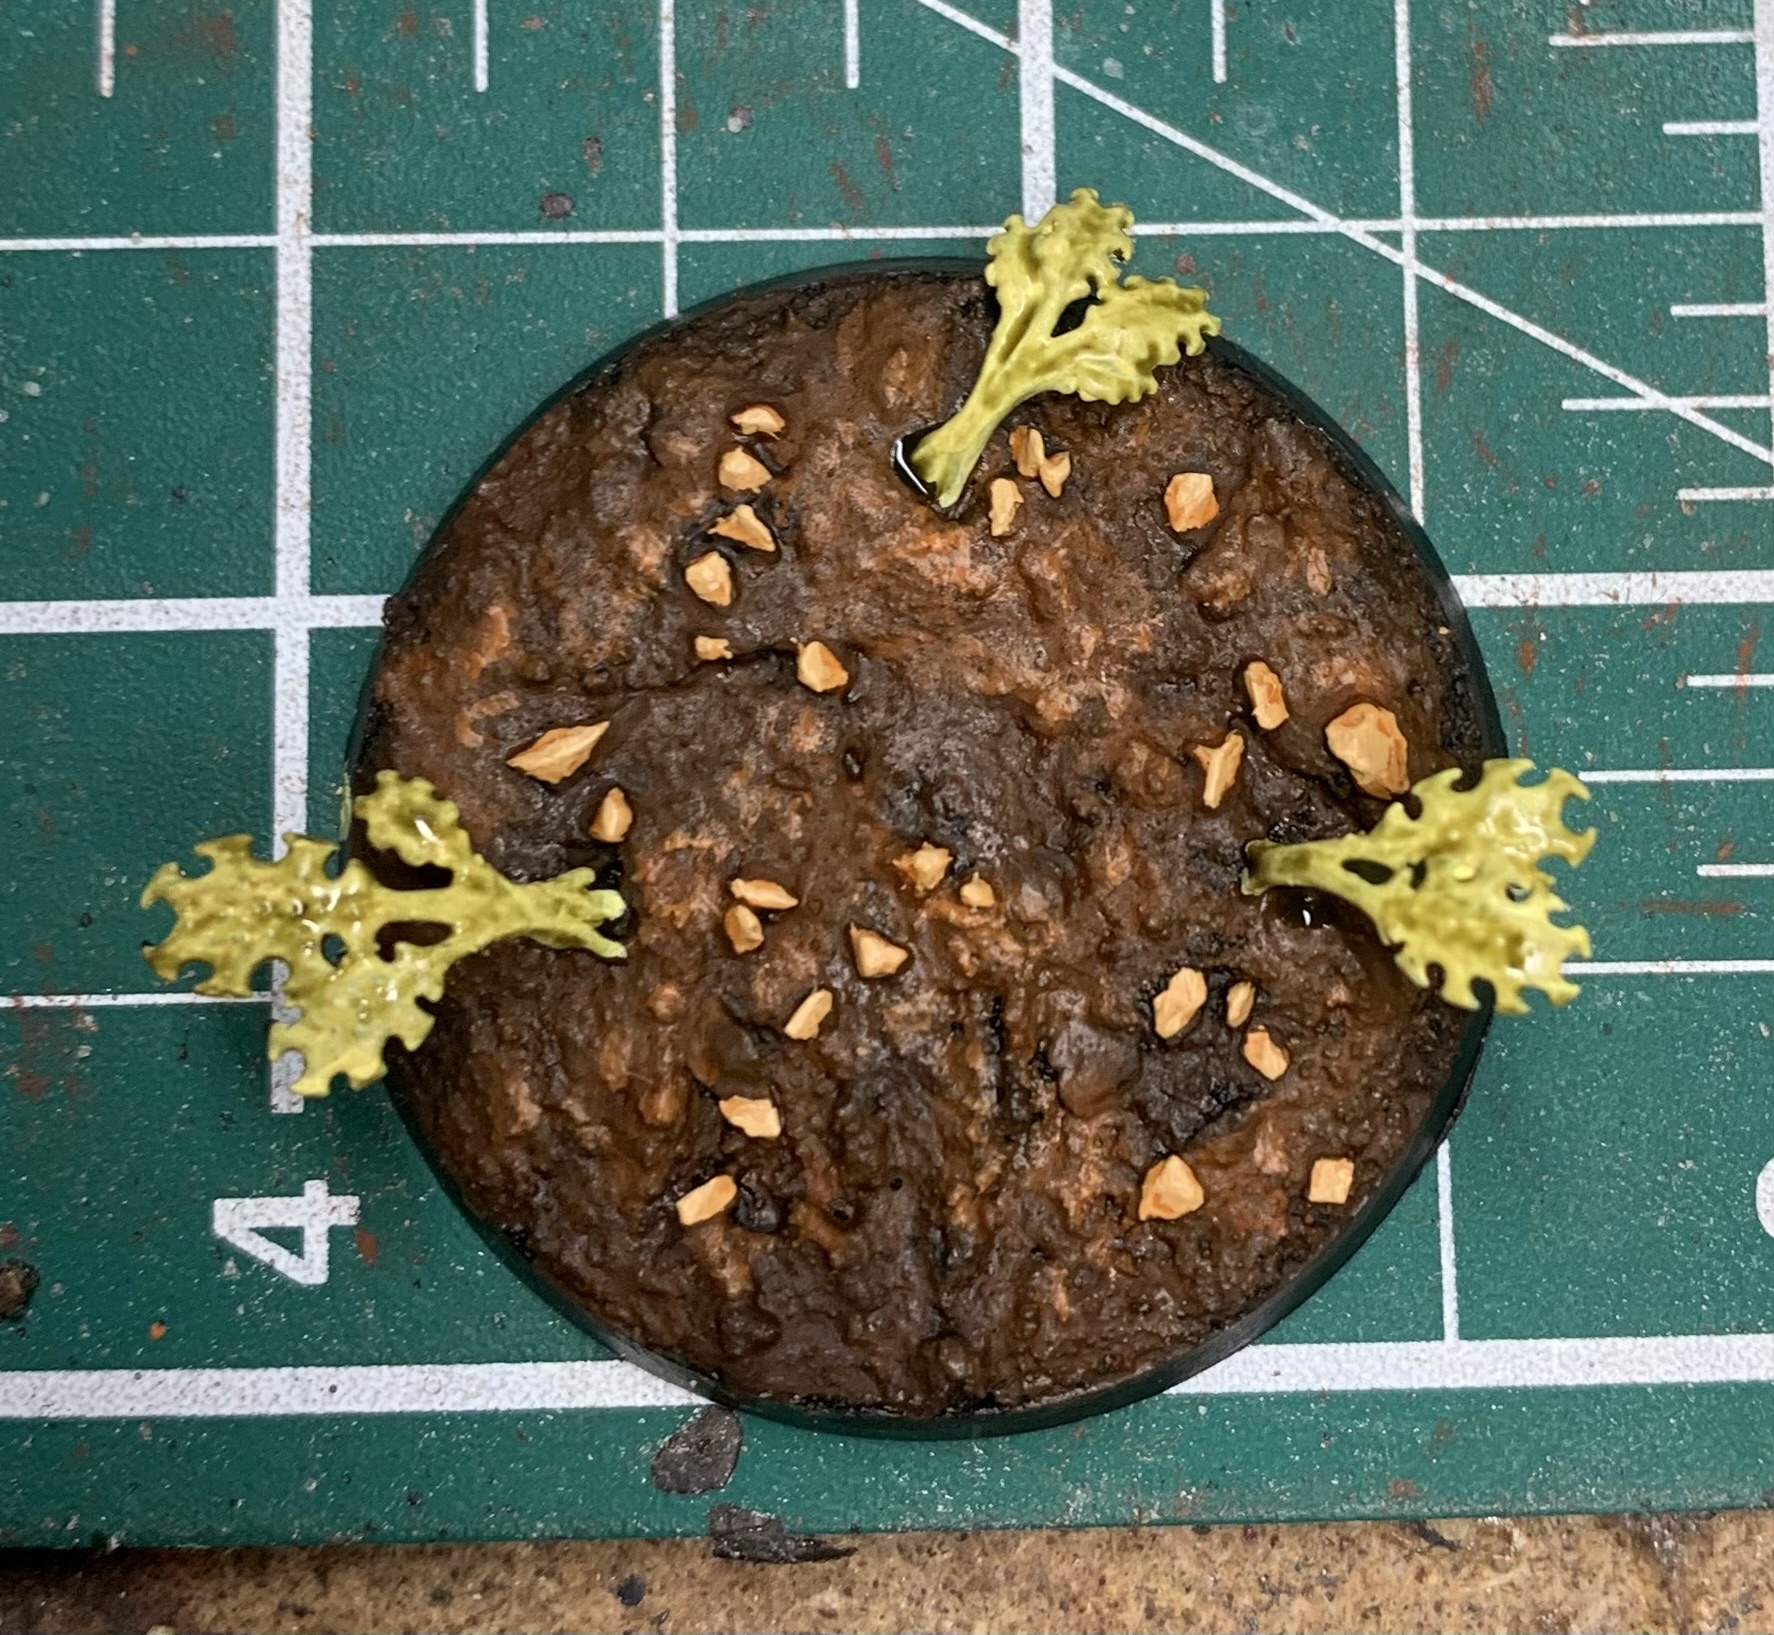
Step 11: Athonian Camoshade – Hit these with some shade and you don’t want it to pool too much, but it’s not big drama if it does.

Step 12: Dorn Yellow – Just pick out the stems with some of the original base paint here.

Step 13: Dorn Yellow/White Scar (1:1) Mix – hit the stems again, just lifting those tones a little. Apparently this caused my camera to lose focus but that’s not something new on this blog!

Step 14: Dorn Yellow/Moot Green (1:1) mix – hit the lower areas of the leaves with a couple of thin coats of this paint. Don’t worry about losing detail in the centre of the leaves here – we’ll come back to that.

Step 15: Moot Green – the rest of the leaves get a nice coat or two of Moot green to make them a little more appetising.

Step 16: Athonian Camoshade – A little of this shade down the middle of the plant and our greenery is done!

Step 17 – The Truffle – So, there’s no easy way to do this really, unless, like me, you happen to have a collection of tiny leaves made from real leaves that were collected a couple of autumns ago before being baked and pushed through a fine mesh. But you could use pencil shavings, old herbs… something that looks like dead foliage. Just put down some watered down pva glue in patches and sprinkle this on. If you’re feeling very rich, you could use real truffle!
The PVA will dry a little glossy, but that works for random wet patches on the forest floor. If you don’t like this though, you could always go over it with a little matt varnish.

Step 18: Abaddon Black – The final touch, the Aubergine itself. Just hit the base rim with Abaddon Black, and you’re done!

I quite like it! It definitely has a very “forest floor” look to it, and there’s a bit of alien forest to it as well, thanks to the Barbed Bracken. I think I could have gone a bit more orange with it – made those tones a bit more vibrant to fit the image on the ad, but I’m happy enough with where I got to. This is what’s great about seeing the world through hobby eyes every now and again – it takes you down weird little journeys like this and what you find at the end can be pretty decent if you set your mind and brushes to it. Is it a perfect representation? No. But if anyone ever remarks on this base, I’ll tell them that it was based entirely on an ad for Truffled Aubergine. I guess it’s a case of compliments really going to the chef!

Until the next time my brain makes me do weird stuff like this again, have a fun time with your paints and toy soldiers. Onwards!
 40kaddict
 4gotowar
 Castigator's Chaos
 convertorum
 darkfuturegaming
 ftgtgaming
 Mind of the Daemon
 taleofpainters
 talkwargaming
 Twisted Brushes
 weemen