

Some of you may have come across a story that’s been going around this week about a letter from Animal Rights group Peta to Games Workshop, asking them to stop modelling fur on their Warhammer 40,000 miniatures. This letter, now confirmed as real *facepalm*, does raise some interesting talking points though, and chief amongst them is the idea of applying modern values from the here and now, to the dystopian nightmare that is the galaxy of the 41st Millennium. While the setting needs to be unique, and represent the bleak grimdark that we all know and love, do we also need to adhere, even on a basic level, to the morals and sensibilities of today? Or can we leave all of that off the table, and just enjoy a game without having to consider the tiring moral complexities of it all? Let’s explore.
By the way, this post isn’t really about that letter. I mention it a couple of times, but I’m thinking bigger picture here. There are now several humorous threads on Facebook, Warseer and Dakka Dakka so that’s where the funny stuff is at.
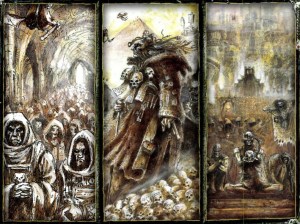
The first thing that we need to remember, is that in Warhammer 40,000, the galaxy is a true dystopia. A lot of people seem to forget this, while also gleefully acknowledging the horrors that supposedly await us. If one were to put a particular spin on things, one could describe the 41st Millennium thusly: A tyrannical demagogue rules from his golden palace, supported by a zealous bureaucracy who will stop at nothing to retain power while the vast majority of the human race suffers through constant war, invasions, enslavement and unremembered deaths at the hands of equally zealous aliens and heretics. Looking at all of that (and noting the similarities Donald Trump’s America) one might wonder why we enjoy this game so much. The fact is, dystopias have always been popular because they allow us to explore and experience what could happen if we weren’t as nice as we are. There but for the grace of the Emperor, go we. Like a bleak mirror, dystopias allow us to reflect on what the worst might be, and it can prompt us to think of what we can do to improve our odds. It’s also just quite a fun thing to immerse oneself in, if one is so inclined. You don’t want to end up with Big (Battle)Brother watching you…
Now that we have clarified where we are, let us first look at things a little more from our current world view. The 41st millennium genuinely is a nightmare. It almost couldn’t be worse. And when we look at each aspect in turn, we see things that should offend our current morals, were we to not think of this as an enjoyable game and hobby. Put yourself in the shoes of someone who has never experienced the setting before, and who knows nothing of how it is received or who received it. Approach it from a point of isolated ignorance of how it is enjoyed, and one cannot blame those who see it for the first time from an angle different to our own, who would decry it as nothing short of awfulness.
Our favourite genetically enhanced super soldiers, the Space Marines, go from being mighty heroes and noble souls in our eyes, to being monstrous products of eugenics and horrific science experiments, who are bent to the will of a fascistic regime determined to rule the galaxy. They’re nearly all white, exclusively male, and, yes, some of them wear animal pelts. We see the likes of Commander Dante and Logan Grimnar as heroes battling to save humanity, while someone who had not arrived at the knowledge of their existence from the same place might view them as fanatical lab experiments who like to kill people who are different than them. All the while wearing armour emblazoned with gold Eagle symbols, used in the past by the Romans, the Nazis and many other invading and conquering forces.
Now, I can hear some of your feathers ruffling already. I know, that that is both true and untrue. Yes, it can be viewed like that, but all of this can be justified. And unlike when people have to justify things in real life (which often means they’re wrong and trying to be clever), in this fantastical setting, it is warranted. Yes, the Space Marines are gene-enhanced super soldiers, but they, like the Thunder Warriors and Custodians before them, were designed to actually give humanity a fighting chance in the 41st millennium. Yes, they wear an Eagle, but that’s not exactly an uncommon heraldic device and has been used by the French, Americans, Mexicans, Albanians, St John and about a million others over the course of history. It’s a cool looking bird. Yes, the Space Marines are nearly all white men, but it’s hard to really call them ‘men’ considering that their evolution (albeit forced) makes them as similar to human males as human males are to chimpanzees. And there are the Battle Sisters, and, when you actually look into it, there are plenty of Space Marine chapters that either don’t have skin colour specified or are actually based on other races and cultures. Yes, the Emperor is a corpse atop a golden throne, but said throne is stopping daemons from destroying Earth, and the Emperor did sacrifice himself to do just that. And as for the bureaucracy, they are trying to run a galaxy wide Empire – there’s bound to be a bit of paperwork. There is awfulness, but there are plenty of reasons for the awfulness, and oddly, very few of those reasons are actively malicious. And this is a dystopia after all. I don’t think any of us are sitting around thinking ‘I really wish things were actually like this’.
There are lots of instances of this sort of thing. So you have the Sisters of Silence who are women who aren’t allowed to speak. Were you to just focus on that, you might miss the fact that they are among the most revered and respected warriors in the Imperium who provide a vital function within the defences of humankind. This sort of thing can crop up time and time again, if you’re looking to find something to be upset about. There’s awfulness everywhere.
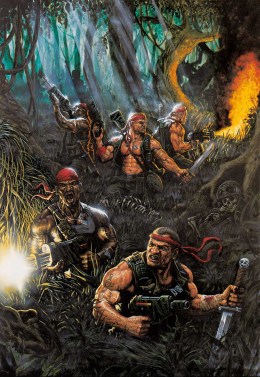
I don’t want to talk to much about the aforementioned Peta letter which is likely nonsense anyway (ok, so it’s real, but it’s still nonsense). But let us consider the treatment of animals in the 41st Millennium. Given that humans have a pretty ropey time of it all, can we really expect, in this dystopia, that wildlife sanctuaries and dog sitters really still exist? As Earth was being ravaged during the Unification wars, were Techno Barbarians really going to say ‘Sorry lads, we’ll have to take the long route to Albion – we can’t risk going through this newt sanctuary’. Of course not. It’s all part of what makes this a dystopia. I, like many of you, I’m sure, love animals. I’ve always had a cat or two in my life, and I would never dream of intentionally harming an animal for sport or fun. I eat meat, but I am, physiologically and psychologically, an omnivore. And yes, I would like to know where every bit of meat I eat comes from and that the animal that it came from was treated well until its death, though alas this is not always possible. In the 41st Millennium though, if it has nutritional value, I imagine it gets eaten without any thought or care whatsoever. And thinking about it, actually, the galaxy of the grimdark future has at least one planet sized animal sanctuary. It’s called Catachan.
The fact of the matter is, that we are perfectly capable of enjoying a dystopian setting, without having to apply our own moral codes and sensibilities to it. However, these concepts make our enjoyment of these theoretical and fantastical ideas all the more compelling. We all like looking into the abyss to see what looks back, and we like to use our imaginations not only to look at our dreams, but also our night terrors – that’s why scary movies exist. If I wanted an activity where I care about animals, worry about things like sexism, racism, religious freedoms, agism and politics, I’d go for a walk outside. The modern world is depressing enough, and it is important that all of us work to make it a better place in whatever way we can, but we are still capable of enjoying books like 1984, or Brave New World, or games like Warhammer 40,000 without applying our current moral standards to them in such a way that they become invasive and obstructive. It may not be the most charming of escapes, but it is still a compelling one.
I suppose the one good thing that came from that letter, is that I got to explore these sort of ideas here. And I can say that I for one would hate to live in the 41st Millennium, unless someone 100% guarantees and promises that I will be one of the 0.0000000000000000000001% of humans who actually has a good time there and then. And it is perfectly normal to have a good moral compass, and still enjoy this nightmare setting. What’s good, is that every now and again, it will prompt one of us to quietly ask ourselves whether or not we think something is wrong or right – that’s how we develop as humans. What’s more, maybe those of us who regularly dive into this Emperor-forsaken setting are more often prompted to try and make a difference in the here and now to ensure that our Great, great, great, great…. *many more ‘greats’ later* ….great, great grandchildren won’t have to deal with this tragedy of a galaxy. I would never wear fur, but I don’t have anything against a power armoured super soldier who kills Tyranids like it ain’t no thang in a galaxy thousands of years in the future (that doesn’t really exist) from getting the ermine out every now and again.
Have you ever had any thoughts about this sort of thing in Warhammer 40,000? Have there ever been any bits of fluff that have made you feel uncomfortable? Do you think Space Marines should have to attend sensitivity training? Do you think that this is all really just a load of tosh and we should all just concentrate on enjoying a game? Stick a comment below and let me know. Hopefully some of that made sense and you didn’t find it boring at all. Onwards!
P.s. If you want my opinion on the actual letter, I can tell you that I think it’s pretty weak. There’s real fur still being worn out there, and Peta should be focussed on that, rather than the fantastical, future fur that’s made out of plastic on 28mm scale minis. But then knowing what a ridiculous, callous, hypocritical and stupid organisation Peta is, it doesn’t surprise me. If you care about animals, donate to your local shelter, your local zoos and wildlife sanctuaries, or organisations like the WWF or Green Peace. Just avoid these jokers.


 40kaddict
 4gotowar
 Castigator's Chaos
 convertorum
 darkfuturegaming
 ftgtgaming
 Mind of the Daemon
 taleofpainters
 talkwargaming
 Twisted Brushes
 weemen