
This is the first in a new series I’m going to bring you (whether you like it or not) which is essentially, a set of really simple painting tutorials on how to paint Blood Angels in the same way that I do. It’s all brush-based painting and there’s nothing here that should be too taxing for anyone, while hopefully still providing you with a good looking end product.

These are the guys I’m working on at the moment. The most basic Blood Angel bolt gun wielding 30k tactical squad you can get. And that’s what I’m going to show you how to paint in this series.
If you’re looking for advanced techniques and daring new ideas, this probably isn’t the sort of tutorial you’re after. I’m painting bog-standard tactical marines (albeit the ones from the Calth box) and I won’t be spending anymore time on them than I need to – I just want to get them to the standard of looking good; not breathtaking. So, if you want to know how I do my Blood Angels in the way that I do them, it’s all going to be in these tutorials.
Getting to the start line – what to do first.

So, as you can see from this image, I’ve put the legs and torso together and based my model. For ease of handling and painting, I think this works best – no need to faff around with corks and pins when you’re just doing the basic grunts.
- remove torso fronts and backs, and legs from sprue.
- remove mould lines and any flash that’s come off with the snipping of sprues.
- glue the torso parts and legs, and then add to the bases.
- add rocks, etc to bases with superglue.
- allow superglue to dry, then add sand using PVA glue.
- undercoat with Chaos Black spray and set to dry.
And that gets us to the start line! Let’s start painting.
The Paints You’ll Need:

Painting Steps:
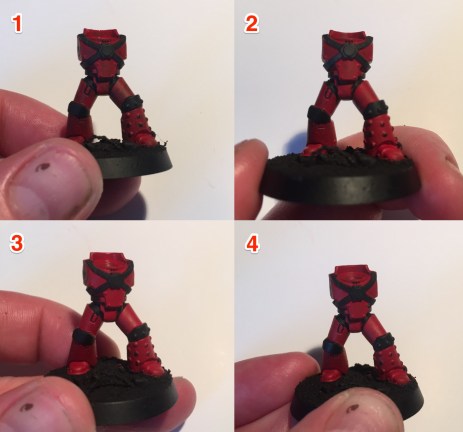
Steps 1, 2 and 3 – Apply three thin coats of Mephiston Red to the areas of the mini that are going to be red. Don’t worry about going over other areas too much – you can clean those up later (try to keep it neat but don’t panic if you go over the lines). Make sure the paint is thin enough to flow smoothly. but thick enough to hold together. Use medium if preferred but I just went with water. In fact, for all of the steps below, the paint is watered down a little with just some water. You can really see in the first three pictures how it builds up and you end up with a deep, broody red.
Step 4 – Use Abaddon Black to tidy up and coat the black areas. I used it here on the belt, the bit that connects the backpack to that armour on the back and knee pads. It’s also a good idea to use this even if you already undercoated with Chaos Black as the spray is inconsistent and looks quite different to the paint that comes out of the pots.

Step 5 – Leadbelcher. Put down a base coat on the areas that you want to be silver. With both this step and the one above, be careful and don’t go over the lines. If you do, tidy it all up after this step and make sure the right paint is on the right part of the model.
Step 6 – Nuln Oil comes next now that all our base colours are down. Don’t apply this all over, but instead, apply it wherever there is a recess and shadow. Delicately get it into the cracks of the armour and under the knee plate. Run it over the top of the knee plate too. You should be able to see from picture 6 where it’s going. Do the entire model like this. When it comes to the Leadbelcher, apply the wash all over this. For all of this, use the wash sparingly and apply slowly and delicately – you don’t want thick lines of black from this, just shadowy underlines.
Step 7 – Evil Sunz Scarlet is then applied as an edge highlight all over the model’s red areas. Again, slow and delicate – let’s keep the lines nice and thin here.
Step 8 – Put your brush down and give it a five minute breather. Pick up a piece of GW sponge (I use the stuff from the old carry cases) and dab it in a little Abaddon Black. Now dab it out on a sheet of plasticard or paper until there’s almost nothing on it – the black should be very faint – and then apply it to occasional areas across the model’s red surfaces. This is going to be our little bit of “weathering”or effect that keeps each marine a little different and makes them feel like they’re in the thick of battle with smoke and grime and explosive stuff staining their armour. Just pick out a few spots, dab-dab-dab, and you’re done. If it goes wrong and you get too much on there, a quick fix with Mephiston Red will solve it easily.

Step 9 – Now we’re going to do a zenith highlight with Fire Dragon Bright. Very thin, steady lines of Orange on any parts of the red armour that have edges facing upwards (as if the sun is coming down on them. Top of the feet, top of the thighs, the shoulder area… that sort of thing. If there’s a red edge that faces upwards, apply there.
Step 10 – Back to Leadbelcher, you’re going to do an underlight on the harness that crosses the chest/back and also apply some to the rivets on the lower leg/knee. With the harness, just do the lower halves of the straps and edge highlight the lower half of the circle and its surround on the chest.
Step 11 – Now, with Ironbreaker, we’re going to do essentially another zenith highlight on all the silver areas, from the rivets to the chest piece and more. Just make sure the upward facing edges of all your silver areas now have this paint on them. Shiny.
Step 12 – With the silver now done, we’re going to use Dawnstone to edge highlight the black areas like the belt and the knees. Thin, steady lines again here – you can always fix it up with a little Abaddon if you think you’re going too thick.

Step 13 – Right, now for some really steady fingers. Take Averland Sunset, water it down a bit, and, in one smooth motion, painting from the bottom up, a straight line of your paintbrush at a diagonal across that knee. Do this a couple of times to deepen the colour. Now, I do it in one swift motion from bottom to top, but if you’re more comfortable going slow from top to bottom, you do it your way. Whatever works for you. You’re the only person who knows how you feel when you paint so do it how it works for you.
Step 14 – Take Yriel Yellow and apply it to the top half of the line, and make sure you get a bit more on that top edge just a touch.
Step 15 – Administratum Grey is used to just to a Zenith on those knees, and on the black of the backpack connecting bit on his back (I don’t have pictures of that one – sorry). I tend not to bother too much with the belt as it’s so far inset that light probably isn’t hitting the top there.
Step 16 – Back to Ironbreaker. Any little bolt heads and rivets, just very gently give them the tiniest touch of this silver paint.
And that’s you done!
- Keep your paints thinned – a wee bit of water or medium will help them flow so much better.
- Don’t panic if you mess up. Yes, it’s a little annoying to have to go back to fix things, but there’s nothing in this that can’t be fixed easily.
So, that’s the legs and torso done. In the next tutorial. we’ll take a look at some arms and bolters. Stay tuned for that and more. Onwards!
 40kaddict
 4gotowar
 Castigator's Chaos
 convertorum
 darkfuturegaming
 ftgtgaming
 Mind of the Daemon
 taleofpainters
 talkwargaming
 Twisted Brushes
 weemen
Interesting, it’s a different tone of finish to the way I do red, which I think comes from the wash stage – I tend to apply agrax earthshade over the red layer, which I find gives the mephiston red a really rich depth, and helps to make the armour panels look dirty round the edges.
This is an equally nice finish, just gives the red a different tone.
Nice tutorial, i tend to weather the finished product, but im liking the effect you are getting doing it mid way through, also makes sense from a touch up point of view.

And ive said it before but will say it again, damn you for making stripes look easy 😛 My latest attempt im still not 100% happy about lol…
Haha -thanks. Yeah, the stripe thing is all about confidence. Channel Shia LaBeouf and just do it! 😉 And even then, I still have to touch it up with a bit of black from time to time. 🙂
Pingback: Basic Painting Tutorial: Blood Angels – Part 2: Arms, Bases & Bolters | Heresy & Heroes
Pingback: Basic Painting Tutorial: Blood Angels – Part 3: Head & Shoulders | Heresy & Heroes
Pingback: Basic Painting Tutorial: Blood Angels – Part 4: Backpack & Legion Vexilla | Heresy & Heroes