
Welcome back hobby chaps and chapettes. Today is the last instalment in my very basic guide to painting Blood Angels legion tactical marines and we’re going to be focussing on the backpack and, as an added bonus, I’ve included the Legion Vexilla as well, as this is a fun little bit to paint up.
This week’s photography issue: White balance. I’ll not go on any more about it, instead, let’s dive in.
Oh, but one last thing to remind you of: These are basic tutorials. If you’re looking for something challenging and groundbreaking, you won’t find it here. These are just little guides to help your average painter get something good looking on the table top. And for this tutorial, you’ll need these paints:
Now, I’m not going to go over in too much detail about painting the backpack itself because, if you’ve read the previous posts in this series (links at the bottom of the page), you’ll know all about painting red, silver and black in this style, but here’s a quick refresher for you.
For this, I’m saving some time by painting up the parts on the Vexilla that correspond too. Oh, and remember to keep your paints a little thin, giving them a nice, smooth consistency.
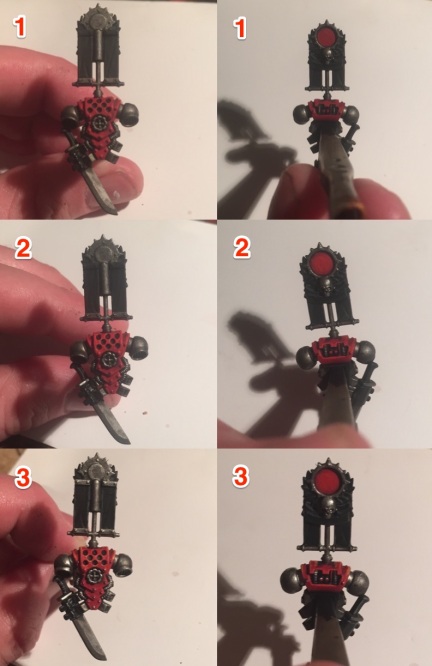
1. Mephiston Red, Abaddon Black and Leadbelcher go down in the appropriate places, before being washed with Nuln Oil. Remember: when it comes to adding the wash to the red, just do the recesses and around the bolts.
2. Evil Sunz Scarlet edge highlight for the red areas, and a Leadbelcher lowlight on the silver – just catch those lower edges.
3. Dawnstone edge highlight on the black, and then zenith highlights of Ironbreaker on the silver, and Fire Dragon Bright on the red. Add just a tiny bit of White Scar to the ‘lights’ in the front of the backpack.
And you’re done! If you’re not doing a Vexilla, you should be able to breeze through this very quickly, but don’t worry if you still like to take your time. Now, onto the Vexilla itself…
Let’s start with the scrollwork. There are other ways of doing this, but this is preferred by me.
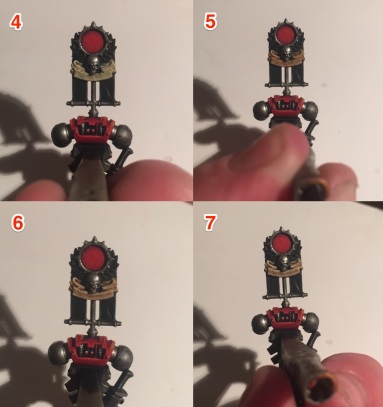
4. Start with a couple of thin coats of Ushabti Bone all over the scroll.
5. Wash with a little Reikland Fleshshade – be conservative here and don’t let it pool but get good coverage.
6. Using thinned down Ushabti Bone, give it an edge highlight.
7. Give the top edges a highlight using a thin mix of Screaming Skull.
8. Finally, write something on there using Abaddon Black. Now, script work is something worth practicing even just to get it to a legible state, never mind all those clever sorts who manage to do calligraphy on there! Practice a while on some plasticard or a flat bit from your bits box, and work at it. I went with a simple ‘BAAL’ but you can do anything.
Now, let’s move on to the scriptwork on the banners that hang down.
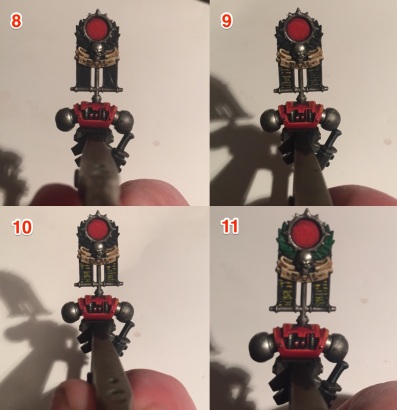
9. Start by writing everything out very thinly in Averland Sunset – steady hands needed.
10. Then highlight this script with Yriel Yellow. It’s as simple as that, but if you do go wrong, or if you don’t like the look, you can always use black paint to touch it up.
Let’s now go on to the laurel.
11. Start with a couple of thin coats of Warpstone Glow.

12. Wash it down with some Biel-Tan Green to give it a little depth…
13. …before bringing it up again by edge highlighting each leaf with Warboss Green.
14. Finally, give each upper edge of those leaves a little bit of Skarsnik Green.
15. Moving on to the circle at the top, I’ve painted in a black blood drop (these are all over Sanguinius’ armour so I thought it would look good here) using Abaddon Black. It’s a surprisingly tricky shape to paint this, but practice it and you’ll get it in no time.
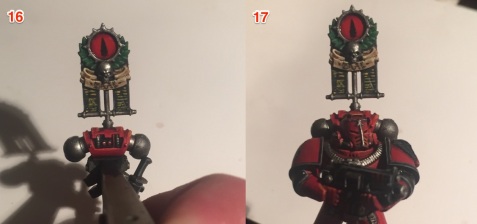
16. Cover the inner area of that circle (so all the red and the black blood drop) with ‘Ardcoat, and add a little to those two ‘lights’ as well.
17. Finally, stick it onto the miniature, and you’re done!
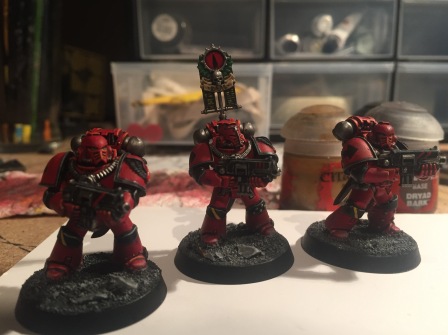
Not too hard, was it? The three guys above are now done, so I’m not too far off being able to show you the whole squad in all their glory. Hopefully, that’ll be very soon too. I hope this guide has helped you out. Sorry for the photography, but I dare say the gist was got despite the images. For those looking to catch up, the links to the other tutorial parts are down below.
Don’t forget to tell me what you think of this series below. Useful? Interesting? I just hope it’s given some painters an idea of how to get things to look good without too much bother. See you with the finished unit soon. Onwards!
 40kaddict
 4gotowar
 Castigator's Chaos
 convertorum
 darkfuturegaming
 ftgtgaming
 Mind of the Daemon
 taleofpainters
 talkwargaming
 Twisted Brushes
 weemen
Brilliant series start to finish, like the way you have done the vexilla too 🙂
The only criticism i have isnt to do with the quality of your pics, just the size, would be worth adding a lightbox/slide show plugin to your blog theme so can get an enlarged version by clicking the images.
Other than that you are a credit to the sons of Baal!
Totally agree re the images. I should look for a good widget for it – this was just the easiest way. And the iPhone camera did me no favours but it was easier than having a photography setup on my desk. Lessons learned for next time! Cheers.
I use this one in the dayjob (web developer) for any WP based sites im working on: https://wordpress.org/plugins/simple-lightbox/ pretty much config free once installed, i would point you at the iphone photography tutorial on taleofpainters but i know you already know of it ;), seriously dont sweat the pics though they look great and do clearly show each step you describe so are perfectly functional, and way better than most of the other similar guides out there.
p.s. if you dont have it yet the new WD is epic, its almost like holding a late ’90s issue (just with visions quality printing and paper stock)