

*puts on serious face* Right. As many of you will know, I am forever lamenting my ability to handle a camera when it comes to photographing miniatures. I genuinely try, every time, to do a decent job each time I finish painting a mini, but it never comes out as I want it to. Many people tell me that my photos are fine, but I know, as the artist, that the photos don’t reflect the model. Anyway, I was getting downhearted about it, and so I have decided to take action. Here begins a journey into improving my photography.
This first session is all about lighting, setup and composition. The images of models that you see in this article were worked on as jpegs, rather than the raw files. That means the resolution still isn’t quite where I’d like it to be, but I’m going to get to that in Part 2.
The Setup

So, first up, yes, that is my kitchen. Why take photos in my kitchen? Well, my work area is where I usually take these photos, but I moved my setup over to the kitchen because of the lighting. I’ve got nice, daylight strip lights above my kitchen surfaces and they help loads. I also, for the first time hooked up my laptop to my camera so that I could use that while shooting. That was a revelation – allowing me to see what was happening with the camera on a larger screen and in real time. It made things so much easier!
Now, notice how the lights are set up in the above shot that was taken at the beginning of the session. This is how I usually have them set up, but by the end of the evening, things looked like this…

It took a lot of fiddling around with the settings on my camera to make it work but it was worth it. I managed to get much better lit minis with far sharper focus than usual. From now on, this is how I’m going to be setting things up. Also, it’s important to note that I waited until after nightfall so I could completely control the lighting in the room. I should also say that this photoshoot was the first time I had the brains to actually turn my camera into portrait mode rather than landscape – I know, I’m slow like that.
The Photos
Now we get to the meat and potatoes of the piece. Here’s the first photo I snapped (using my Dark Mech Magos) on the evening of the shoot:

It’s ok. It picks out a lot of details and the colours are alright too. But it’s a bit flat, and despite being very in focus (which I like), it just looks a little bland. So, then I switched up the lights and got the camera settings into line. What I then got was this:

Now that’s more like it! More of the model is clean of glare and light flash, the background looks better, and the colours are more true to what they actually looks like. It has lost a smidgen of sharpness though – it’s not quite as crisp but that’s another thing for me to be working on next time. I’m calling this one a win, but the next shoot I’ll be doing, I want to make it a thrashing.
Next up was a little bit of a fail, but only because of focus. Again, I used the same lights and camera settings, but it just doesn’t look as sharp – almost as if the camera moved or just wouldn’t focus – see for yourselves…
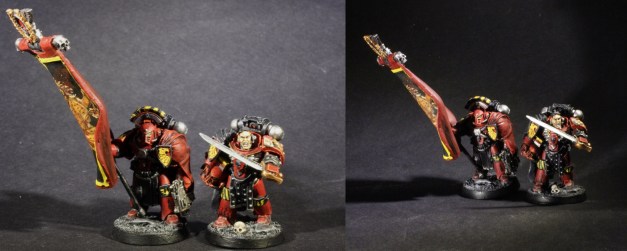
The one on the left is the old one, while the one on the right is from this session. The colours are truer, the shadowing is improved, but the image isn’t quite in focus. This is another one I’m going to have to work on.
Another lesson I learned tonight, which sounds really freakin’ obvious (honestly, it makes me sound like a fool), is that I can move the lights. I know. I told you I was a fool when it came to cameras. I took my Nurgle Daemon Prince – a far larger model and this is the first image:

With a simple moving of the light, I got rid of all that shadow that is completely obscuring the right hand side of the model, and picked out some really cool details, like the gunk coming out of the gun barrels. Here’s what’s happened when I merely moved a light…

I’m really happy with this image. I always thought the images I got of this guy when I first showed him off on here really didn’t do him justice. Well, justice has now been done, and this is another win. All from moving a light!
I took a few more miniatures down and put them into the light box and got some good results. Not perfect, but here they are, and they are all improvements on the originals.


There you have it then. Improvements! I’m getting there, and in the next instalment of these articles, I’ll be working on improving focus, and editing the raw files in a proper editing tool. For those of you interested, these are the camera settings I was using:

If you have any hints/tips for me, or if you’d like any info from me, let me know in the comments below. It’s been great for me to do this and to write this post. Seeing progress, still far from perfection but progress nonetheless is a nice feeling to have. I’m going to crack this photography stuff and I think I’m on the right track now. So with a positive attitude; Onwards!
 40kaddict
 4gotowar
 Castigator's Chaos
 convertorum
 darkfuturegaming
 ftgtgaming
 Mind of the Daemon
 taleofpainters
 talkwargaming
 Twisted Brushes
 weemen
This might help http://www.blacklibrary.com/Home/how-to-photograph-miniatures.html
Not that I’ve ever featured in White Dwarf, I always photograph my finished miniatures on a red planet background, as that’s how all my models are based. I now only take pictures during the day, so I get pure daylight, which has helped improve my shots but maybe that’s why I’ve never been picked to feature?
Thanks Dave. I know that guide well, and it has been helpful. Also, Garfy over at Tale Of Painters has put some guides up and he’s always appearing in WD – you can find his DSLR one here: http://taleofpainters.blogspot.co.uk/2016/01/tutorial-beginners-guide-to-miniature.html Cheers!
Dude you seem to be perpetually 3 weeks ahead of me lol, first HH BA’s now, better photography awesome stuff, looking forward to next installment, i assume you have seen the photography how to series on taleofpainters? if not well worth a read
Lol in time it took me to post, you already mentioned taleofpainters guides 😀
Ha! We must have some sort of Psyker gene thing going on. As long as the Inquisition don’t find out, we should be safe. 😀
Nice one, it’s definitely tougher than it looks getting decent shots. I’ve only used a dslr for a few of mine (when I’ve been able to borrow kit from work), and my setup has always been pretty lax. It was good seeing how you’ve done yours and the results you’ve gotten thus far. It’ll be good to see how you get on with it.